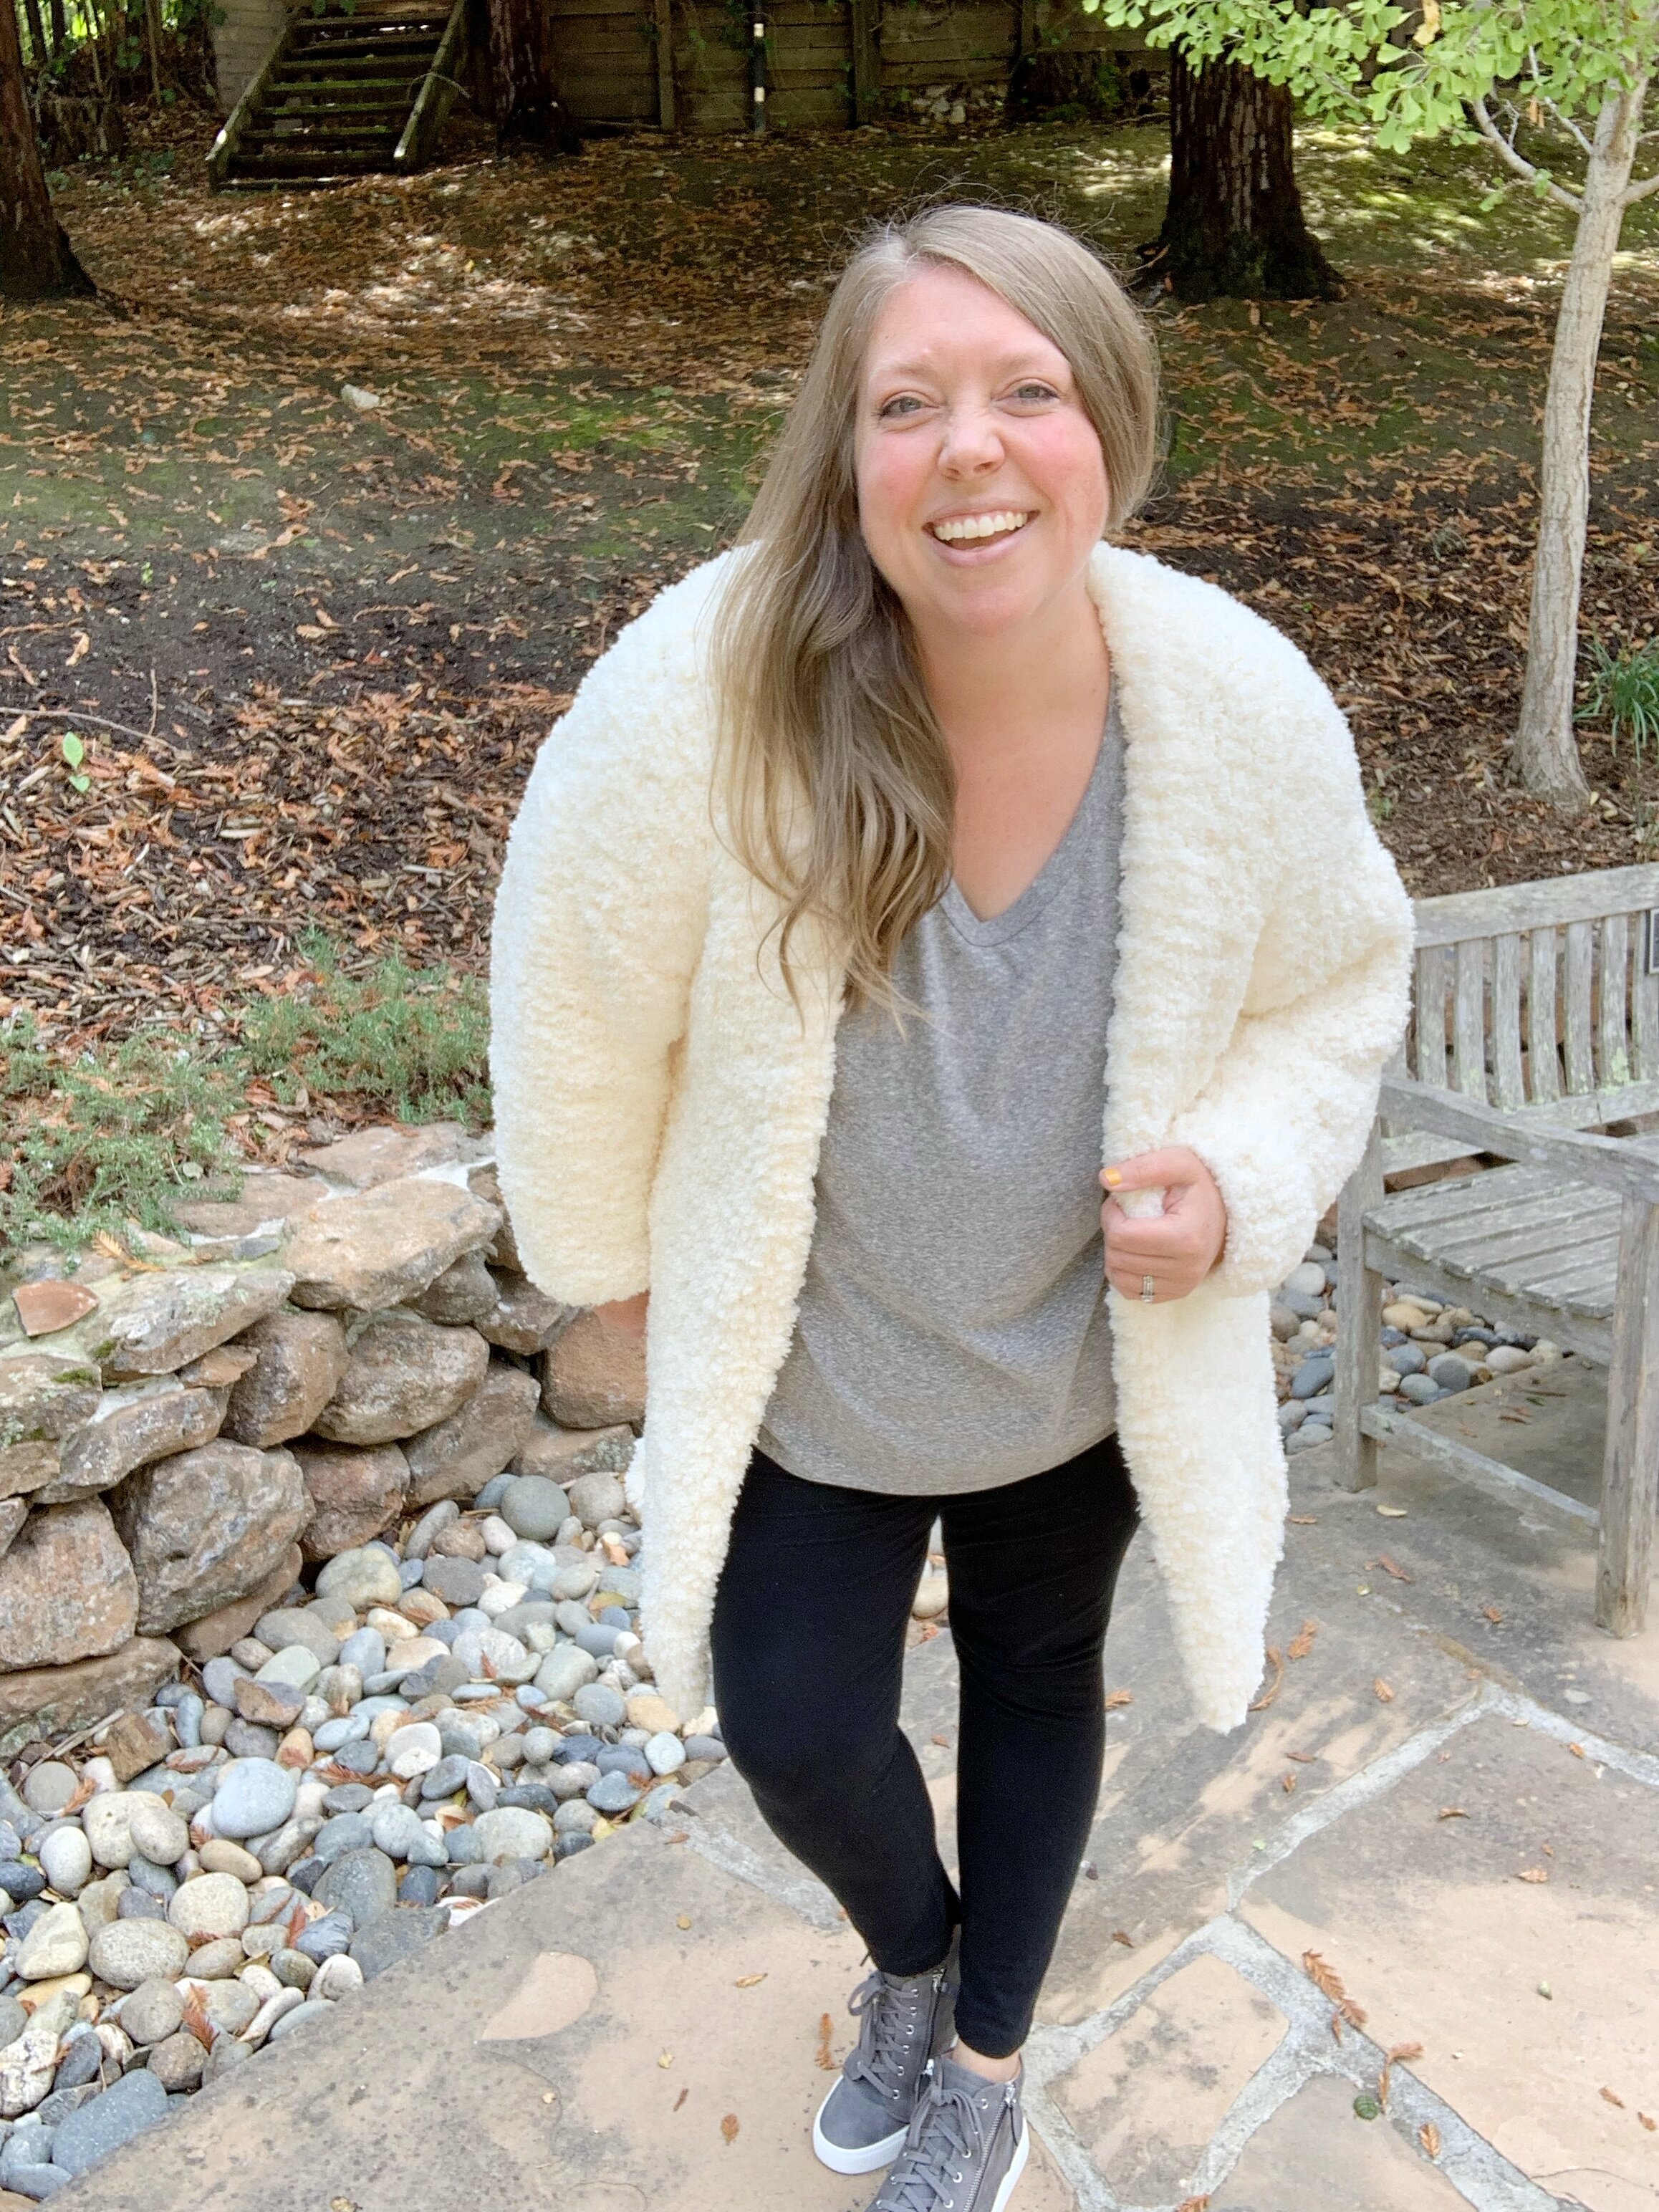
The Lottie Cardigan- Free Knitting Pattern
Try the Lottie cardigan pattern and make yourself a comfy and super stylish cardigan. This is a pattern for knitters of all skill levels, even beginners. You can knit a warm, cozy cardigan that will be a welcome addition to any fall wardrobe with the Go For Fleece Sherpa yarn. Find the free pattern below, a digital PDF in my shop or better yet, grab the complete kit from Lion Brand Yarn.

Get ready for the fluffiest, coziest cardigan you ever did knit. The Lottie Cardigan is just the thing to keep you warm this winter season. It’s perfect for apple picking, Friday night football games or just lounging around the house. Made with the ultra soft Go For Fleece Sherpa it works up quickly and only uses 4-7 skeins depending on your size.
The Lottie is extra special to me because it was made in collaboration with one of my favorite crochet designers and friend, Rachel of Evelyn and Peter! It was a blast working on this collab together. We made sure to create these cardigans with the beginner in mind. The back and front panels are simple rectangles using basic knit and crochet stitches. The sleeves have a slight taper to them using easy increase stitches on the edges. You can find Rachel’s Luna Cardigan crochet pattern here.
As an added bonus, Rachel and I created full video tutorials for The Lottie and The Luna so you can see each step along the way. Since the Go For Fleece Sherpa is so fuzzy it can help to see it in action.
Grab your needles and lets get started!
The Lottie Cardigan Knitting Pattern
Materials:
356-572 yards of Lion Brand Go For Fleece Sherpa in Cream
32” circular size 15 (10mm) knitting needles
Tapestry needle
Scissors
Stitch Marker
Abbreviations:
CO- cast on
st(s)- stitch(es)
RS- right side
WS- wrong side
K- knit
P-purl
BO- bind off
K1FB- knit one front and back
Gauge:
6 sts and 10 rows in stockinette = 4” square
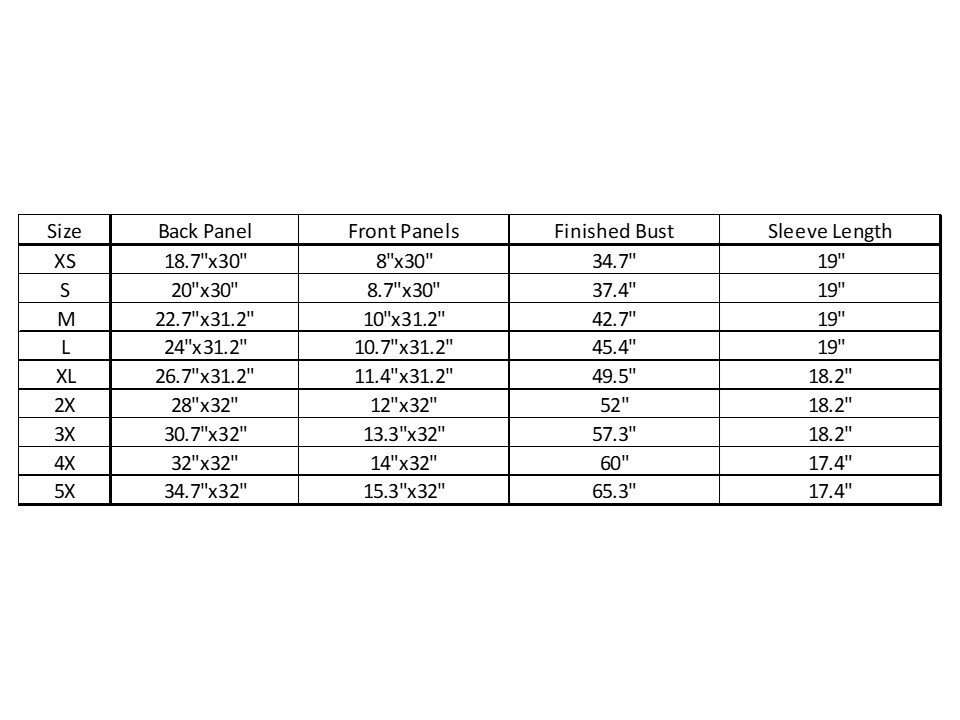
Size:
XS: fits bust 28-30” (approx. 356 yards) 4 skeins
S: fits bust 32-34” (approx. 379 yards) 5 skeins
M: fits bust 36-38” (approx. 414 yards) 5 skeins
L: fits bust 40-42” (approx. 449 yards) 6 skeins
XL: fits bust 44-46” (approx. 458 yards) 6 skeins
2X: fits bust 48-50” (approx. 486 yards) 6 skeins
3X: fits bust 52-54” (approx. 513 yards) 6 skeins
4X: fits bust 56-58” (approx. 549 yards) 7 skeins
5X: fits bust 60-62” (approx. 572 yards) 7 skeins
Notes:
1. Pattern is worked in five pieces (back panel, two front panels and two sleeves) worked bottom up. The front and back panels are seamed at the shoulders and then sleeves are sewn in place. Underarms and sides are then seamed to complete the cardigan.
2. Pattern is made with 6-8” of positive ease. Size down for a tighter fit.
3. Model is wearing a size 2X and is 5’9”
Pattern:
Back Panel: make one
CO 28(30, 34, 36, 40, 42, 46, 48, 52)
Row 1(RS): K all sts. (28(30, 34, 36, 40, 42, 46, 48, 52)
Row 2: (WS): P all sts. (28(30, 34, 36, 40, 42, 46, 48, 52)
Repeat Rows 1 & 2 for a total of 74(74, 76, 76, 76, 78, 78, 78, 78)
Row 75(75, 77, 77, 77, 79, 79, 79, 79): BO all sts, leaving a long tail for seaming. (28(30, 34, 36, 40, 42, 46, 48, 52)
Front Panels: make two
CO 12(13, 15, 16, 17, 18, 20, 21, 23)
Row 1(RS): K all sts. (12(13, 15, 16, 17, 18, 20, 21, 23)
Row 2: (WS): P all sts. (12(13, 15, 16, 17, 18, 20, 21, 23)
Repeat Rows 1 & 2 for a total of 74(74, 76, 76, 76, 78, 78, 78, 78)
Row 75(75, 77, 77, 77, 79, 79, 79, 79): BO all sts, leaving a long tail for seaming. (12(13, 15, 16, 17, 18, 20, 21, 23)
Sleeves: make two
S(M, L, XL, 2X, 4X, 5X)
CO 16(16, 18, 18, 18, 22, 22)
Row 1(RS): K all sts. (16(16, 18, 18, 18, 22, 22)
Row 2 and all even Rows: (WS): P all sts. (16(16, 18, 18, 18, 22, 22)
Rows 3 & 5: K all sts. (16(16, 18, 18, 18, 22, 22)
Row 7: K1FB in first st, K across until 1 st remains, K1FB in last st. (18(18, 20, 20, 20, 24, 24)
Rows 9 & 11: K all sts. (18(18, 20, 20, 20, 24, 24)
Row 13: K1FB in first st, K across until 1 st remains, K1FB in last st. (20(20, 22, 22, 22, 26, 26)
Rows 15 & 17: K all sts. (20(20, 22, 22, 22, 26, 26)
Row 19: K1FB in first st, K across until 1 st remains, K1FB in last st. (22(22, 24, 24, 24, 28, 28)
Rows 21 & 23: K all sts. (22(22, 24, 24, 24, 28, 28)
Row 25: K1FB in first st, K across until 1 st remains, K1FB in last st. (24(24, 26, 26, 26, 30, 30)
Rows 27 & 29: K all sts. (24(24, 26, 26, 26, 30, 30)
Row 31: K1FB in first st, K across until 1 st remains, K1FB in last st. (26(26, 28, 28, 28, 32, 32)
Rows 33 & 35: K all sts. (26(26, 28, 28, 28, 32, 32)
Row 37: K1FB in first st, K across until 1 st remains, K1FB in last st. (28(28, 30, 30, 30, 34, 34)
Rows 39-45(45, 45, 43, 43, 41, 41): K all sts. (28(28, 30, 30, 30, 34, 34)
Row 47(47, 47, 45, 45, 43, 43): BO all sts. (28(28, 30, 30, 30, 34, 34)
Move on to seaming.
Sleeves: make two
XS(3X)
CO 16(20)
Row 1(RS): K all sts. (16(20)
Row 2 and all even Rows: (WS): P all sts. (16(20)
Rows 3-7: K all sts. (16(20)
Row 9: K1FB in first st, K across until 1 st remains, K1FB in last st. (18(22)
Rows 11-15: K all sts. (18(22)
Row 17: K1FB in first st, K across until 1 st remains, K1FB in last st. (20(24)
Rows 19-23: K all sts. (20(24)
Row 25: K1FB in first st, K across until 1 st remains, K1FB in last st. (22(26)
Rows 27-31: K all sts. (22(26)
Row 33: K1FB in first st, K across until 1 st remains, K1FB in last st. (24(28)
Rows 35-39: K all sts. (24(28)
Row 41: K1FB in first st, K across until 1 st remains, K1FB in last st. (26(30)
XS-ONLY
Rows 43-45: K all sts. (26)
3X-ONLY
Row 43: K all sts. (30)
Row 47(45): BO all sts. (26(30)
Move on to seaming.

Seaming:
Lay Back Panel and two Front Panels together at the shoulders with RS facing each other. Using your preferred seaming method attach front panels to back panel, leaving 4(4, 4, 4, 6, 6, 6, 6, 6) sts unworked in the center.
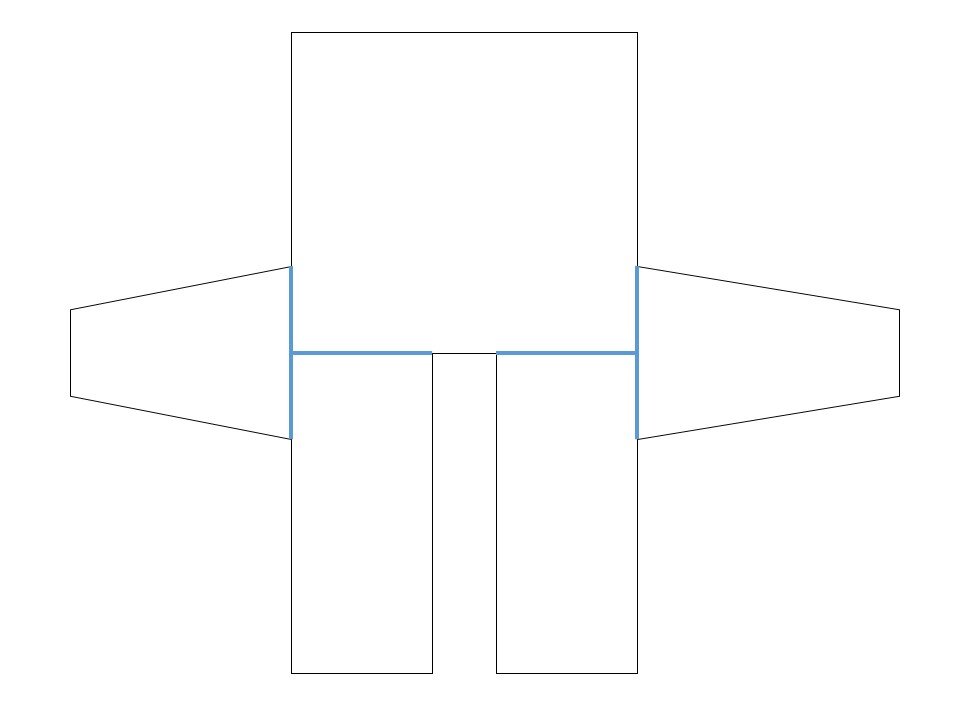
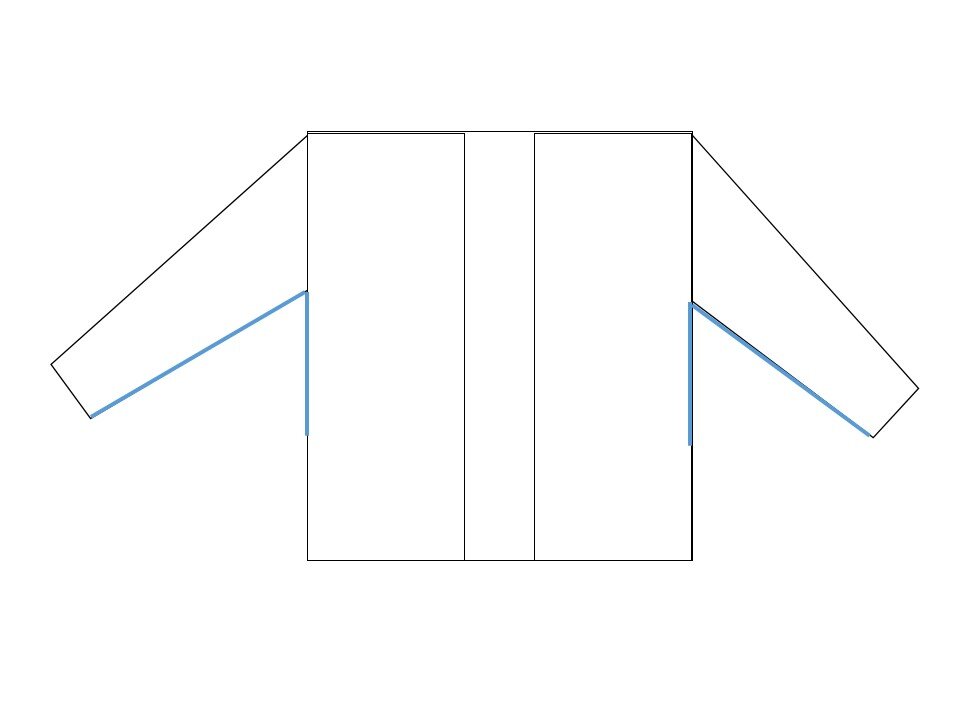
Attach the sleeves to the sides of the cardigan making sure to align the center of the sleeve with the shoulder seam. Make sure the sleeves are attached evenly from the center shoulder seam, down the sides. Using stitch markers to hold the sleeve in place is recommended.
Fold cardigan so that the back and front panels are on top of each other. Then seam the sleeves from the underarm to the cuff. Seam the sides from the underarm down leaving 11” unseamed for the slits. Adjust the size of the slits as needed.
Weave in all ends.

I hope you absolutely love your brand new Lottie Cardigan. If you share on social media make sure to tag me @meghanmakesdo so I can see and share.
A PDF version of this pattern is available in my shop, on Etsy and Ravelry. You can also grab a complete kit from Lion Brand Yarn.
Happy Knitting,
Meghan