The Ellington Infinity-Free Crochet Pattern
The Ellington Infinity Scarf crochet pattern is perfect for showcasing Local Grown yarn. This pattern features simple stitches and a unique construction method, resulting in a stylish and versatile accessory. Get the pattern and create your own beautiful scarf today. Find the free pattern below, a PDF in my shop or grab the kit from Lion Brand Yarn.

Have you seen the newest yarn from Lion Brand? It’s a 100% wool yarn made from start to finish right here in the USA. I was lucky enough to get my hands on it early. When Lion Brand reached out asking if I could design something with this new yarn I was thrilled. I couldn’t wait to see how it would work up.
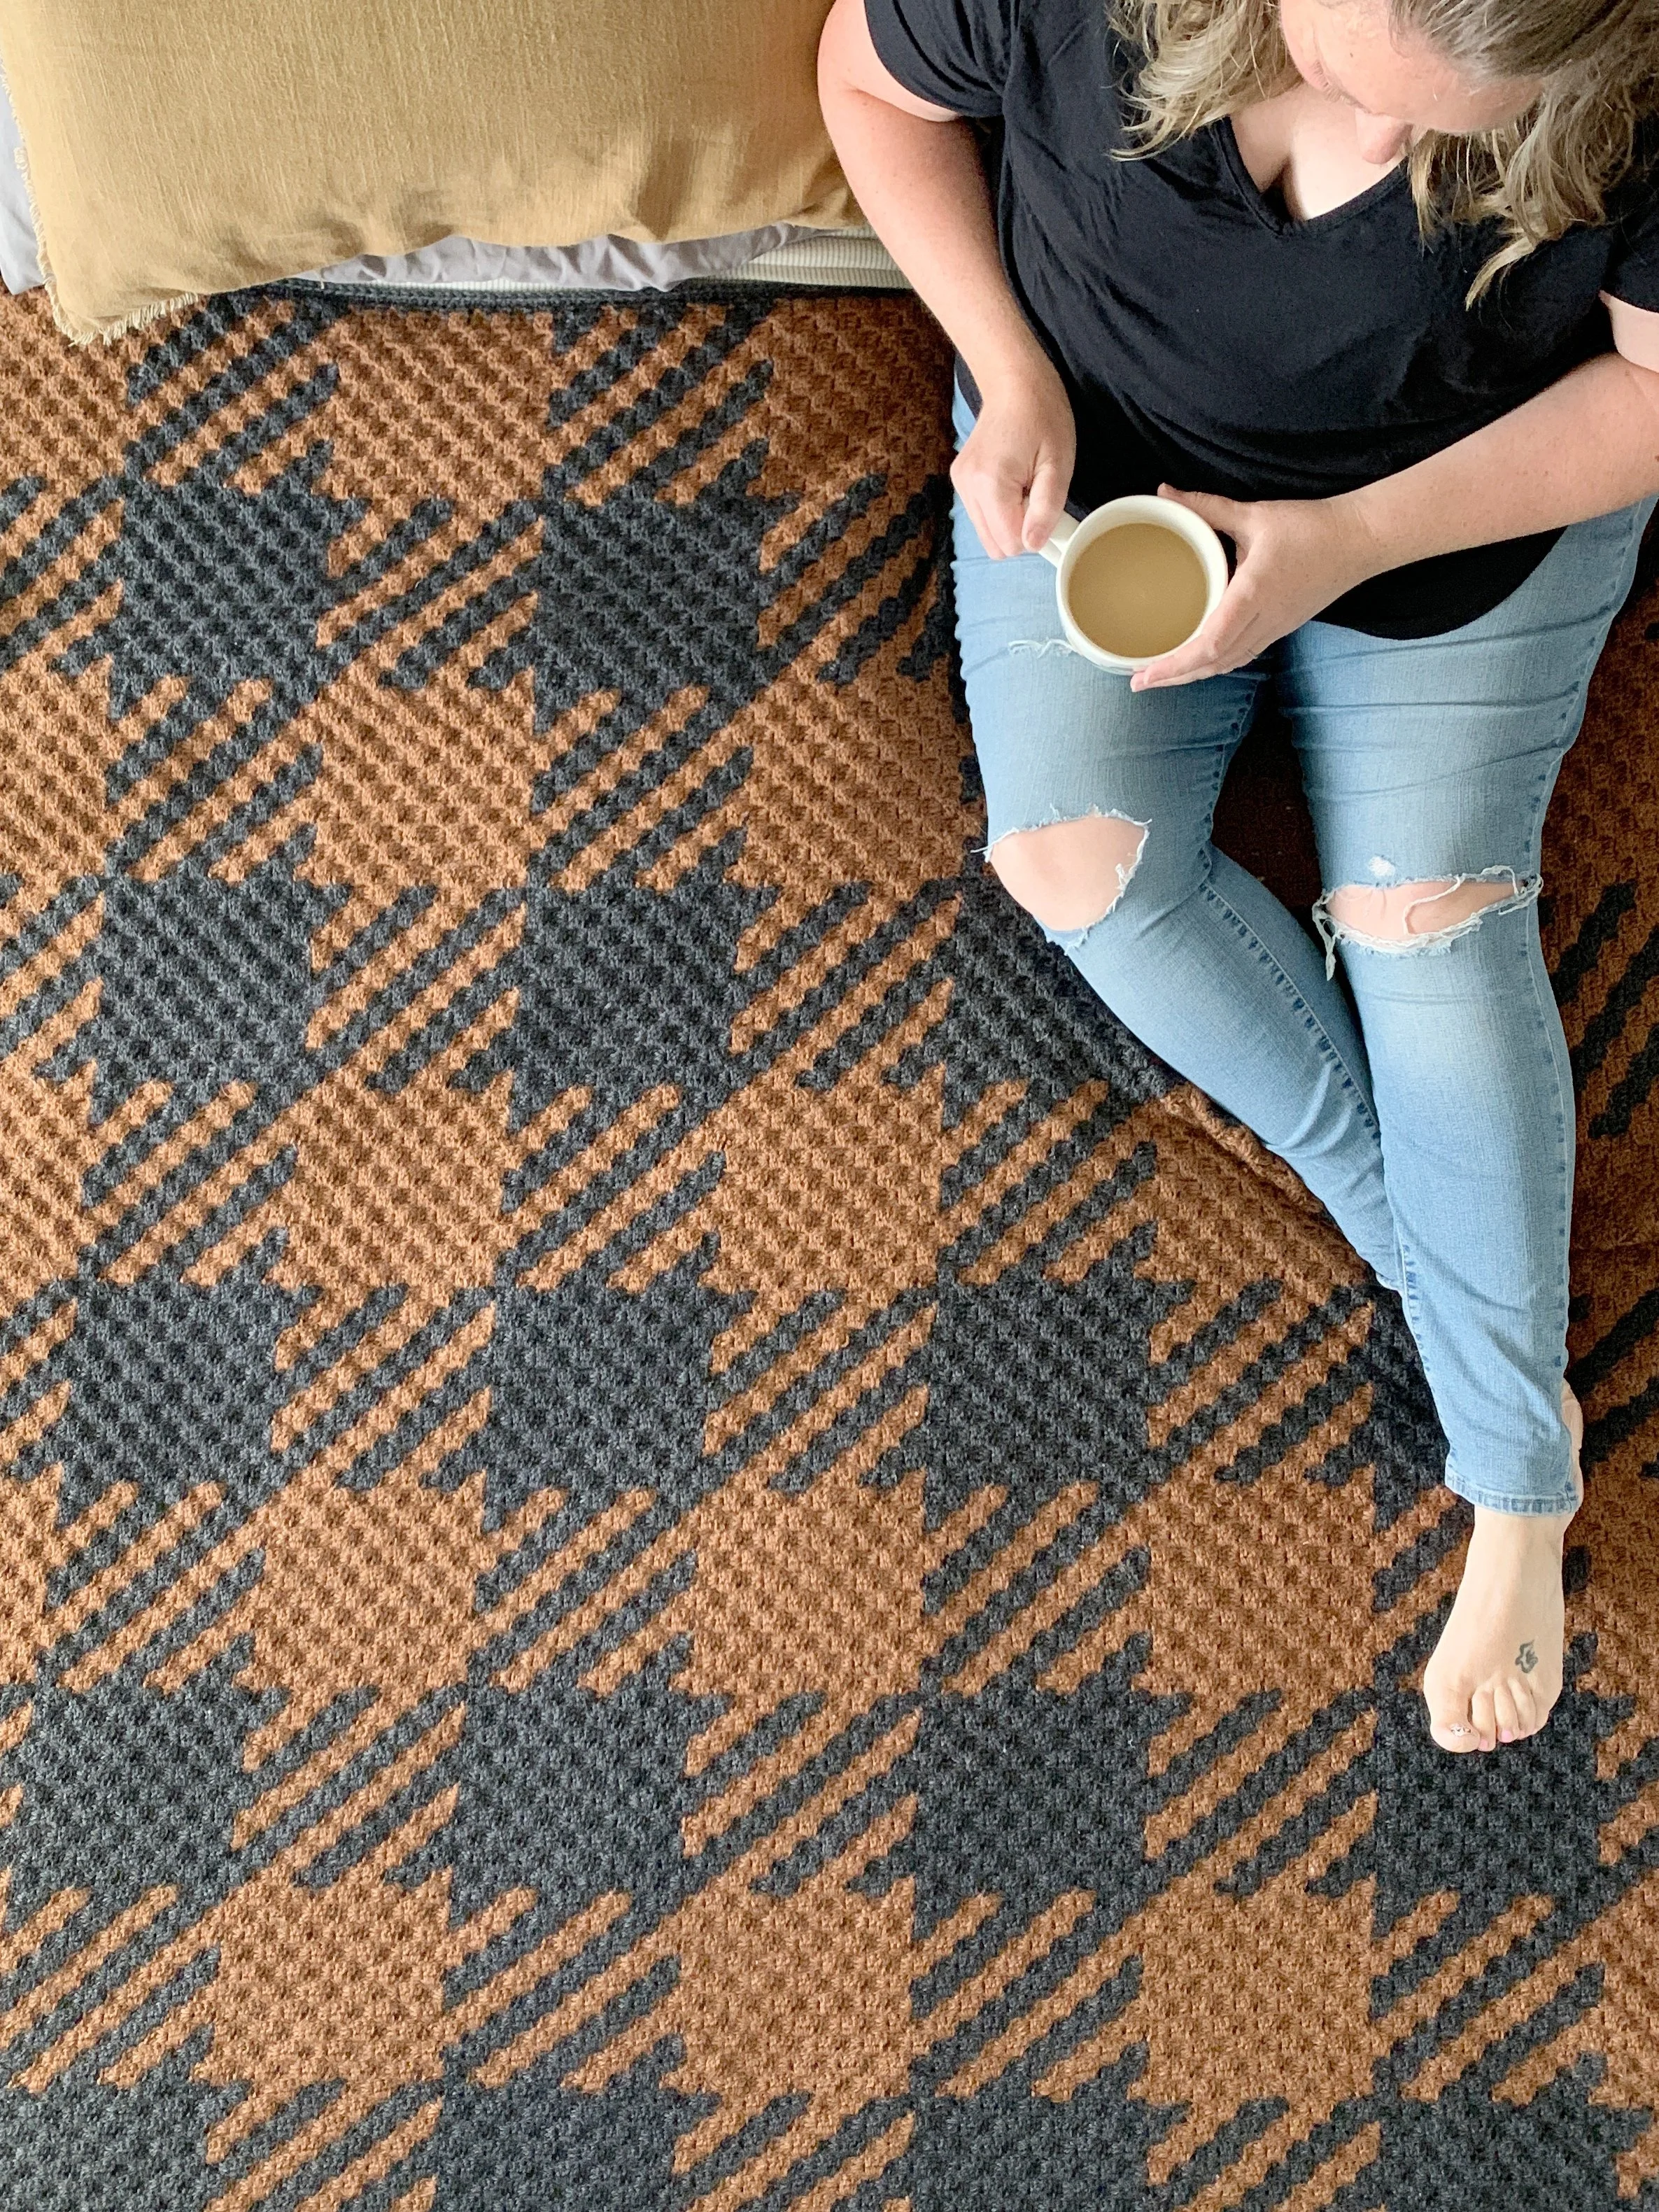
Local Grown comes in 15 gorgeous colors that were made to easily coordinate with one another. I chose Cherry Blossom, Beetroot and Barn. When they first arrived I was worried I had picked poorly, but once worked up, they all looked so good together. I knew I wanted to design a cowl or infinity scarf and wanted to try out some new techniques to create a plaid like fabric.
It took a few false starts before I landed on the perfect stitch and construction technique. The linen stitch never disappoints. When I paired it with these three colors it made the perfect modern plaid. The pattern is made in three sections. You’ll start by fulling completing the first section with an easy row repeat and simple color changes. Yes, there will be some ends to weave in, but it will totally be worth it. Once section one is complete you’ll start section two and slip stitch to join as you go. To finish you’ll work section three the same way as you did section two. Then it’s time to block and seam together to complete the scarf.

The Ellington is sure to be a new staple in your winter accessories. Since Local Grown is a 100% wool yarn, you’ll have to take some extra care to hand wash and lay it flat to dry. With time and wear the Ellington will become softer and more flexible. Even after just one blocking session it had a more flexible and flow drape to it. I love how wool keeps you warm without overheating. I was taking photos of it in the middle of July and didn’t feel overheated or sweaty.
So grab your three favorite colors of Local Grown and get started on your Ellington Infinity today!

The Ellington Infinity Crochet Pattern
Materials:
165 yards (1 skein) of Lion Brand Local Grown in Color A (Beetroot)
165 Yards (1 skein) of Lion Brand Local Grown in Color B (Barn)
165 yards (1 skein) of Lion Brand Local Grown in Color C (Cherry Blossom)
Tapestry needle, scissors, tape measure
Abbreviations:
Ch(s)- chain(s)
St(s)- stitch(es)
sc- single crochet
sk- skip
sl st- slip stitch
RS- right side
WS- wrong side
Notes:
1.Ch(s) at beginning of rows do(es) not count as a stitch.
2.Scarf is worked in three sections. The first section is worked all the way through, then the second and third sections are worked and attached with slip stitches as you go.
3.It is recommended to weave in ends after each section is completed.
4.Graphs for each section have been included to show color changes more easily.
5.Change color during the last stitch of a row before the last yarn over.
Gauge:
12 sts X 10 rows = 3” X 3” in pattern stitch (linen stitch)
Size:
Finished scarf is approx: 10” wide X 60” circumference (after blocking)
Special Stitches: join as you go slip stitching
The Ellington Infinity has a unique construction. You will be making the scarf in three sections and joining those sections as you go using slip stitches. Here is a quick photo tutorial.
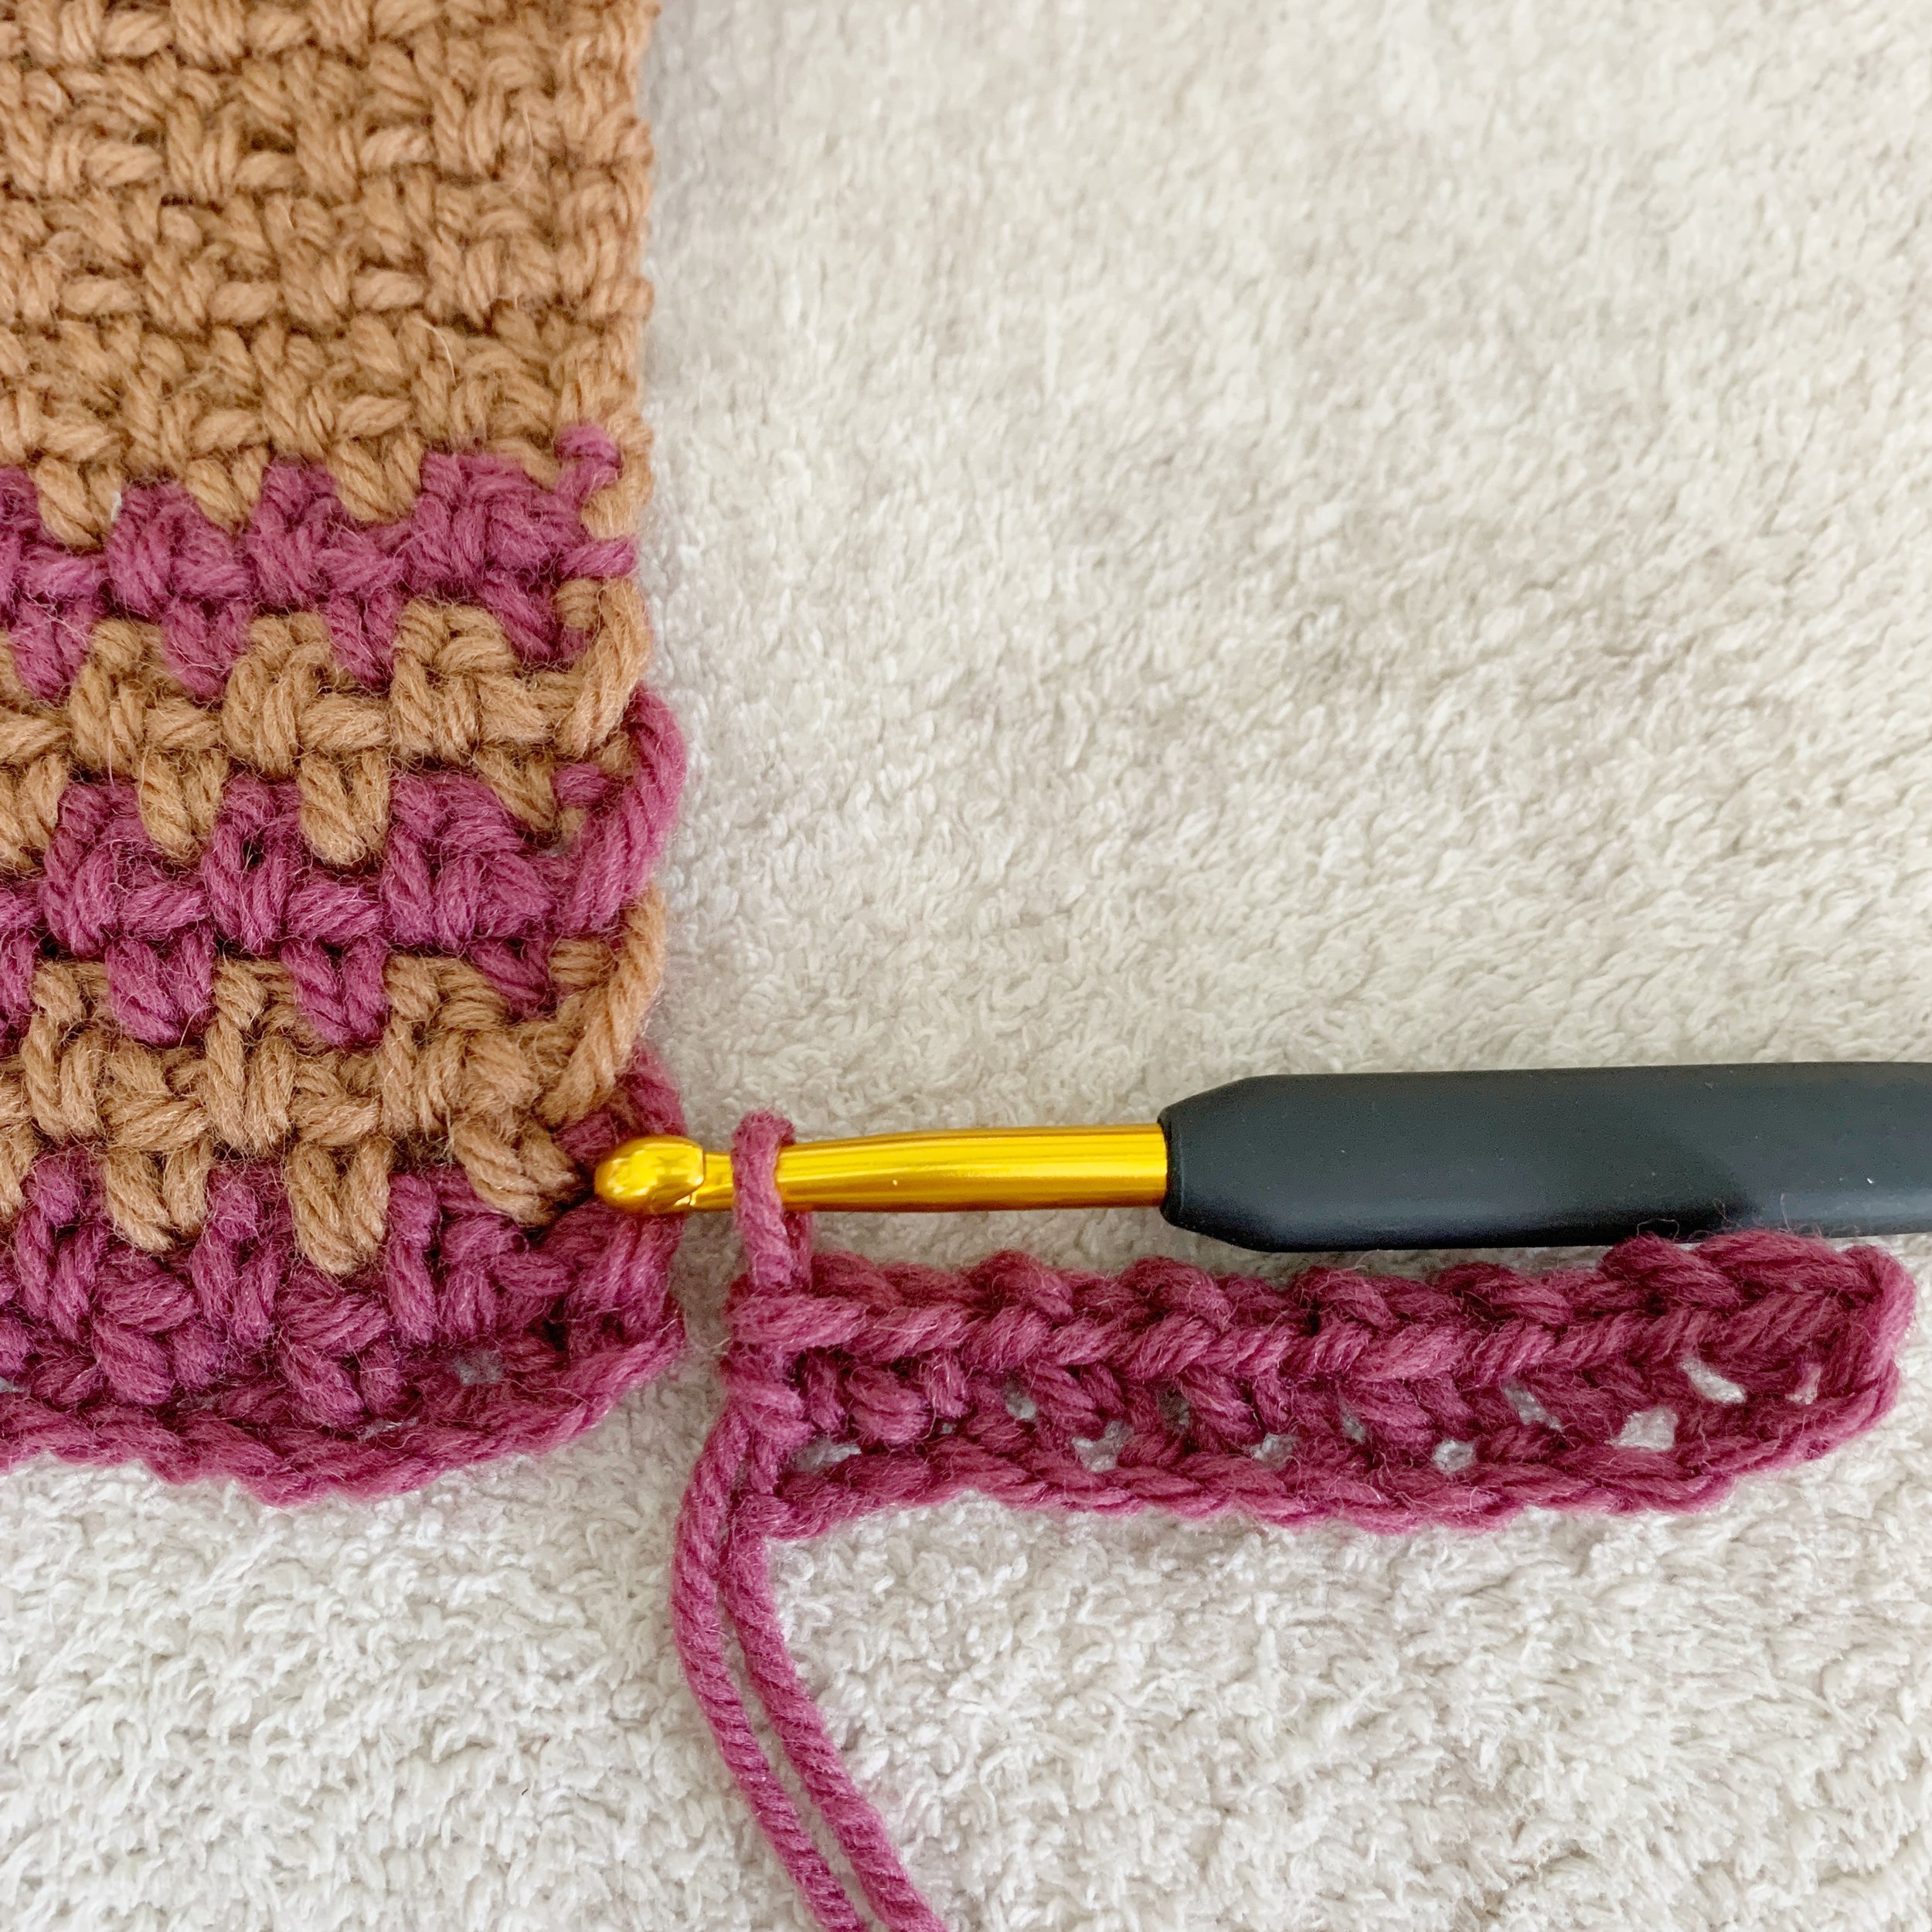


Work 1st row. Then sl st into the edge of the second row of the previous section. Turn. Sl st counts as ch 1 for next row. Work 2nd row, stopping before last yo of last st.


Change to next color. Work next row. Sl st into the edge of the next row on the previous section. Turn. Work next row, change color and repeat.
For a more detailed look at how to slip stitch to join check out the video tutorial for the Ellington below.
Video Tutorial
Pattern:
Section One:
With Color A, ch 13
Row 1(RS): sc in 2nd ch from hook, *ch 1, sk 1, sc in next ch, repeat from * until 1 st remains, sc in last ch, ch 1, turn. (12)
Row 2(WS): sc in 1st st, *ch 1, sk 1, sc in next st, repeat from * until 1 st remains, sc in last st, ch 1, turn. (12)
Rows 3-10: repeat Row 2.
Rows 11&12: repeat Row 2 with Color B.
Rows 13&14: repeat Row 2 with Color A.
Rows 15&16: repeat Row 2 with Color B.
Rows 17&18: repeat Row 2 with Color A.
Rows 19&20: repeat Row 2 with Color B.
Rows 21&22: repeat Row 2 with Color C.
Rows 23&24: repeat Row 2 with Color A.
Rows 25&26: repeat Row 2 with Color C.
Rows 27&28: repeat Row 2 with Color A.
Rows 29&30: repeat Row 2 with Color C.
Rows 31-40: repeat Row 2 with Color A.
Repeat Rows 11-40 five times.
Then repeat Rows 11-30 once more.
Fasten off and weave in all ends.
Section Two:
With Color A, ch 13
Row 1(RS): sc in 2nd ch from hook, *ch 1, sk 1, sc in next ch, repeat from * until 1 st remains, sc in last ch. (12)
Row 2(WS): sl st directly into the edge of the 2nd row of section one (counts as ch 1), turn,
sc in 1st st, *ch 1, sk 1, sc in next st, repeat from * until 1 st remains, sc in last st, ch 1, turn. (12)

With Color B
Row 3(RS): sc in 1st st, *ch 1, sk 1, sc in next st, repeat from * until 1 st remains, sc in last st, ch 1, turn. (12)
Row 4(WS): sl st directly into the edge of the next row of section one (counts as ch 1), turn,
sc in 1st st, *ch 1, sk 1, sc in next st, repeat from * until 1 st remains, sc in last st, ch 1, turn. (12)
Rows 5&6: repeat Rows 3&4 with Color A.
Rows 7&8: repeat Rows 3&4 with Color B.
Rows 9&10: repeat Rows 3&4 with Color A.
Rows 11-20: repeat Rows 3&4 with Color B.
Rows 21&22: repeat Rows 3&4 with Color C.
Rows 23&24: repeat Rows 3&4 with Color B.
Rows 25&26: repeat Rows 3&4 with Color C.
Rows 27&28: repeat Rows 3&4 with Color B.
Rows 29&30: repeat Rows 3&4 with Color C.
Rows 31&32: repeat Rows 3&4 with Color A.
Rows 33&34: repeat Rows 3&4 with Color B.
Rows 35&36: repeat Rows 3&4 with Color A.
Rows 37&38: repeat Rows 3&4 with Color B.
Rows 39&40: repeat Rows 3&4 with Color A.
Repeat Rows 11-40 five times.
Then repeat Rows 11-30 once more.
Fasten off and weave in all ends.
Section Three:
With Color A, ch 13
Row 1(RS): sc in 2nd ch from hook, *ch 1, sk 1, sc in next ch, repeat from * until 1 st remains, sc in last ch. (12)
Row 2(WS): sl st directly into the edge of the next row of section two (counts as ch 1), turn,
sc in 1st st, *ch 1, sk 1, sc in next st, repeat from * until 1 st remains, sc in last st, ch 1, turn. (12)
With Color C
Row 3(RS): sc in 1st st, *ch 1, sk 1, sc in next st, repeat from * until 1 st remains, sc in last st, ch 1, turn. (12)
Row 4(WS): sl st directly into the edge of the next row of section one (counts as ch 1), turn,
sc in 1st st, *ch 1, sk 1, sc in next st, repeat from * until 1 st remains, sc in last st, ch 1, turn. (12)
Rows 5&6: repeat Rows 3&4 with Color A.
Rows 7&8: repeat Rows 3&4 with Color C.
Rows 9&10: repeat Rows 3&4 with Color A.
Rows 11&12: repeat Rows 3&4 with Color B.
Rows 13&14: repeat Rows 3&4 with Color C.
Rows 15&16: repeat Rows 3&4 with Color B.
Rows 17&18: repeat Rows 3&4 with Color C.
Rows 19&20: repeat Rows 3&4 with Color B.
Rows 21-30: repeat Rows 3&4 with Color C.
Rows 31&32: repeat Rows 3&4 with Color A.
Rows 33&34: repeat Rows 3&4 with Color C.
Rows 35&36: repeat Rows 3&4 with Color A.
Rows 37&38: repeat Rows 3&4 with Color C.
Rows 39&40: repeat Rows 3&4 with Color A.
Repeat Rows 11-40 five times.
Then repeat Rows 11-30 once more.
Fasten off and weave in all ends.
Block to listed dimensions.
Then bring short ends together and seam using your preferred method and Color A or C. Weave in ends and enjoy!

I hope you love your new Ellington. Make sure to share yours on social media and tag me @meghanmakesdo and use #theellingtoninfinty so I can share.
As always you can find a PDF version of this pattern in my shop, Etsy and Ravelry or grab the complete kit from Lion Brand Yarn.
Happy Crocheting,
Meghan