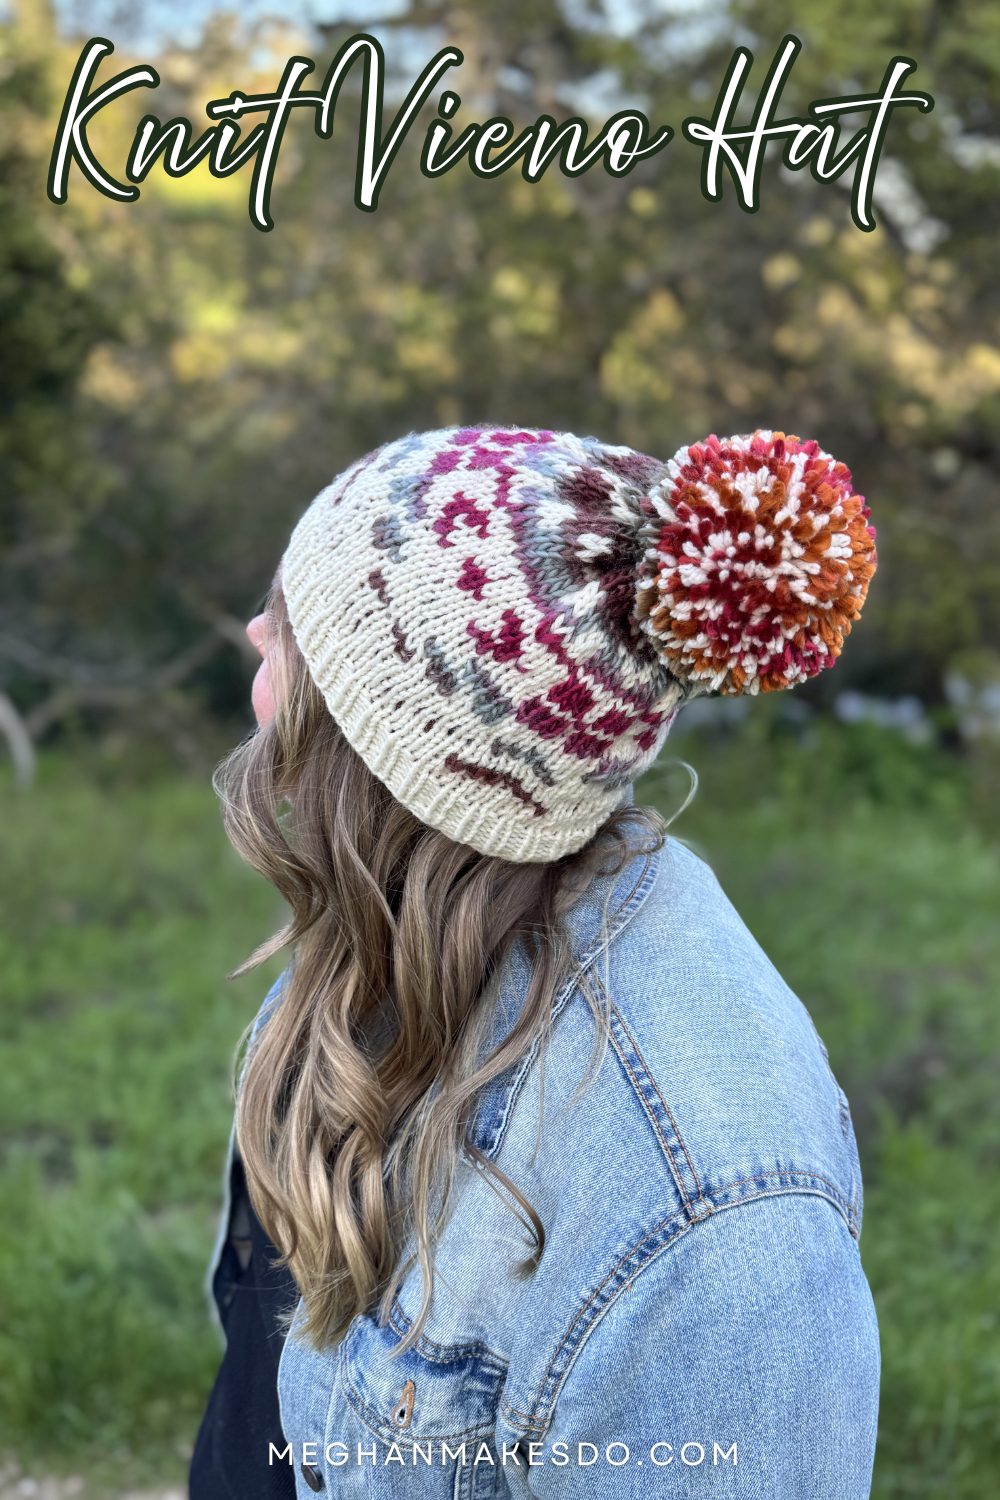
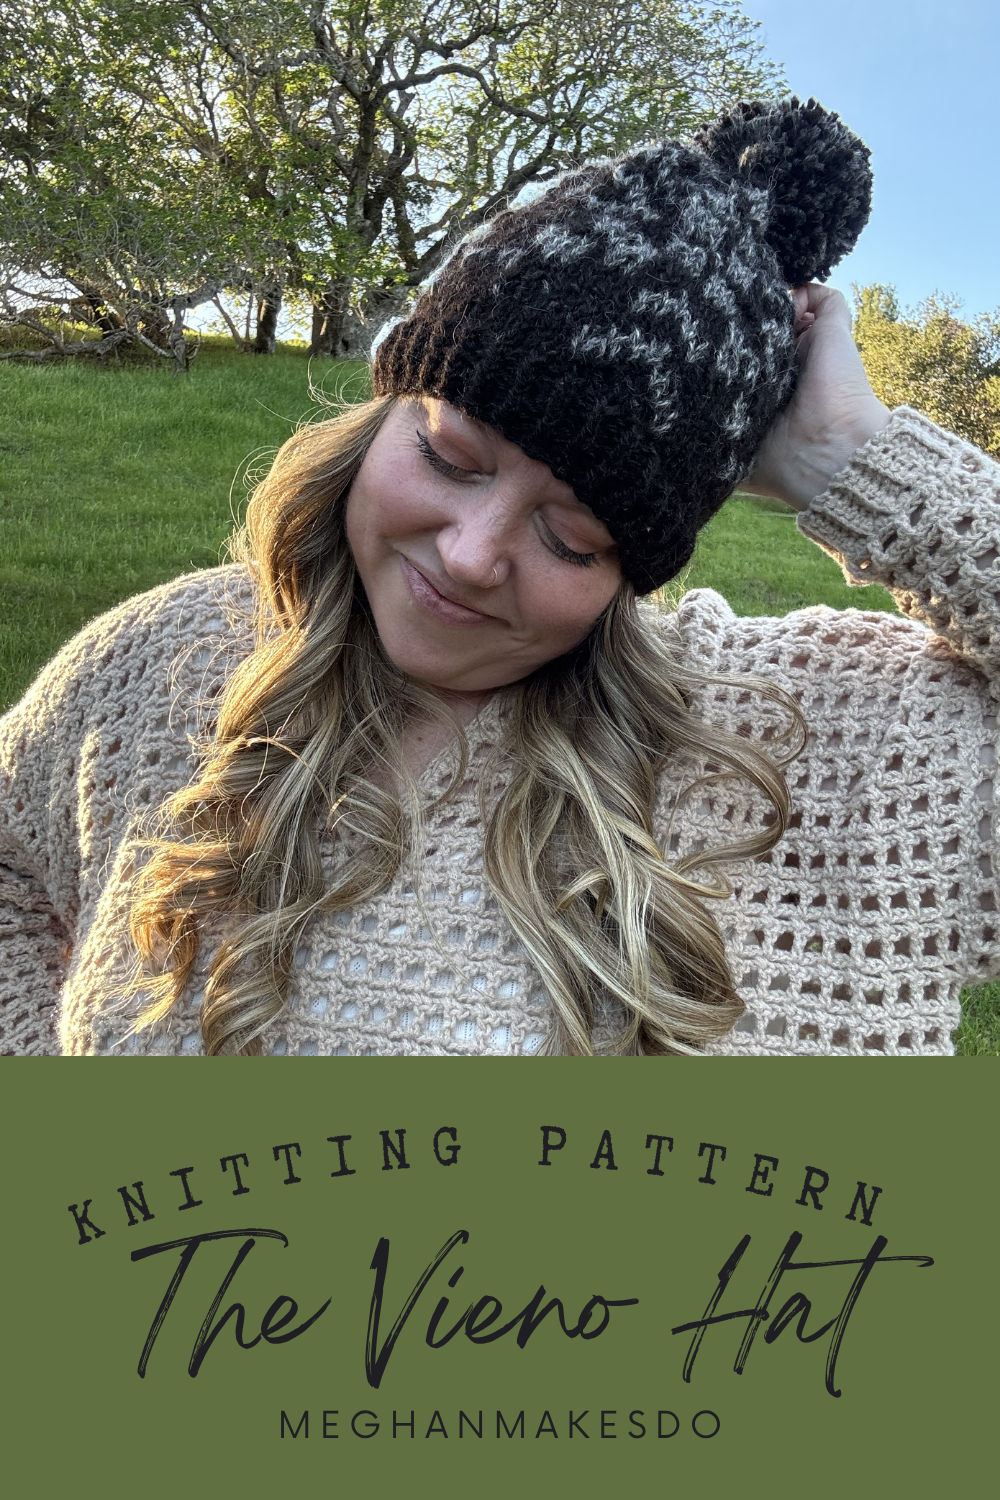
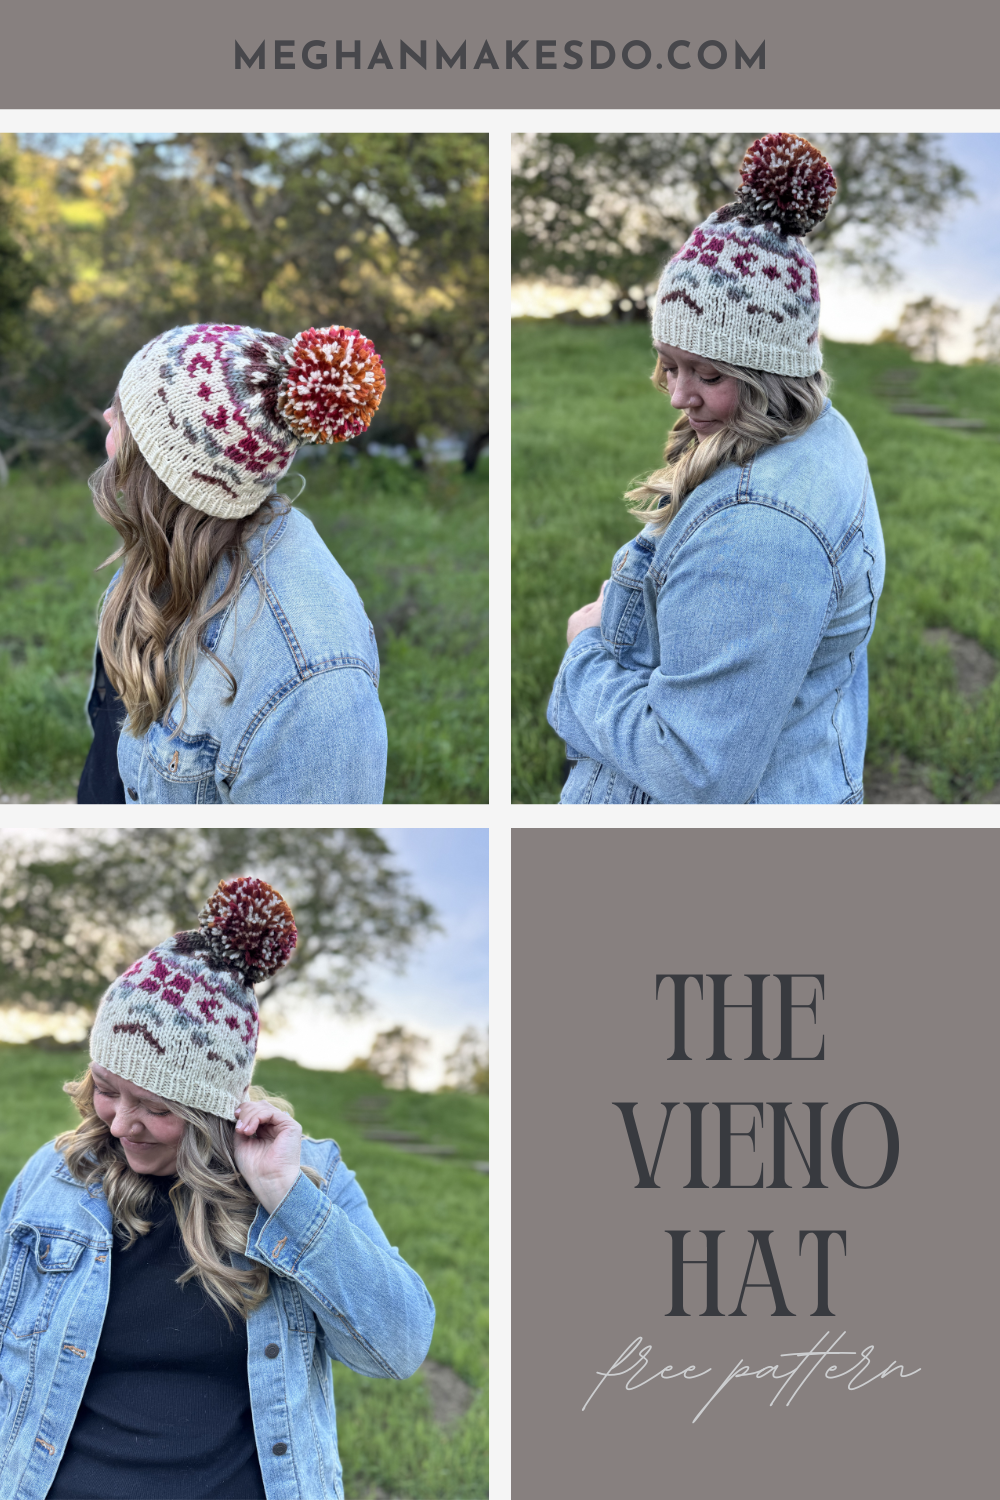
The Vieno Hat Knitting Pattern
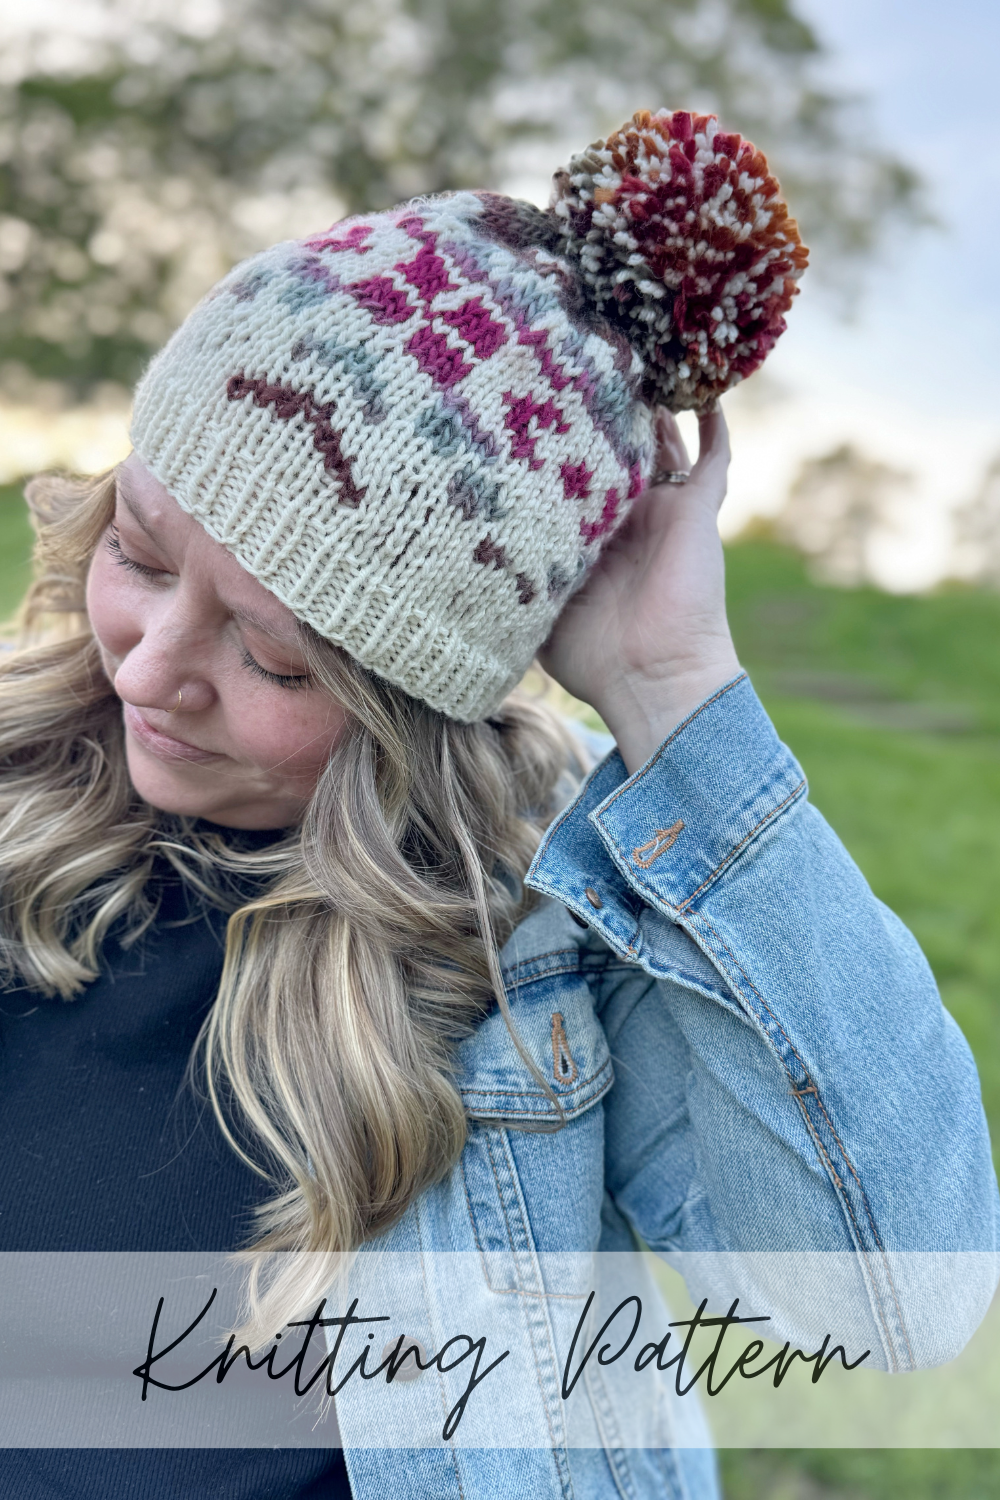
The Vieno Hat knitting pattern combines classic stranded colorwork with a modern snowflake motif for a fun, contemporary look. Worked using two colors of worsted to bulky weight yarn combined with simple knit stitches lets the design really pop. The hat is worked from the brim up and is finished with a full pom-pom for cozy, wearable style.
Keep scrolling for the free version or grab a printable PDF in the shop.
I pleased to be bringing you this fun new knitting pattern today. This is the knit version of an older crochet pattern of mine from back in 2021. Can you believe that it took me so long to release the crochet version?
Well, if it wasn’t for my procrastination on that pattern the knit version would have never existed! Let me explain…
This year I started a new series called Stitch Through The Stash. I spend 30 (or more) minutes a day working on projects that have been sitting in my stash for way too long. You can hear more about it and follow along over on YouTube and Instagram.
The first project I picked was two skeins of yarn I’d picked up in Iceland last year with the intent of recreating the original crochet hat pattern and finally releasing it here on the blog. Long story short, I ran out of yarn and decided to pivot and knit the design instead. My misfortune is your gain I guess, because I couldn’t release the crochet version without also releasing the knit one too now that I had worked it up.
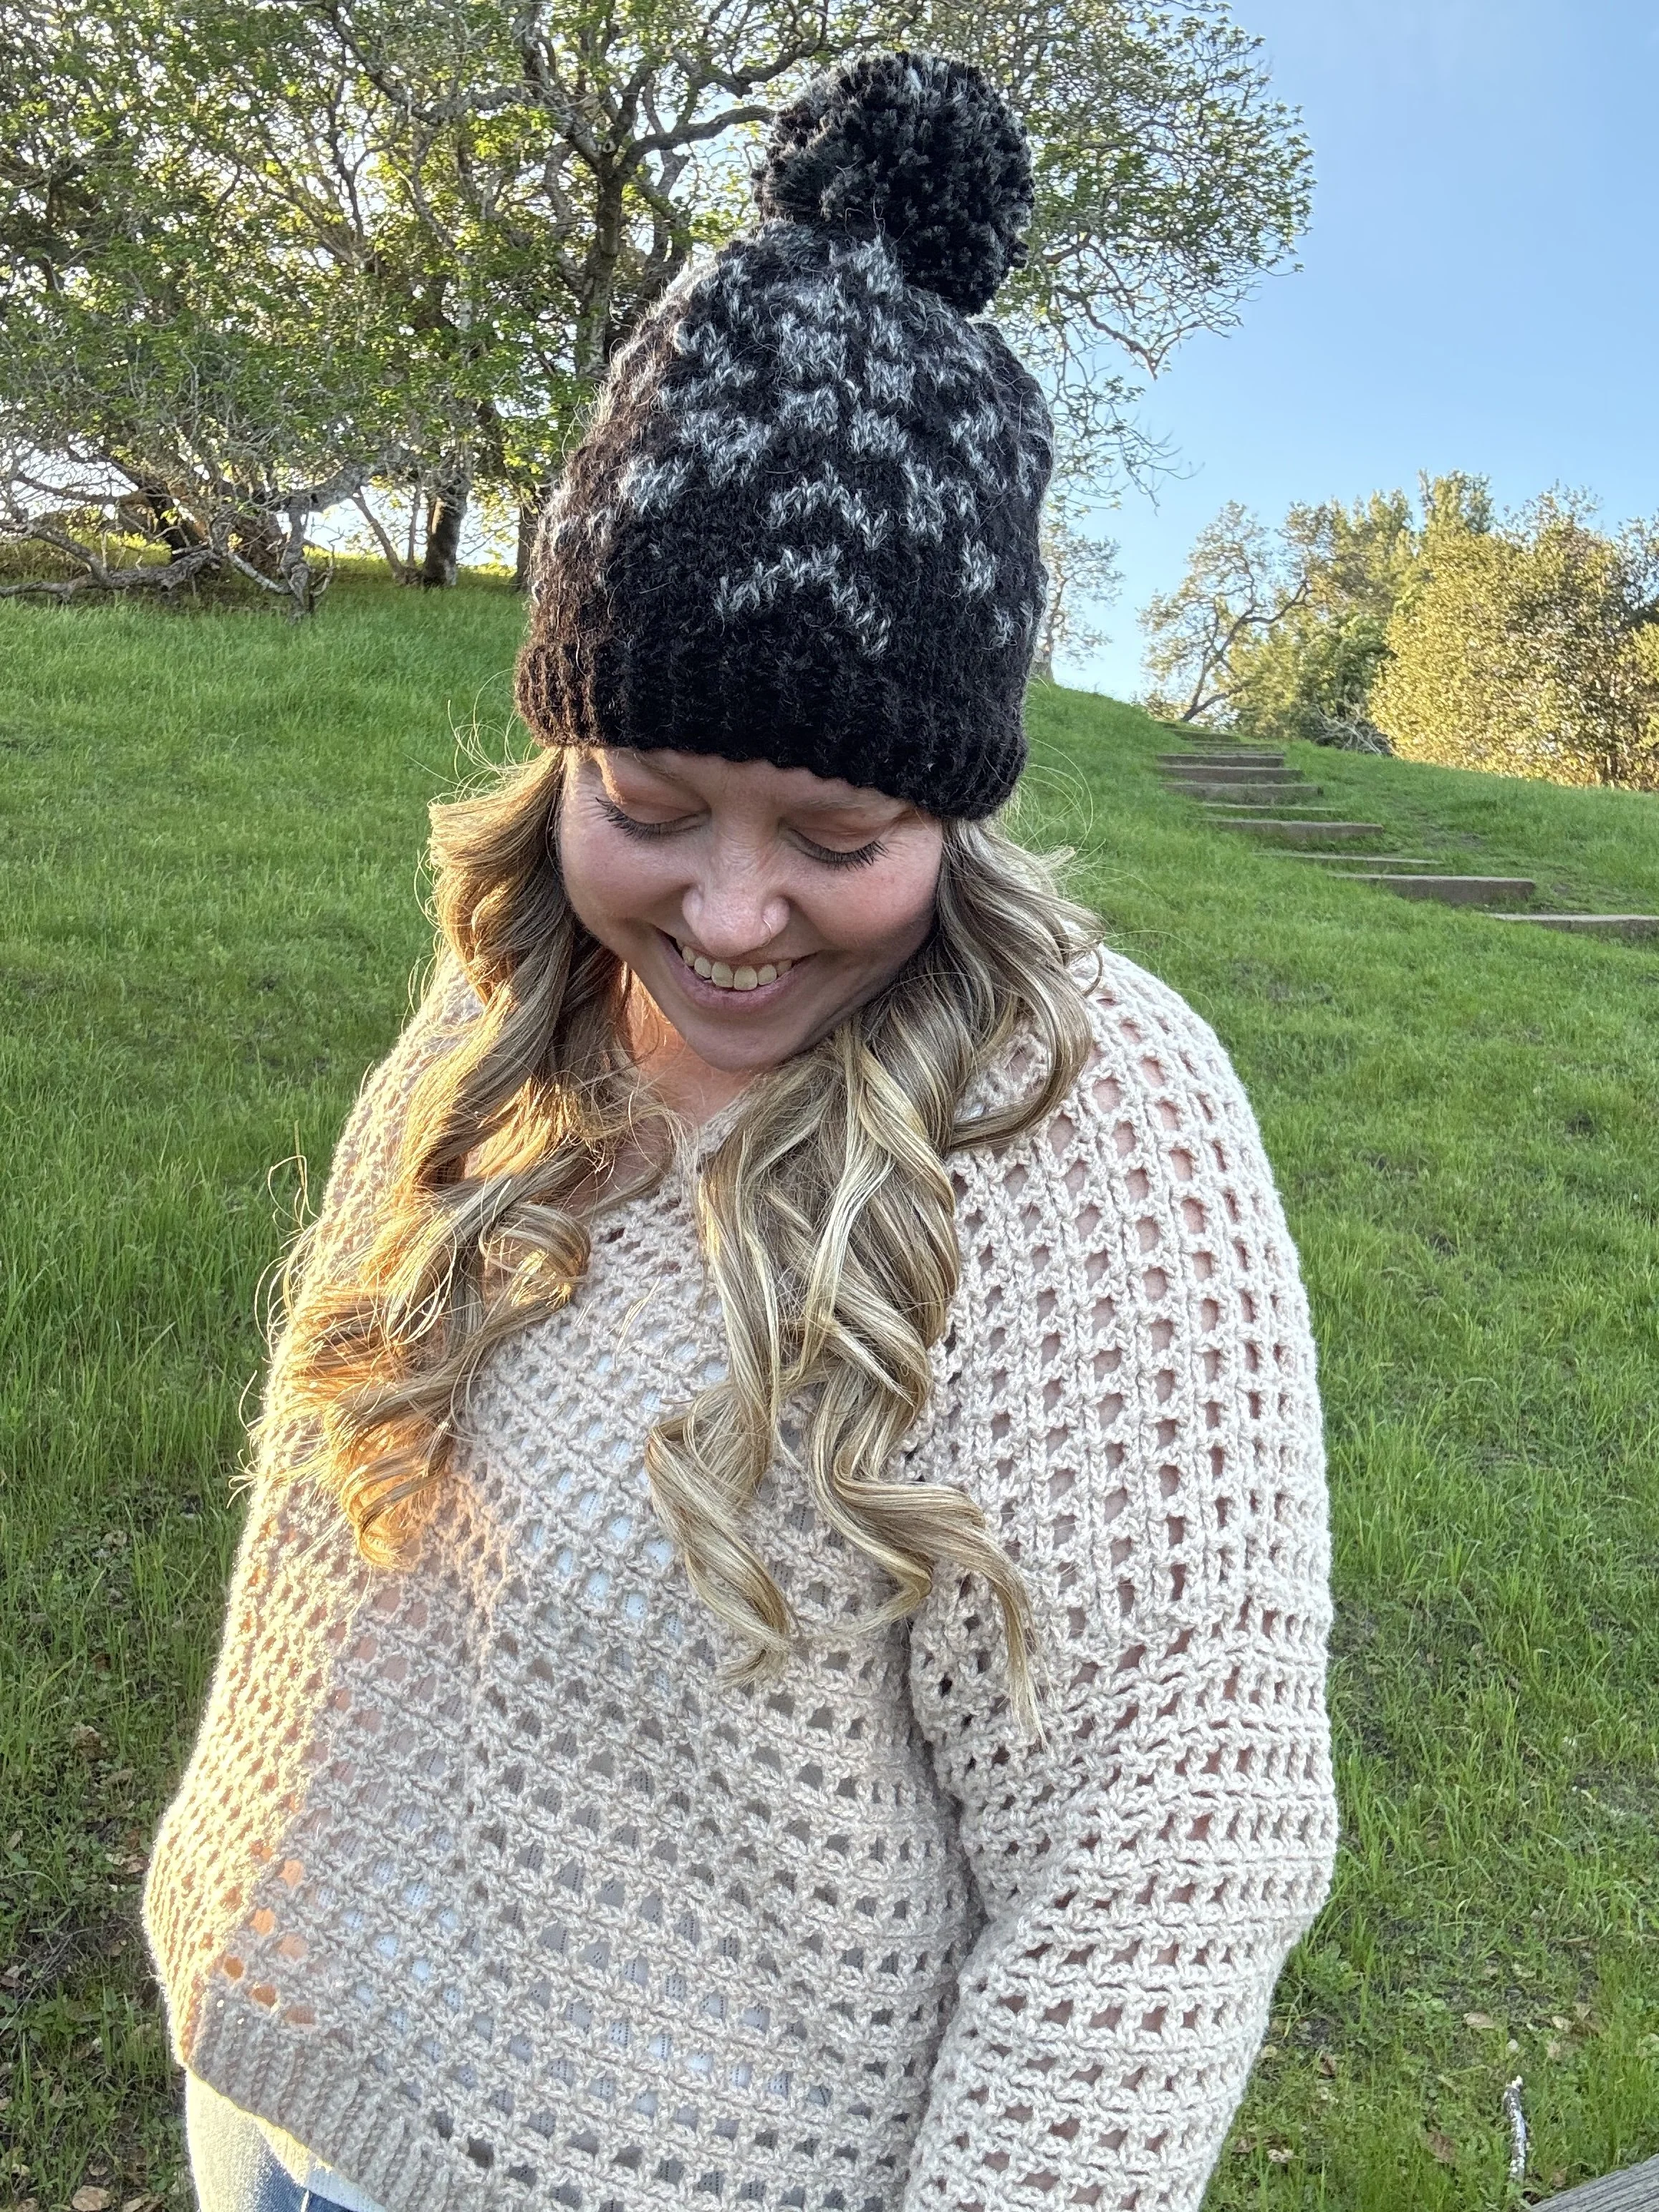
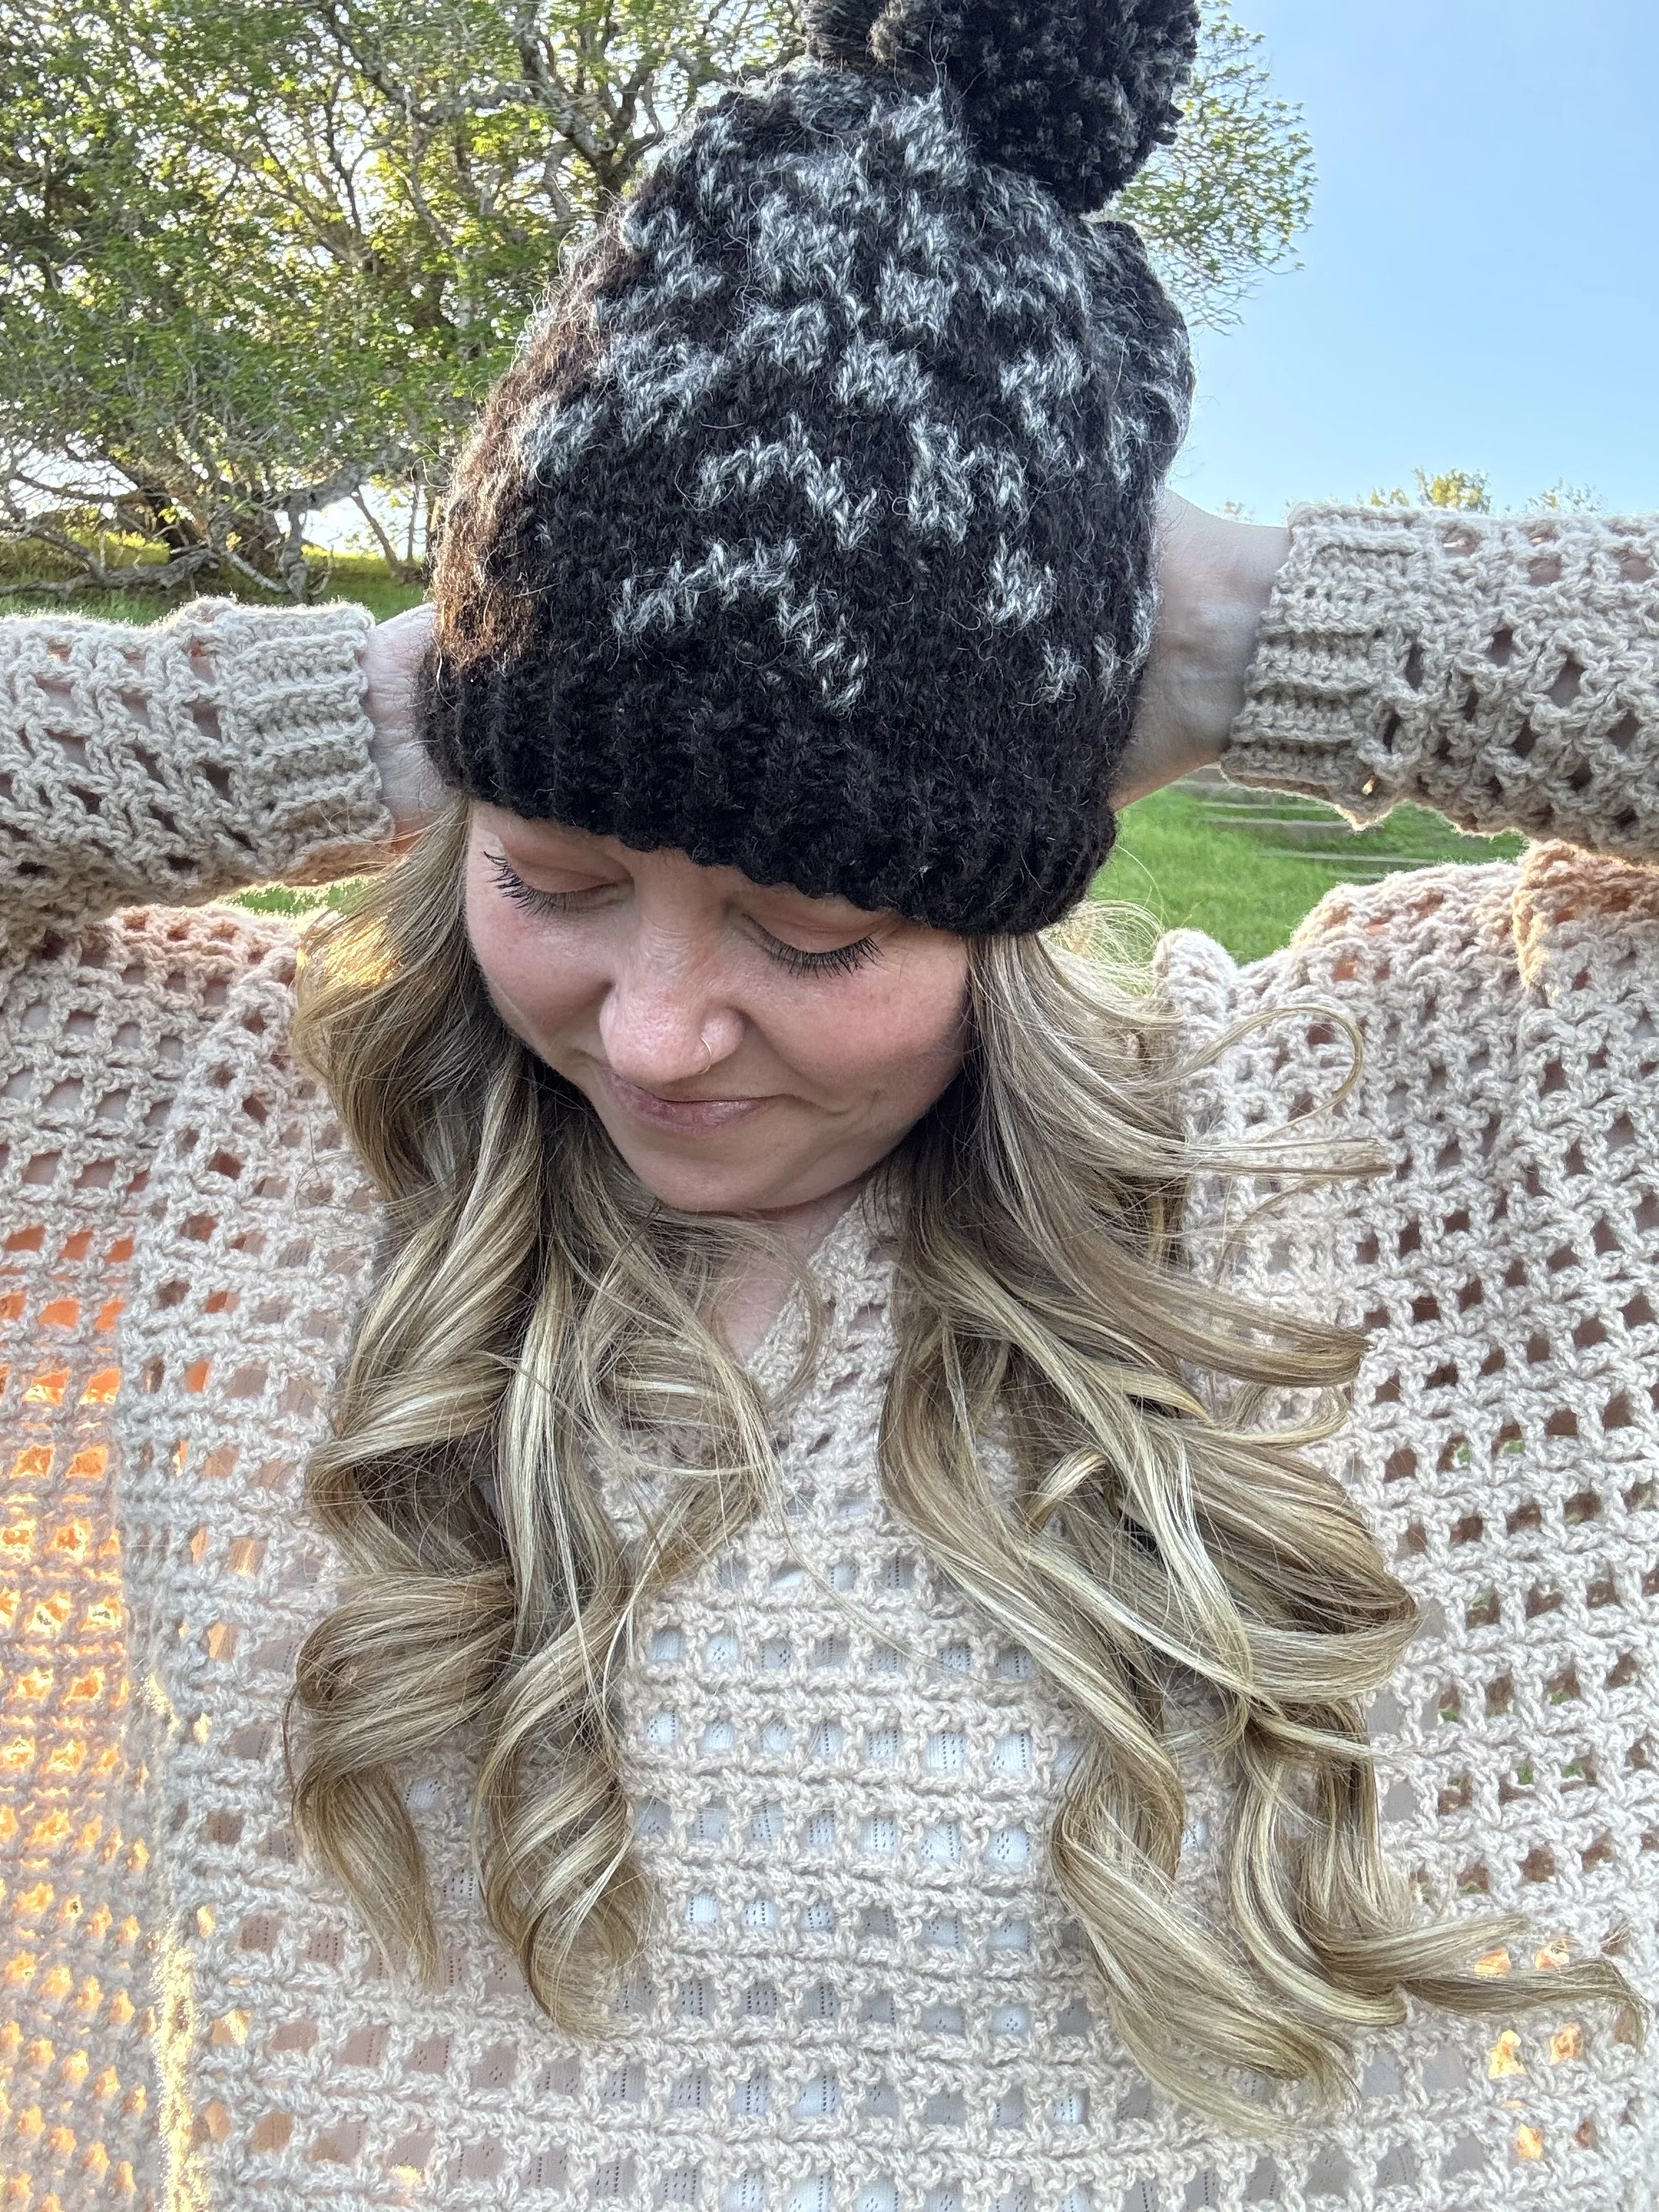
It was my first time doing stranded color work in knitting and it took me a few tries to get it right, but I’m so glad I persisted. You can see my original version using the Icelandic Wool below.
I was thrilled to finally have a finished project using yarn from my stash, but I still didn’t have the crochet pattern released and now I also wanted to get a knit version out too.
Plus, me being me, I wanted to include video tutorials for both as well. So I dove back into my stash and found some extra yarn leftover from my Magnus Pullover and got to work.
Thus the Vieno hat crochet and knit patterns were made and both include full video tutorials.
I love that even though the design is the same each version has it’s own unique look. Think of all the fun color combinations you could make too!
I’ve listed the yarn I used in the video tutorial (Lion Brand Wool-Ease and Landscapes) in the pattern, but you can also easily substitute for a heavier worsted weight or even light bulky too. Just make sure to check your gauge. In my original knit version I used black and charcoal yarn called Dvergaband from Uppspuni Mini Mill. You can find them on Instagram and if you’re ever in Iceland definitely check them out because they are so nice and have an amazing collection of yarn.
You can find the free version below and you can purchase a printable PDF in my shop, Etsy or Ravelry.
The Vieno Hat Knit Pattern
Materials:
125 yards (1 skein) of a weight 4 yarn for Color A (shown in Lion Brand Wool-Ease)
100 yards (1 skein) of a weight 4 yarn for Color B (shown in Lion Brand Landscapes)
US size 10(6mm) circular knitting needles (9”)
US size 8(5mm) circular knitting needles
Tapestry needle, scissors, tape measure
pom-pom maker (optional)
Notes:
1.Pattern is made bottom up in the round. Place a stitch marker at the beginning of the first round to mark rounds.
2.To keep tension loose and even it is recommended to work with the WS facing out.
Abbreviations:
CO- cast on
st(s)- stitch(es)
K- knit
P- purl
k2tog- knit two stitches together
BO- bind off
RS- right side
WS- wrong side
sm- stitch marker/ slip marker
Gauge:
16 sts X 21 rows = 4” X 4” in stockinette stitch in the round using 6mm needles.
Size:
one size fits most adults and teens
17” circumference X 8.25” high
Video Tutorial:
Pattern:
With 5mm needles and Color A, CO 72 using the Bulgarian cast on method. There will be one extra stitch from the cast on for a total of 73 before joining.
Make sure all stitches are straight on the needles, then join to the first st by slipping the first st off the left needle to the right purlwise, draw the last st over the slipped stitch and then transfer that stitch back to the left needle.
Place a sm on right needle.
Ribbing:
Rounds 1-8: *K1, P1, repeat from * around, sm. (72)
Main Body:
Change to 6mm needles.
Rounds 9-10: K all sts around, sm. (72)
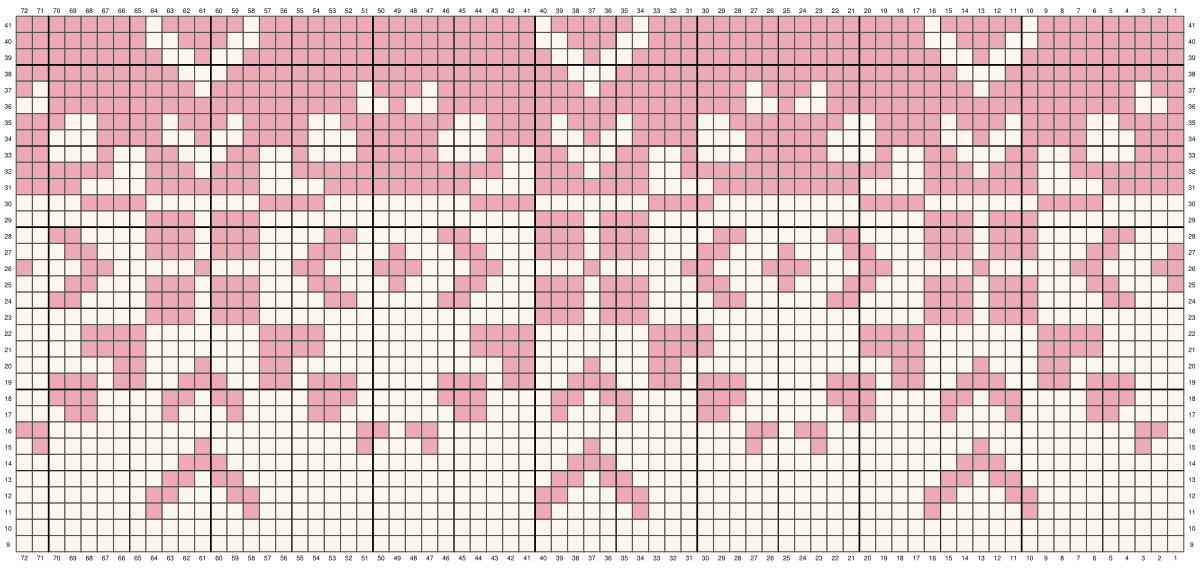
Begin colorwork using the stranded knitting technique. K all stitches and use the graph and the written instructions for color changes. Float Color B on the WS of the hat making sure to catch the strands every 5-6 stitches to keep floats even. Starting on Round 31 the main color switches and you will float color A on the WS of the hat.
Main Body:
Round 1: continuing to use Color A yarn, ch 1, sc 72 sts evenly around the top of band, (work 2sc in the end of every 11th row), placing a stitch marker in the first st. Do not join. (72)
Round 2: working directly into the first st of Round 1, csc in each st around. (72)
Continue to work in continuous rounds, replacing the st marker into the first st of each round as you go.
Color Work Section: continue to follow the instructions below or use the chart provided.
A=Wool Ease, B=Landscapes.
Use the stranded technique for all Color B sts until Round 23, then use the stranded technique for all Color A sts.
Round 3: (A) x 9, (B) x 1, (A) x 5, (B) x 1, (A) x 17, (B) x 1, (A) x 5, (B) x 1, (A) x 17, (B) x 1, (A) x 5, (B) x 1, (A) x 8
Round 4: (A) x 9, (B) x 2, (A) x 3, (B) x 2, (A) x 17, (B) x 2, (A) x 3, (B) x 2, (A) x 17, (B) x 2, (A) x 3, (B) x 2, (A) x 8
Round 5: (A) x 10, (B) x 2, (A), (B) x 2, (A) x 19, (B) x 2, (A), (B) x 2, (A) x 19, (B) x 2, (A), (B) x 2, (A) x 9
Round 6: (A) x 11, (B) x 3, (A) x 21, (B) x 3, (A) x 21, (B) x 3, (A) x 10
Round 7: (A) x 2, (B) x 1, (A) x 9, (B) x 1, (A) x 9, (B) x 1, (A) x 3, (B) x 1, (A) x 9, (B) x 1, (A) x 9, (B) x 1, (A) x 3, (B) x 1, (A) x 9, (B) x 1, (A) x 9, (B) x 1, (A) x 1
Round 8: (A) x 1, (B) x 2, (A) x 19, (B) x 2, (A) x 1, (B) x 2, (A) x 19, (B) x 2, (A) x 1, (B) x 2, (A) x 19, (B) x 2
Round 9: (A) x 4, (B) x 2, (A) x 4, (B) x 1, (A) x 3, (B) x 1, (A) x 4, (B) x 2, (A) x 7, (B) x 2, (A) x 4, (B) x 1, (A) x 3, (B) x 1, (A) x 4, (B) x 2, (A) x 7, (B) x 2, (A) x 4, (B) x 1, (A) x 3, (B) x 1, (A) x 4, (B) x 2, (A) x 3
Round 10: (A) x 3, (B) x 3, (A) x 4, (B) x 2, (A) x 1, (B) x 2, (A) x 4, (B) x 3, (A) x 5, (B) x 3, (A) x 4, (B) x 2, (A) x 1, (B) x 2, (A) x 4, (B) x 3, (A) x 5, (B) x 3, (A) x 4, (B) x 2, (A) x 1, (B) x 2, (A) x 4, (B) x 3, (A) x 2
Round 11: (A) x 3, (B) x 3, (A) x 1, (B) x 2, (A) x 2, (B) x 3, (A) x 2, (B) x 2, (A) x 1, (B) x 3, (A) x 5, (B) x 3, (A) x 1, (B) x 2, (A) x 2, (B) x 3, (A) x 2, (B) x 2, (A) x 1, (B) x 3, (A) x 5, (B) x 3, (A) x 1, (B) x 2, (A) x 2, (B) x 3, (A) x 2, (B) x 2, (A) x 1, (B) x 3, (A) x 2
Round 12: (A) x 7, (B) x 2, (A) x 3, (B) x 1, (A) x 3, (B) x 2, (A) x 13, (B) x 2, (A) x 3, (B) x 1, (A) x 3, (B) x 2, (A) x 13, (B) x 2, (A) x 3, (B) x 1, (A) x 3, (B) x 2, (A) x 6
Round 13: (A) x 5, (B) x 4, (A) x 7, (B) x 4, (A) x 9, (B) x 4, (A) x 7, (B) x 4, (A) x 9, (B) x 4, (A) x 7, (B) x 4, (A) x 4
Round 14: (A) x 5, (B) x 4, (A) x 7, (B) x 4, (A) x 9, (B) x 4, (A) x 7, (B) x 4, (A) x 9, (B) x 4, (A) x 7, (B) x 4, (A) x 4
Round 20: (A) x 7, (B) x 2, (A) x 3, (B) x 1, (A) x 3, (B) x 2, (A) x 13, (B) x 2, (A) x 3, (B) x 1, (A) x 3, (B) x 2, (A) x 13, (B) x 2, (A) x 3, (B) x 1, (A) x 3, (B) x 2, (A) x 6
Round 21: (A) x 5, (B) x 4, (A) x 7, (B) x 4, (A) x 9, (B) x 4, (A) x 7, (B) x 4, (A) x 9, (B) x 4, (A) x 7, (B) x 4, (A) x 4
Round 22: (A) x 5, (B) x 4, (A) x 7, (B) x 4, (A) x 9, (B) x 4, (A) x 7, (B) x 4, (A) x 9, (B) x 4, (A) x 7, (B) x 4, (A) x 4
Round 23: (A) x 9, (B) x 3, (A) x 1, (B) x 3, (A) x 17, (B) x 3, (A) x 1, (B) x 3, (A) x 17, (B) x 3, (A) x 1, (B) x 3, (A) x 8
Round 24: (A) x 3, (B) x 2, (A) x 4, (B) x 3, (A) x 1, (B) x 3, (A) x 4, (B) x 2, (A) x 5, (B) x 2, (A) x 4, (B) x 3, (A), (B) x 3, (A) x 4, (B) x 2, (A) x 5, (B) x 2, (A) x 4, (B) x 3, (A) x 1, (B) x 3, (A) x 4, (B) x 2, (A) x 2
Round 25: (B) x 1, (A) x 3, (B) x 2, (A) x 3, (B) x 3, (A) x 1, (B) x 3, (A) x 3, (B) x 2, (A) x 3, (B) x 1, (A) x 3, (B) x 2, (A) x 3, (B) x 3, (A) x 1, (B) x 3, (A) x 3, (B) x 2, (A) x 3, (B) x 1, (A) x 3, (B) x 2, (A) x 3, (B) x 3, (A) x 1, (B) x 3, (A) x 3, (B) x 2, (A) x 3
Round 26: (B) x 2, (A) x 3, (B) x 2, (A) x 5, (B) x 1, (A) x 5, (B) x 2, (A) x 3, (B) x 3, (A) x 3, (B) x 2, (A) x 5, (B) x 1, (A) x 5, (B) x 2, (A) x 3, (B) x 3, (A) x 3, (B) x 2, (A) x 5, (B) x 1, (A) x 5, (B) x 2, (A) x 3, (B) x 1
Round 27: (B) x 1, (A) x 3, (B) x 2, (A) x 3, (B) x 3, (A) x 1, (B) x 3, (A) x 3, (B) x 2, (A) x 3, (B) x 1, (A) x 3, (B) x 2, (A) x 3, (B) x 3, (A) x 1, (B) x 3, (A) x 3, (B) x 2, (A) x 3, (B) x 1, (A) x 3, (B) x 2, (A) x 3, (B) x 3, (A) x 1, (B) x 3, (A) x 3, (B) x 2, (A) x 3
Round 28: (A) x 3, (B) x 2, (A) x 4, (B) x 3, (A) x 1, (B) x 3, (A) x 4, (B) x 2, (A) x 5, (B) x 2, (A) x 4, (B) x 3, (A) x 1, (B) x 3, (A) x 4, (B) x 2, (A) x 5, (B) x 2, (A) x 4, (B) x 3, (A) x 1, (B) x 3, (A) x 4, (B) x 2, (A) x 2
Round 29: (A) x 9, (B) x 3, (A) x 1, (B) x 3, (A) x 17, (B) x 3, (A) x 1, (B) x 3, (A) x 17, (B) x 3, (A) x 1, (B) x 3, (A) x 8
Round 30: (A) x 5, (B) x 4, (A) x 7, (B) x 4, (A) x 9, (B) x 4, (A) x 7, (B) x 4, (A) x 9, (B) x 4, (A) x 7, (B) x 4, (A) x 4
Round 31: (B) x 5, (A) x 4, (B) x 7, (A) x 4, (B) x 9, (A) x 4, (B) x 7, (A) x 4, (B) x 9, (A) x 4, (B) x 7, (A) x 4, (B) x 4
Round 32: (B) x 7, (A) x 2, (B) x 3, (A) x 1, (B) x 3, (A) x 2, (B) x 13, (A) x 2, (B) x 3, (A) x 1, (B) x 3, (A) x 2, (B) x 13, (A) x 2, (B) x 3, (A) x 1, (B) x 3, (A) x 2, (B) x 6
Round 33: (B) x 3, (A) x 3, (B) x 1, (A) x 2, (B) x 2, (A) x 3, (B) x 2, (A) x 2, (B) x 1, (A) x 3, (B) x 5, (A) x 3, (B) x 1, (A) x 2, (B) x 2, (A) x 3, (B) x 2, (A) x 2, (B) x 1, (A) x 3, (B) x 5, (A) x 3, (B) x 1, (A) x 2, (B) x 2, (A) x 3, (B) x 2, (A) x 2, (B) x 1, (A) x 3, (B) x 2
Round 34: (B) x 3, (A) x 3, (B) x 4, (A) x 2, (B) x 1, (A) x 2, (B) x 4, (A) x 3, (B) x 5, (A) x 3, (B) x 4, (A) x 2, (B) x 1, (A) x 2, (B) x 4, (A) x 3, (B) x 5, (A) x 3, (B) x 4, (A) x 2, (B) x 1, (A) x 2, (B) x 4, (A) x 3, (B) x 2
Round 35: (B) x 4, (A) x 2, (B) x 4, (A) x 1, (B) x 3, (A) x 1, (B) x 4, (A) x 2, (B) x 7, (A) x 2, (B) x 4, (A) x 1, (B) x 3, (A) x 1, (B) x 4, (A) x 2, (B) x 7, (A) x 2, (B) x 4, (A) x 1, (B) x 3, (A) x 1, (B) x 4, (A) x 2, (B) x 3
Round 36: (B) x 1, (A) x 2, (B) x 19, (A) x 2, (B) x 1, (A) x 2, (B) x 19, (A) x 2, (B) x 1, (A) x 2, (B) x 19, (A) x 2
Round 37: (B) x 2, (A) x 1, (B) x 9, (A) x 1, (B) x 9, (A) x 1, (B) x 3, (A) x 1, (B) x 9, (A) x 1, (B) x 9, (A) x 1, (B) x 3, (A) x 1, (B) x 9, (A) x 1, (B) x 9, (A) x 1, (B) x 1
Round 38: (B) x 11, (A) x 3, (B) x 21, (A) x 3, (B) x 21, (A) x 3, (B) x 10
Round 39: (B) x 10, (A) x 2, (B) x 1, (A) x 2, (B) x 19, (A) x 2, (B) x 1, (A) x 2, (B) x 19, (A) x 2, (B) x 1, (A) x 2, (B) x 9
Round 40: (B) x 9, (A) x 2, (B) x 3, (A) x 2, (B) x 17, (A) x 2, (B) x 3, (A) x 2, (B) x 17, (A) x 2, (B) x 3, (A) x 2, (B) x 8
Round 41: (B) x 9, (A) x 1, (B) x 5, (A) x 1, (B) x 17, (A) x 1, (B) x 5, (A) x 1, (B) x 17, (A) x 1, (B) x 5, (A) x 1, (B) x 8
Chart
Chart is read right to left for all rounds. The white squares represent Color A and the pink squares represent Color B.
The next three rounds will be decrease rounds in order to shape the top of the hat. Fasten off Color A and continue with Color B.
Rnd 42: *K10, k2tog, repeat from * around, sm. (66)
Rnd 43: *K4, k2tog, repeat from * around, sm. (?)
Rnd 44: *K3, k2tog, repeat from * around. (?)
BO all stitches.
Fasten off leaving a long tail for sewing the top of the hat closed.
Finishing:
To close the top of the hat fold in half so join is in the center, sew through both sides at the top. You will have two open loops at the top your hat, bring the center of each loop into the middle and sew through both sides.
Now you will have four open loops, bring the center of each loop into the middle and stitch closed. You will have eight open loops. One at a time bring the center of each loop into the middle and stitch closed. Fasten off and weave in ends. Make a large pom-pom with remaining yarn and attach to the top of the hat (optional).
See Video Tutorial for a more detailed look at how to finish your hat.
I am so happy to finally have this hat pattern out in the world. I hope you love making it too. If you make one, I’d love to see it. Make sure to tag me @meghanmakesdo on socials and use #thevienohat so I can share.
Don’t forget you can also get a PDF version of this hat in my shop, Etsy or Ravelry.
Happy Knitting,
Meghan