Pattern Design Series-The Building Blocks of a Great Pattern
This post may contain affiliate links. If you make a purchase through one of those links
I may earn a small commission.
If you’ve been following along the past month then you know we have been talking all about Pattern Designing both on Instagram LIVE and here on the blog. I’m so excited to finally be sharing The Building Blocks of a Great Pattern today. In case you missed the first two posts in the series, you can find them here.
Think of a crochet or knit pattern as the instruction manual for your design. We all know a good instruction manual when we see one, so how do we make sure our patterns are written well and easy to follow? We do that by making sure we have included all the necessary information in a way that is clear and easy to follow. Below you will find 11 things to include in your patterns to make sure you have the best “instruction manual” around.
Title & Photo
Every pattern needs a name. When you name your pattern you make it easier for people to find and share. Naming your design and even giving it it’s own hashtag is a great way to keep track of who is making your designs and allows people to easily share their finished pieces with others.
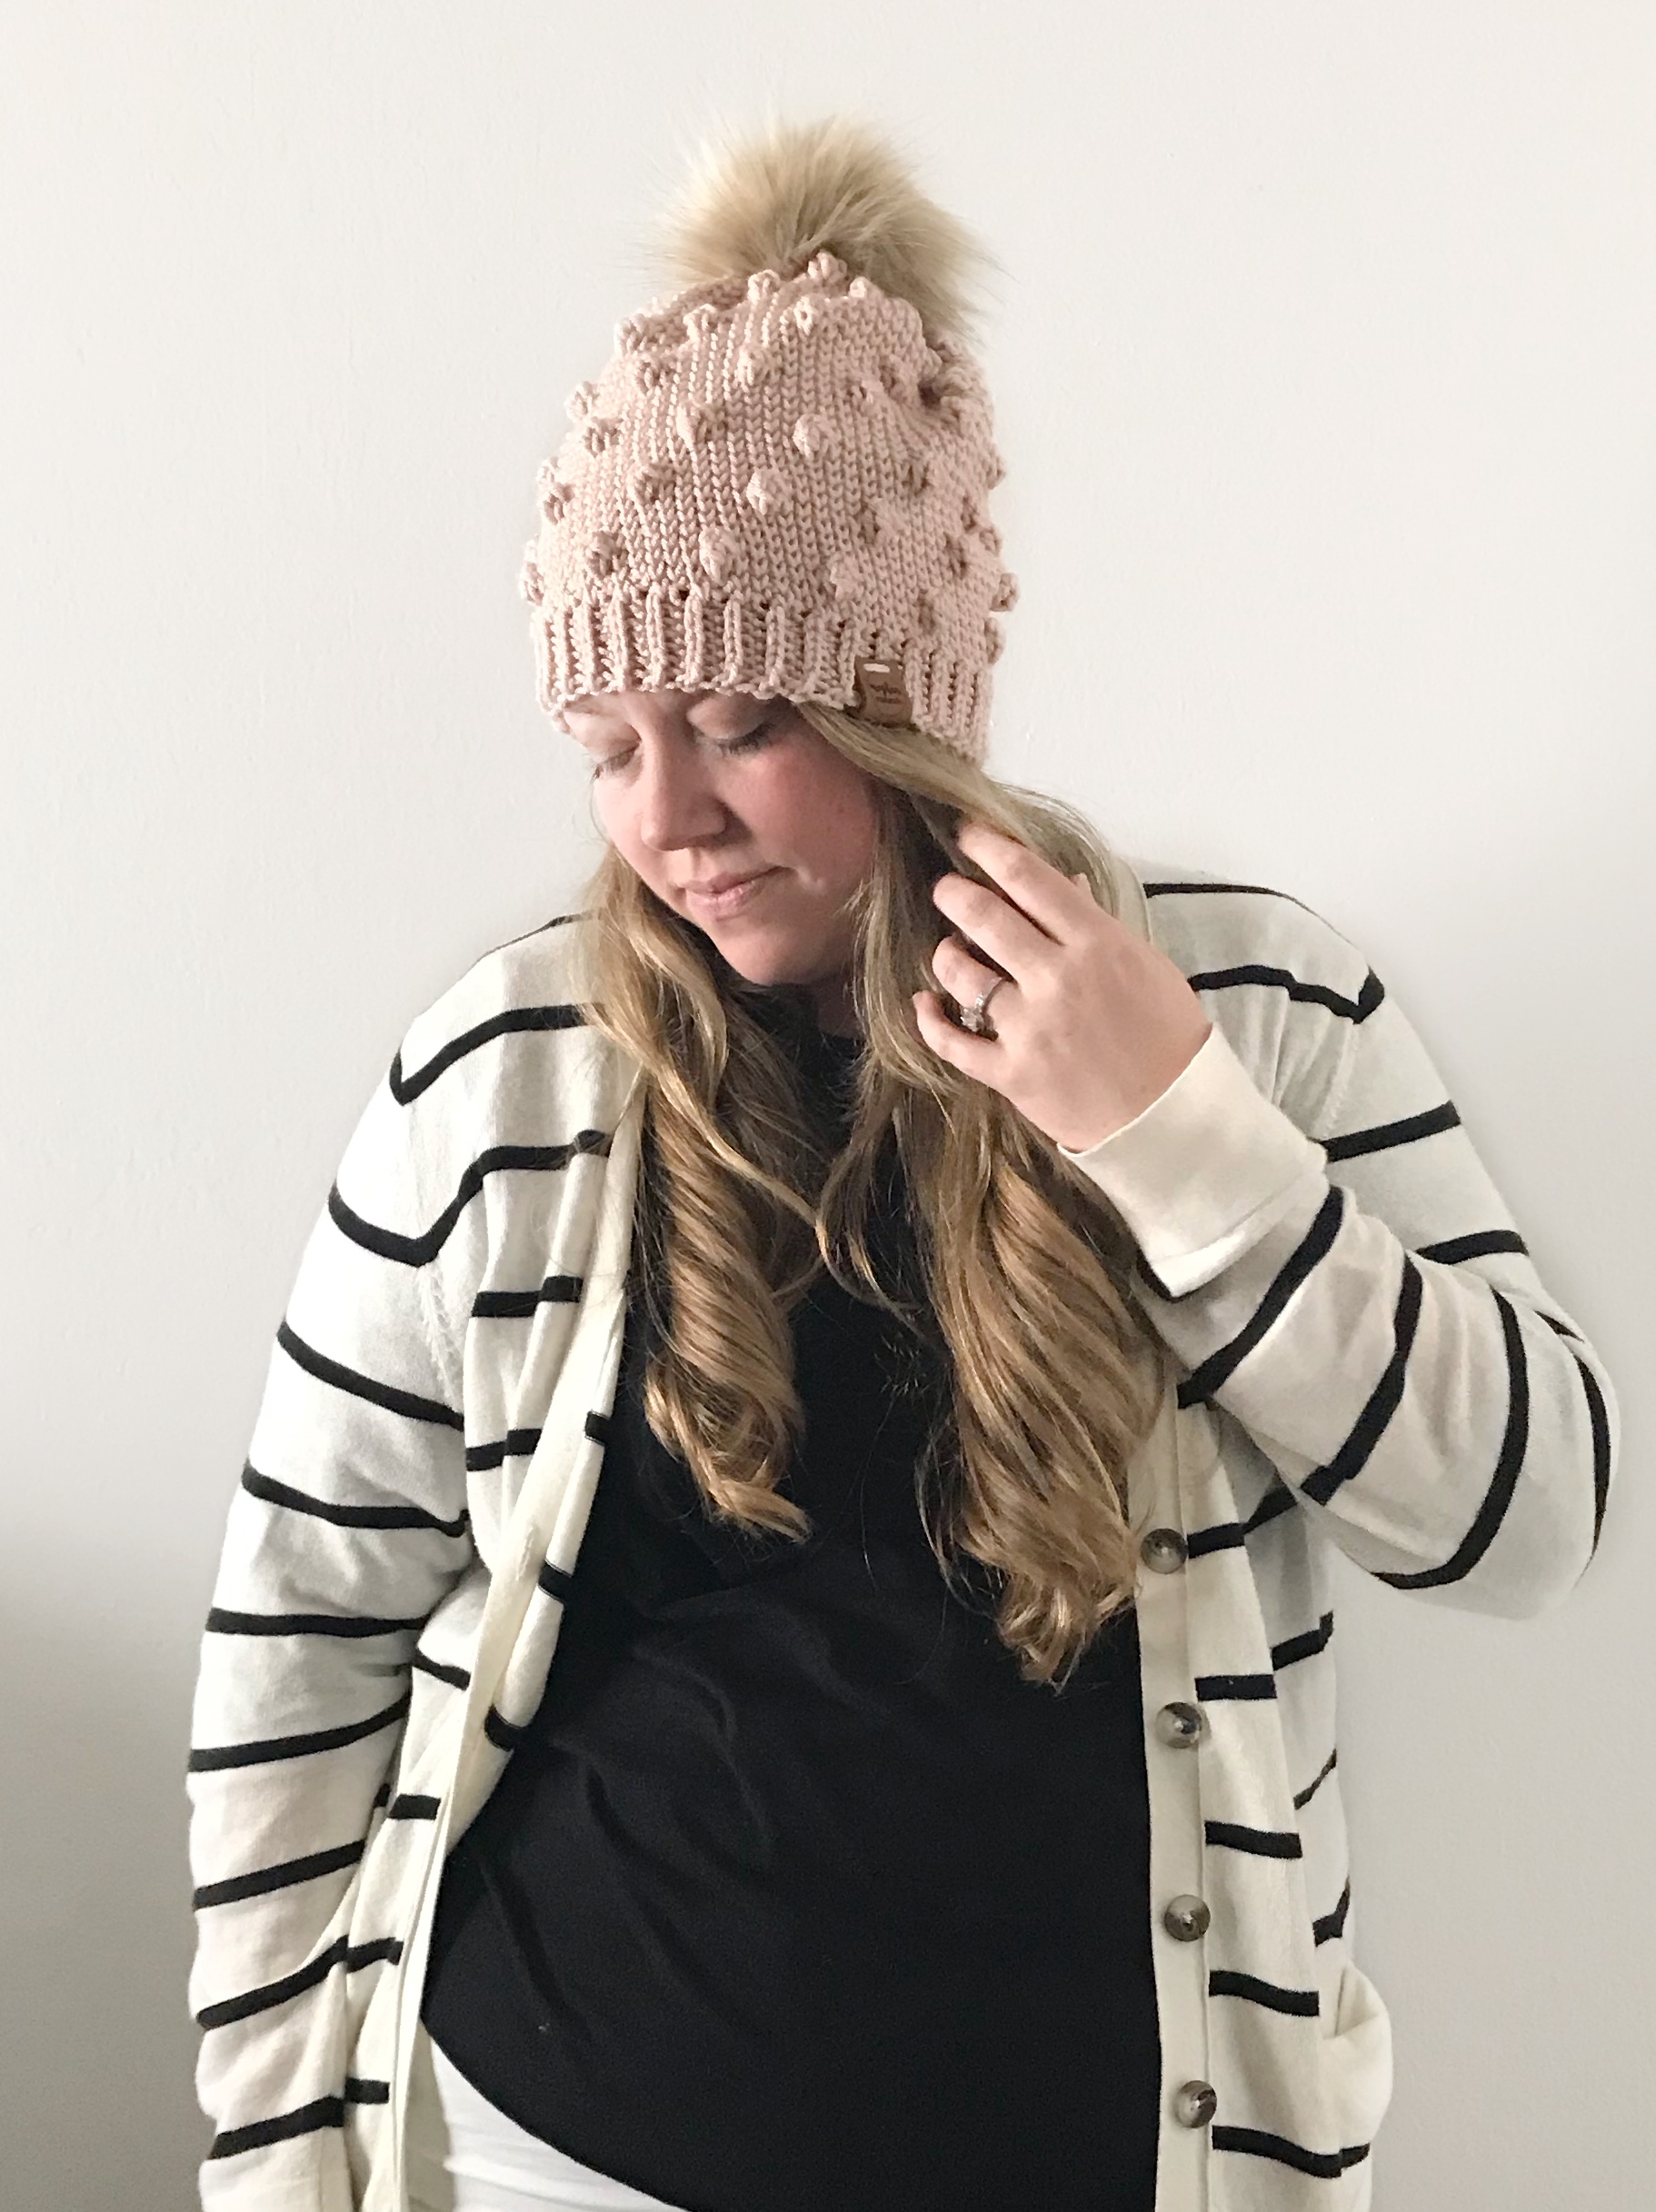
It’s expected that you will also include a photo of the finished item. When your customers go to make your design they will need to see a finished picture in order to know if they have made it correctly. You can include the photo in the title page or at the end. Make sure that it is a good quality photo and that it is in use. If you designed a hat make sure that you have a photo of someone wearing it included in the pattern. It can also help to have a variety of photos of the item so people can see if from different angles.Your product name and photo are usually together on the title page along with your name and a social media handle or website link.
Materials
Most patterns include a page with all the details of the pattern. This is a great place to list all the materials you used to create your piece. A materials list should include yarn used, hook or needles used, any additional materials that a person may need in order to complete the item. Be as specific as possible. It’s okay to include optional items as well such as stitch markers and then just mark it (optional) in the list.
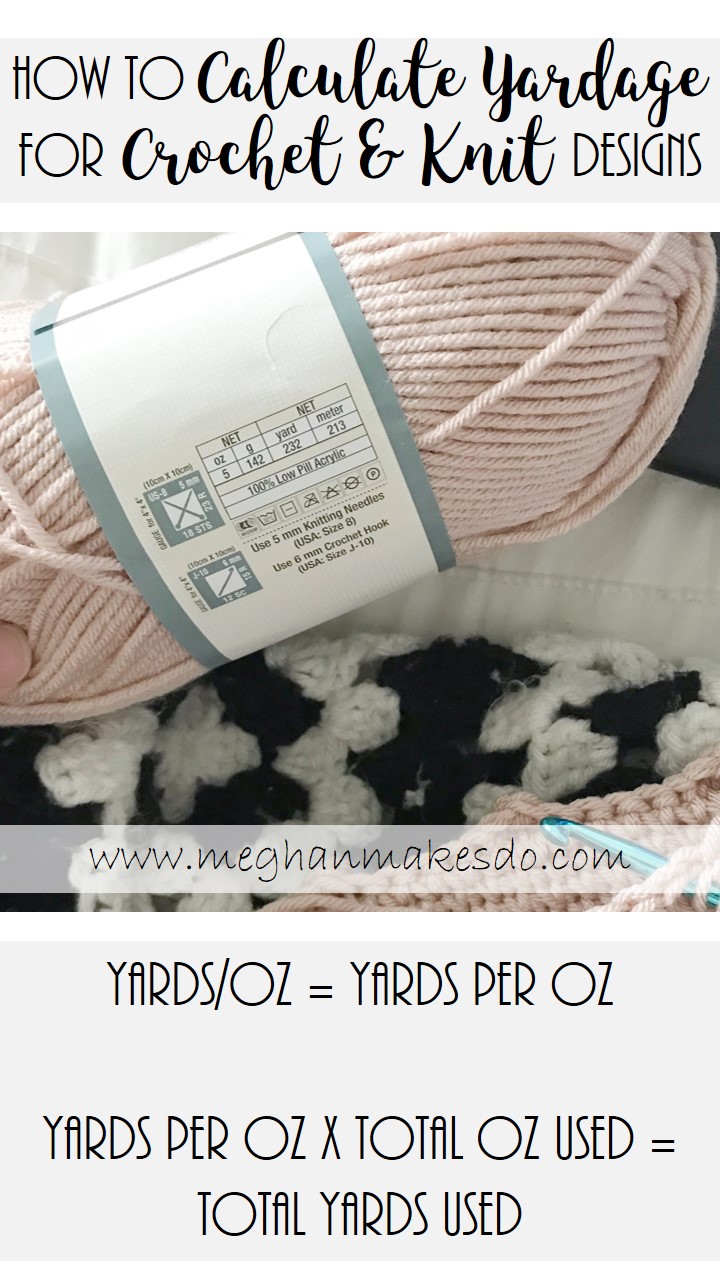
When listing your yarn make sure to be specific as to which brand and color you used. It is also extremely important to list the yardage used, not just the number of skeins. People will substitute with different yarns so having yardage amount is the best way for them to know how much yarn they will need.
To calculate yardage you can either weigh your skeins before you start and then again after you are finished to find the weight you used or weigh your finished piece after it is constructed. If using more than one color or type of yarn it is best to weigh your skeins before you start. All you need is a small kitchen scale. Once you know how much yarn you used in ounces you will need to convert it to yards. Every label will give you an amount in ounces and an amount in yards. Divide the yards by oz to get the yards per oz. Then multiply that number by the ounces you actually used to determine the yardage used.
Hook size is another thing you will need to be specific on. You don’t have to list the brand you use, but you do need to list the size in millimeters as well as the letter. This helps people to determine if they have the right size hook. Just listing the letter won’t work since some countries don’t use the letter system and some hook sizes use the same letter. For example a G hook can be either 4.00mm or 4.25mm depending on the brand.
Make sure you also include any other materials that will be necessary such as fabric, zippers, buttons, etc.
3. Abbreviations
Crochet and knit patterns are written in their own language. When someone reads your pattern they need to be able to interpret the language easily. Including a list of abbreviations in your details page is necessary to ensure your pattern can easily be read.
For example, some common abbreviations are:
sl st- slip stitch, sc-single crochet, dc-double crochet, etc.
Make sure to include all abbreviations you used throughout the pattern. If you are ever unsure about what an abbreviation should be you can check out the Craft Yarn Council website. They have a ton of information about the proper abbreviations to use as well as how to write your pattern.
If you make up an abbreviation for a stitch you use make sure you also include a special stitch instruction for that stitch. For example, in my very first crochet pattern, The Emerson Scarf, I used the Lemon Peel stitch. I couldn’t find an abbreviation for this stitch so I just used LP to indicate when to use that stitch. Then in my abbreviations I simple wrote next to it:
LP- lemon peel stitch (alternate sc and dc sts)
I also included a special stitches page where I shared a photo tutorial on how to do that stitch. Stitch tutorials are not necessary but they can be helpful for a beginner or if the stitches you used are not easily found online.
4. Gauge
Gauge is ESSENTIAL! Your gauge is the tension you used to crochet or knit your item. Listing the gauge will ensure that people who want to make your pattern will be able to make it to the correct size.
To find your gauge, measure how many rows and how many stitches it takes to make a 4” square. I typically use a tape measure, but you can also purchase a special gauge ruler like the one shown in the picture below. You can either measure it from the finished item or make your own swatch and measure it there. If making a swatch make sure to work it up larger than 4 inches so you are able to get an accurate count. Standard gauge is listed as a 4” square, but you can also use a smaller square or a circle. For example if you are making a top down hat that is crocheted in the round you can simply state gauge as the diameter the first few rows should be.
It is also important to list which stitch you used to find your gauge. This way anyone making your design will be able to find their gauge using the same stitch you used. If using mulitiple stitches and hook sizes it can be a good idea to list more than one gauge. For example if I make a ribbed brim on a hat using hdc and then use a different stitch in the round for the top of the hat, I would list gauge for the brim and gauge for the top.
There will be some patterns where gauge is not essential, such as a pillow or a bag. It is still essential that you list the gauge, but you can add into the notes that gauge is not essential.

photo courtesy of Hooked Hazel
5. Size
Size is another thing that needs to be included in your details page. Make sure to include the sizes available in the pattern as well as the finished size of the items. This is especially important for a garments. Although most designers try to stick to standard sizes each item will vary. Having finished dimensions listed will help people figure out which size would fit them best.
6. Skill Level & Terminology
This is something that I am starting to include in all of my patterns. Since UK and US terms are different it is extremely helpful to include which terminology you used to write your pattern. With most patterns available world wide this will help people know if they need to translate the pattern into terms they will understand.
Skill level is also becoming very important. By listing the skill level of your pattern you’ll be able to let people know right away if they have the skills needed to make your pattern before they purchase it. Most patterns are listed as Beginner, Intermediate or Advanced.
7. Notes
The notes section allows you to give a bit more explanation to your pattern. This is where you can state whether the chains at the beginning of your rounds or rows counts a stitch and if any special instructions are needed. It’s a good idea to jot down anything you think you may need to include in the notes during the design process. If issues arise during the testing process you can also consider adding a note to address those specific issues too.

8. The Instructions
The instructions are the main part of your pattern. This is where you will write out and explain exactly how to make your design. Every pattern writer will format their pattern differently, but there are some basics that you should follow to make sure pattern is written in the best way possible.
Always start with the number of chains needed or if making something in the round make sure to state if they need to start with a magic ring or chains. When making multiple sizes write the pattern for the smallest size with all other sizes listed in parenthesis. (ex: XS(S, M, L, XL))
Make sure to label all rows and rounds and making them bold will help people keep track of where they are. (ex: Row 1: )
Separate stitches and steps with commas. If writing short hand remember that writing 2sc means to do two sc in one stitch, and writing sc 2 means to sc in each of the next 2 sts. (ex: 2sc in first st, 5sc, 3sc, sc 4)
It’s also extremely helpful to include stitch counts at the end of each row. They are usually in parenthesis after the instructions of that row.
If working in rows make sure to include instruction for turning by stating at the end of the row to ch 1 and turn or at the beginning to ch 1 before starting that row’s instructions.
Be sure to use all proper terms according to the Craft Yarn Council. Again, they have a ton of helpful information to help guide you in writing your own patterns.
Also, if there are any tricky parts or important instructions it can help to bold them in the pattern so they stand out and won’t be forgotten. (ex: work in BLO from here throughout)
9. Instructional Photos
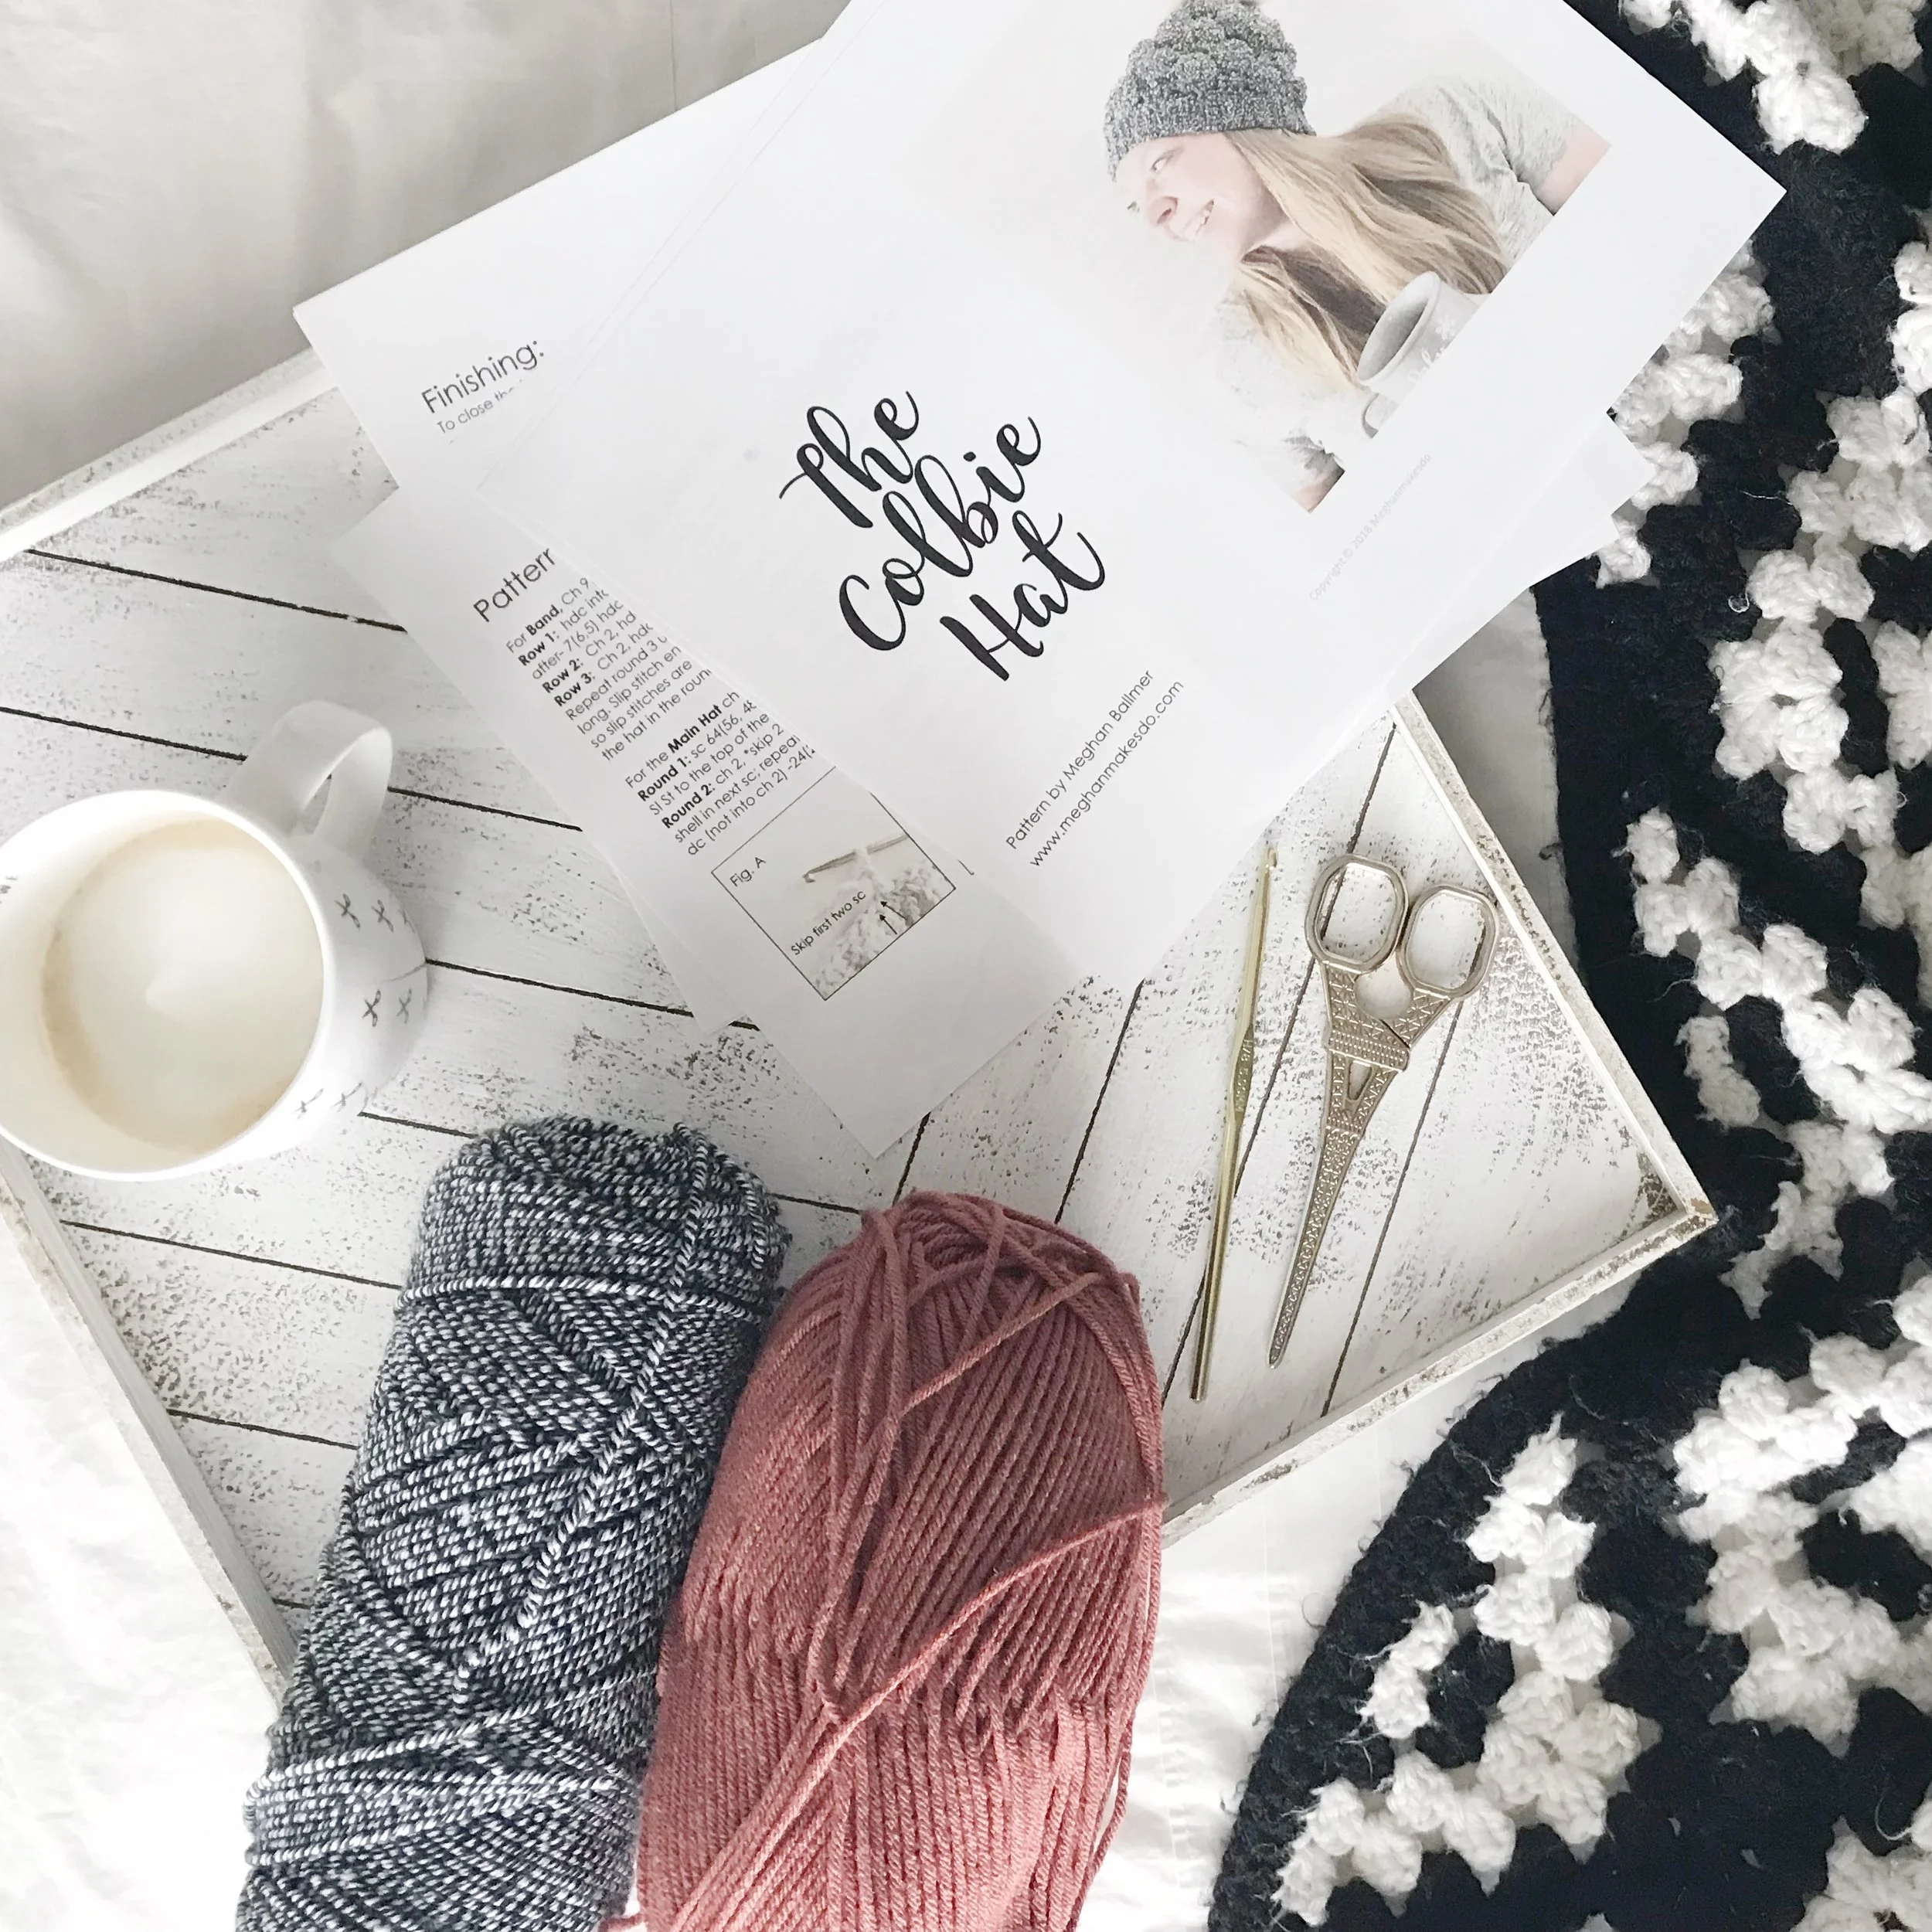
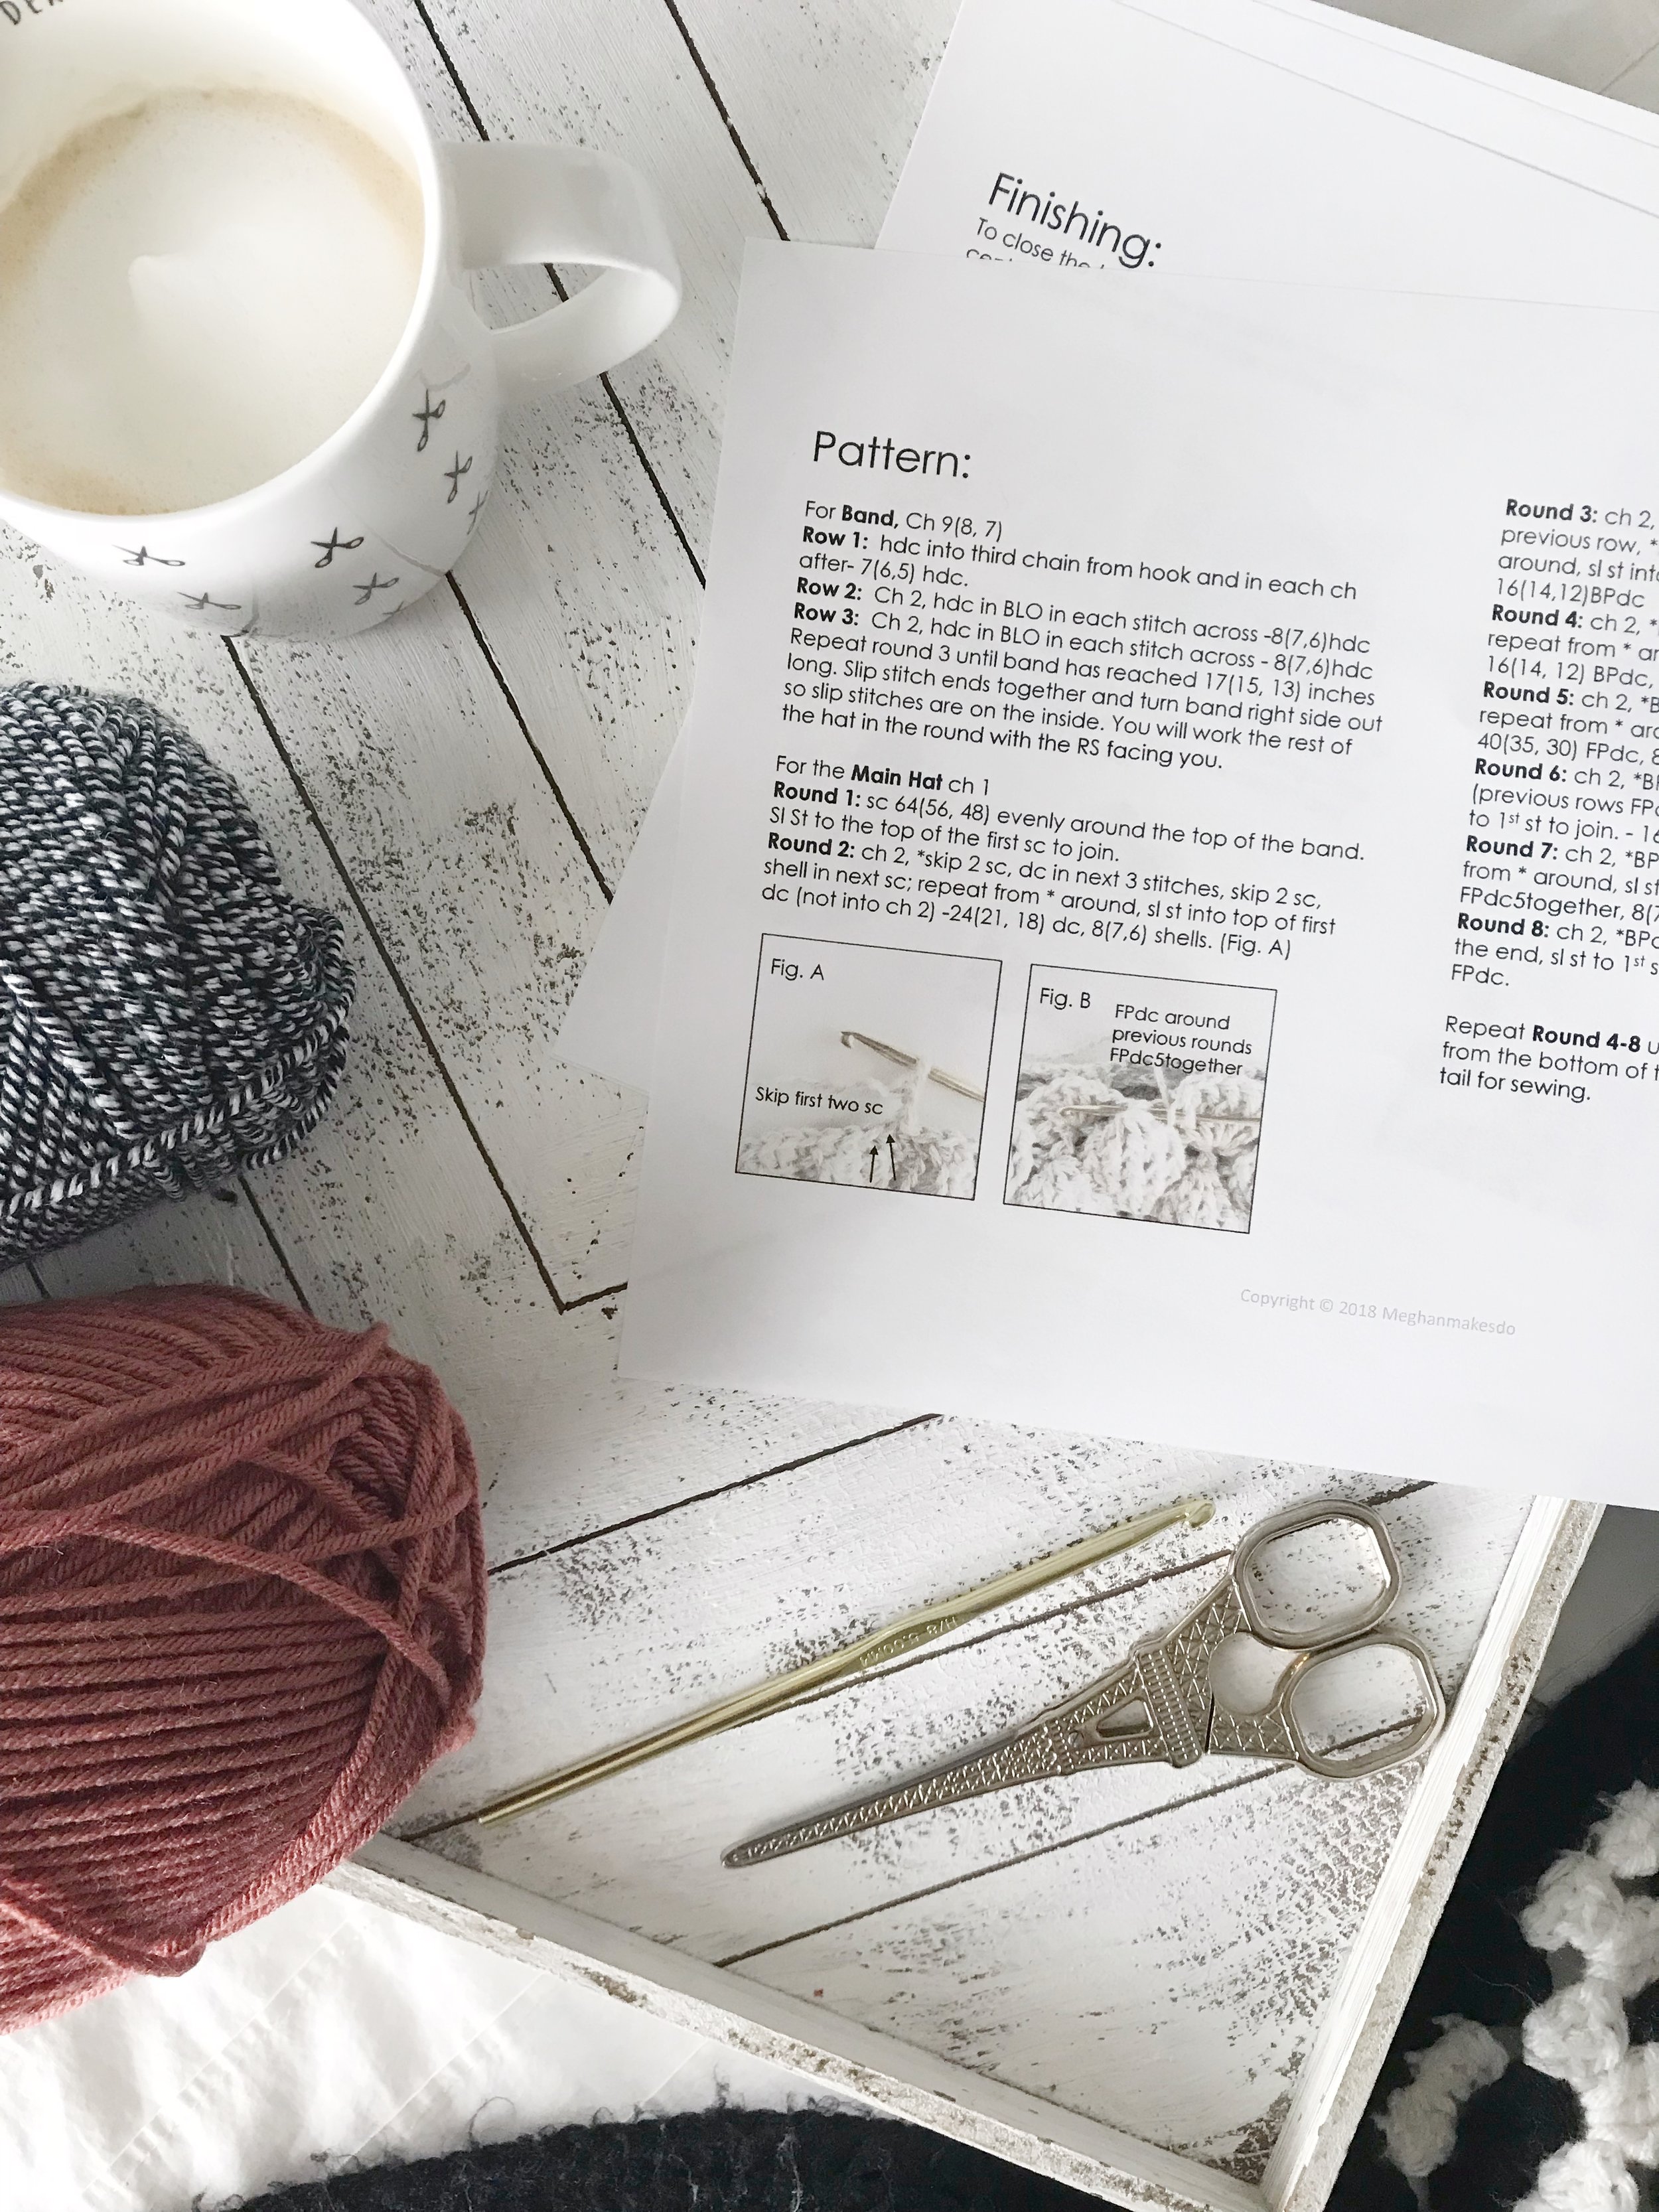
There may be times when writing a pattern that certain sections need a bit more explanation. Including some instructional photos in the actual pattern are always a good way to make things more clear. They can be in the margins or in the middle of the pattern or even on an index page before or after the written pattern. No matter where you put them it can be helpful to label them as Fig. A and then add that same figure letter at the end of the row the picture is showing. For example, if your pattern states, 2dc in last st, ch 1, turn. [Fig. A], that let’s the reader know to reference Fig. A for an example of what to do in that row. Then the picture that goes with that row will be labeled as Fig. A. You can also include arrows to specific stitches an extra instructions on the photos as well. See the picture below for an example of what instructional photos look like in a pattern.
10. Finishing Instructions
At the end of your pattern you will need to include any additional instructions for finishing the item. Does the piece need to be blocked? Do you need to seam up the garment? Include these instructions at the end so the reader is clear on any extra steps needed to make their item perfect. You can include photos here too just to make it even more clear. This is also a great place to include any special instructions for how to use the item, such as ways to style a scarf or shawl to make it look its best.
11. Copyright Disclosure
.Since copyright laws have a lot of grey areas it is best to always include a little disclosure at the end (or beginning) of your pattern. This will let people know that you have copyright on the pattern and gives them clear instructions on how they are able to use the pattern. Make sure to clearly state that your written pattern and images are copyrighted and that they may not be reproduced, redistributed or shared in any way. This is also a great spot to tell people whether it is okay to sell finished products made from your pattern. You can also include information on how to share their finished items with you, whether it is tagging you on social media or using a specific hashtag. Below is an example of what I usually put at the end of my patterns. Feel free to use it in yours as well!
“All images and patterns are copyright of [your business name]. You may sell any items that you make from this pattern. You may not use my images. Please do not copy, redistribute or claim as your own. If selling items from this pattern please give credit to the designer by linking to my website [www.yourwebsite.com] or on social media [@yoursocialmediahandle]
I would love to see what you create. Use [#yourbusinesstag] or [#specificpatterntag] to share.”
Phew! Okay, I think that just about covers all the essentials you will need to have in your crochet or knit patterns. As always, if you have any questions or suggestions on other things I may have missed, I’d love to hear from you. Comment below or send me an e-mail. I hope that you found all the information here helpful. I can’t wait to start seeing all the amazing patterns you will create!
Happy Pattern Writing!
Meghan