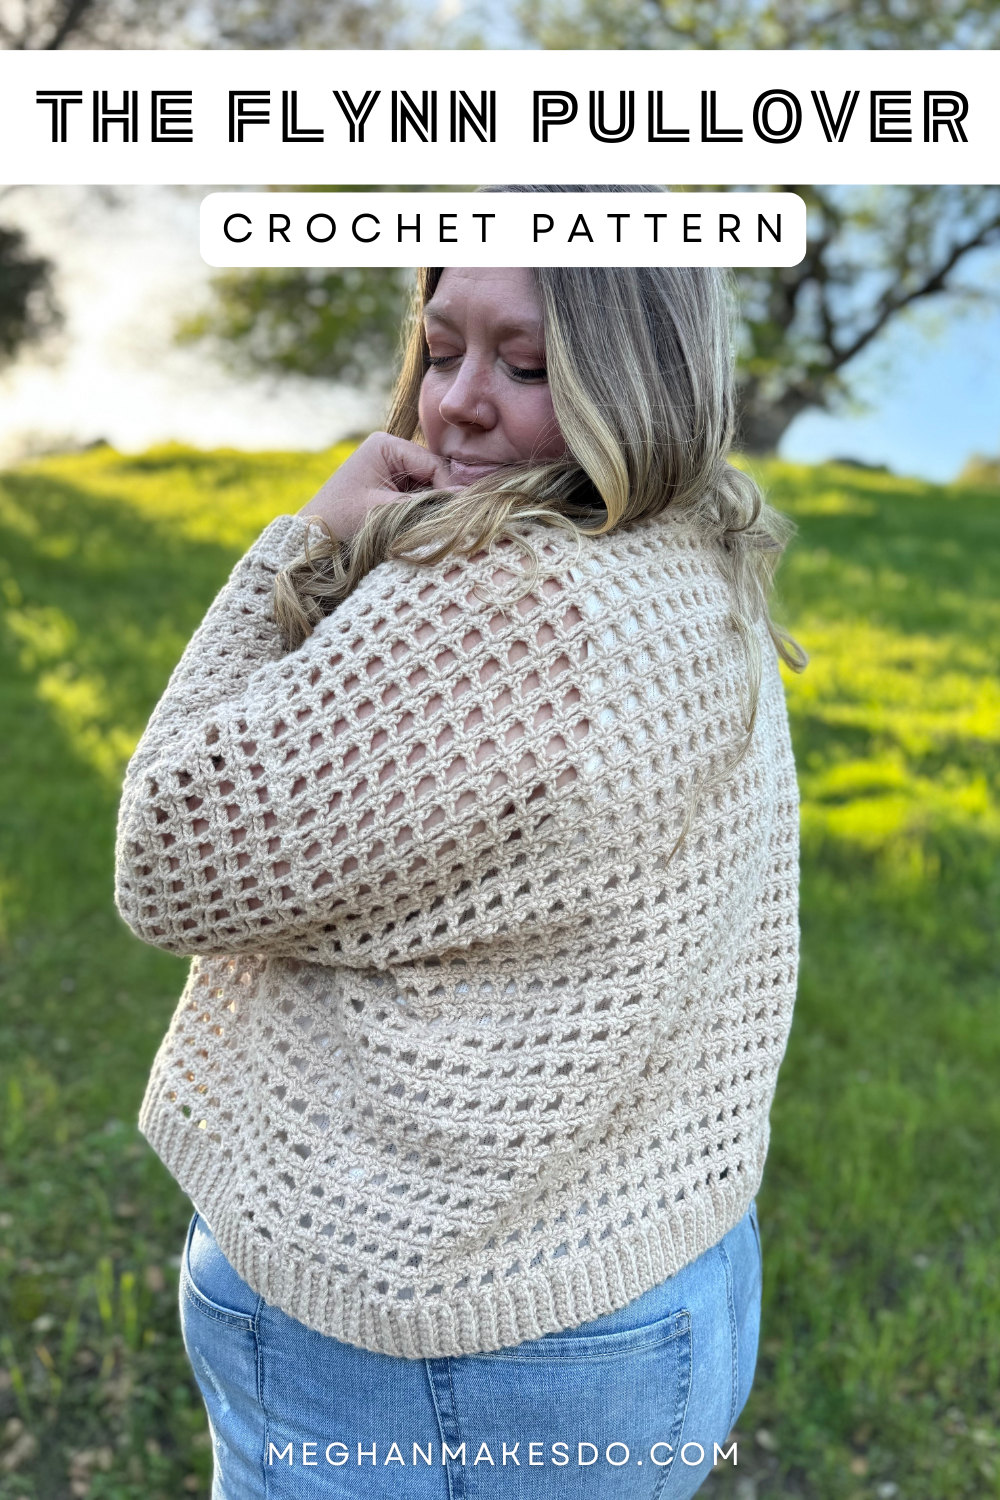
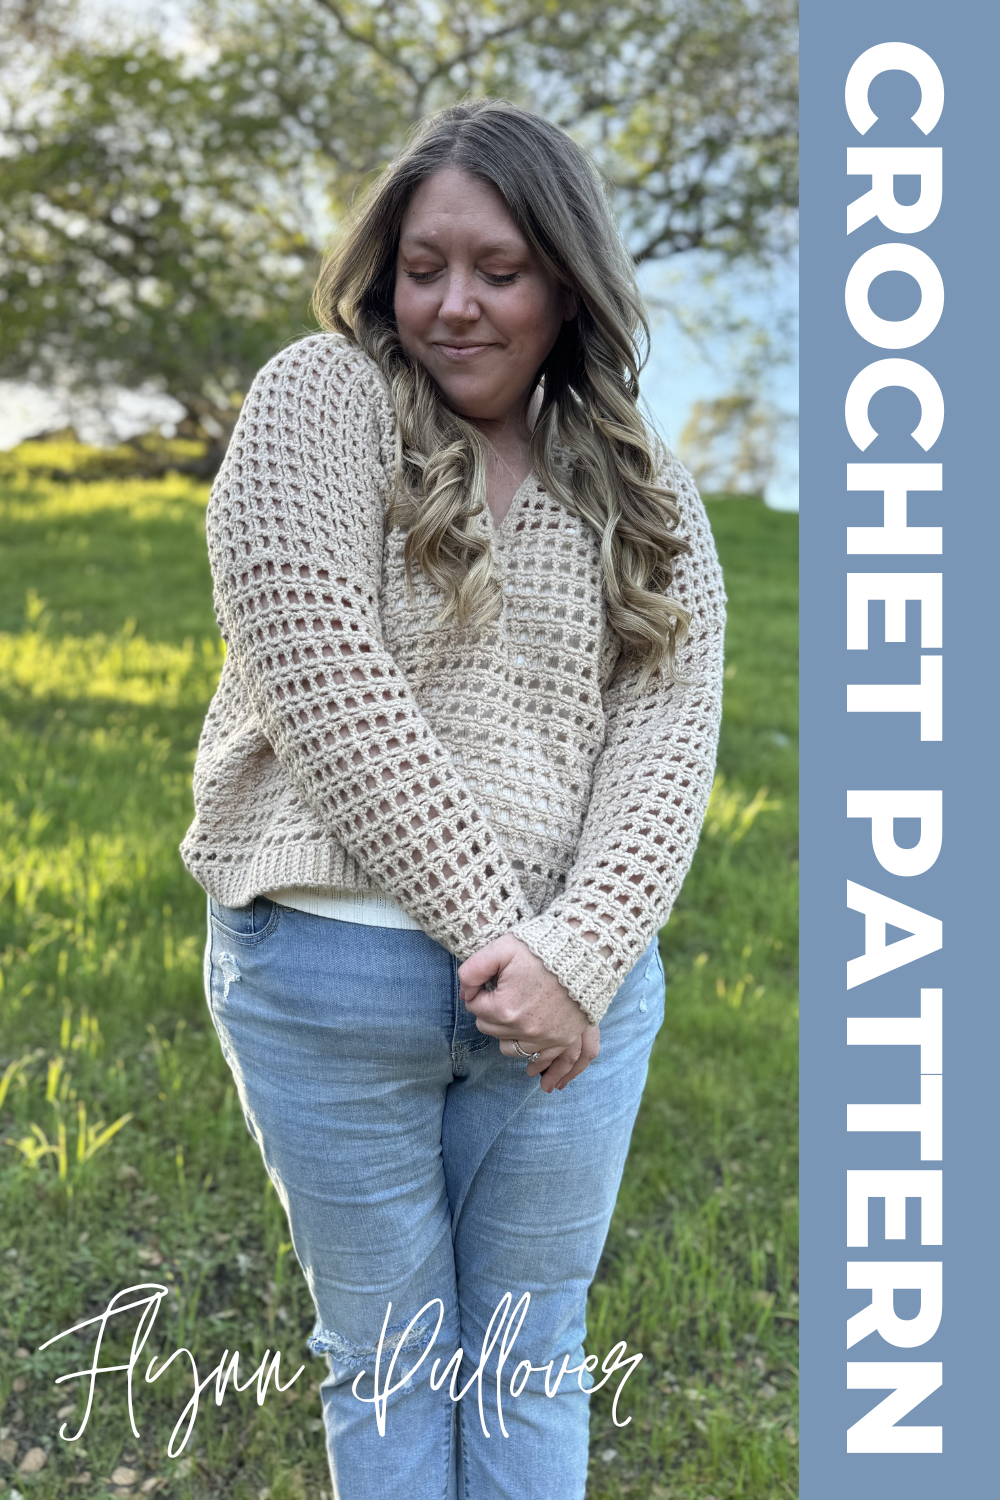
The Flynn Pullover- Free Crochet Pattern
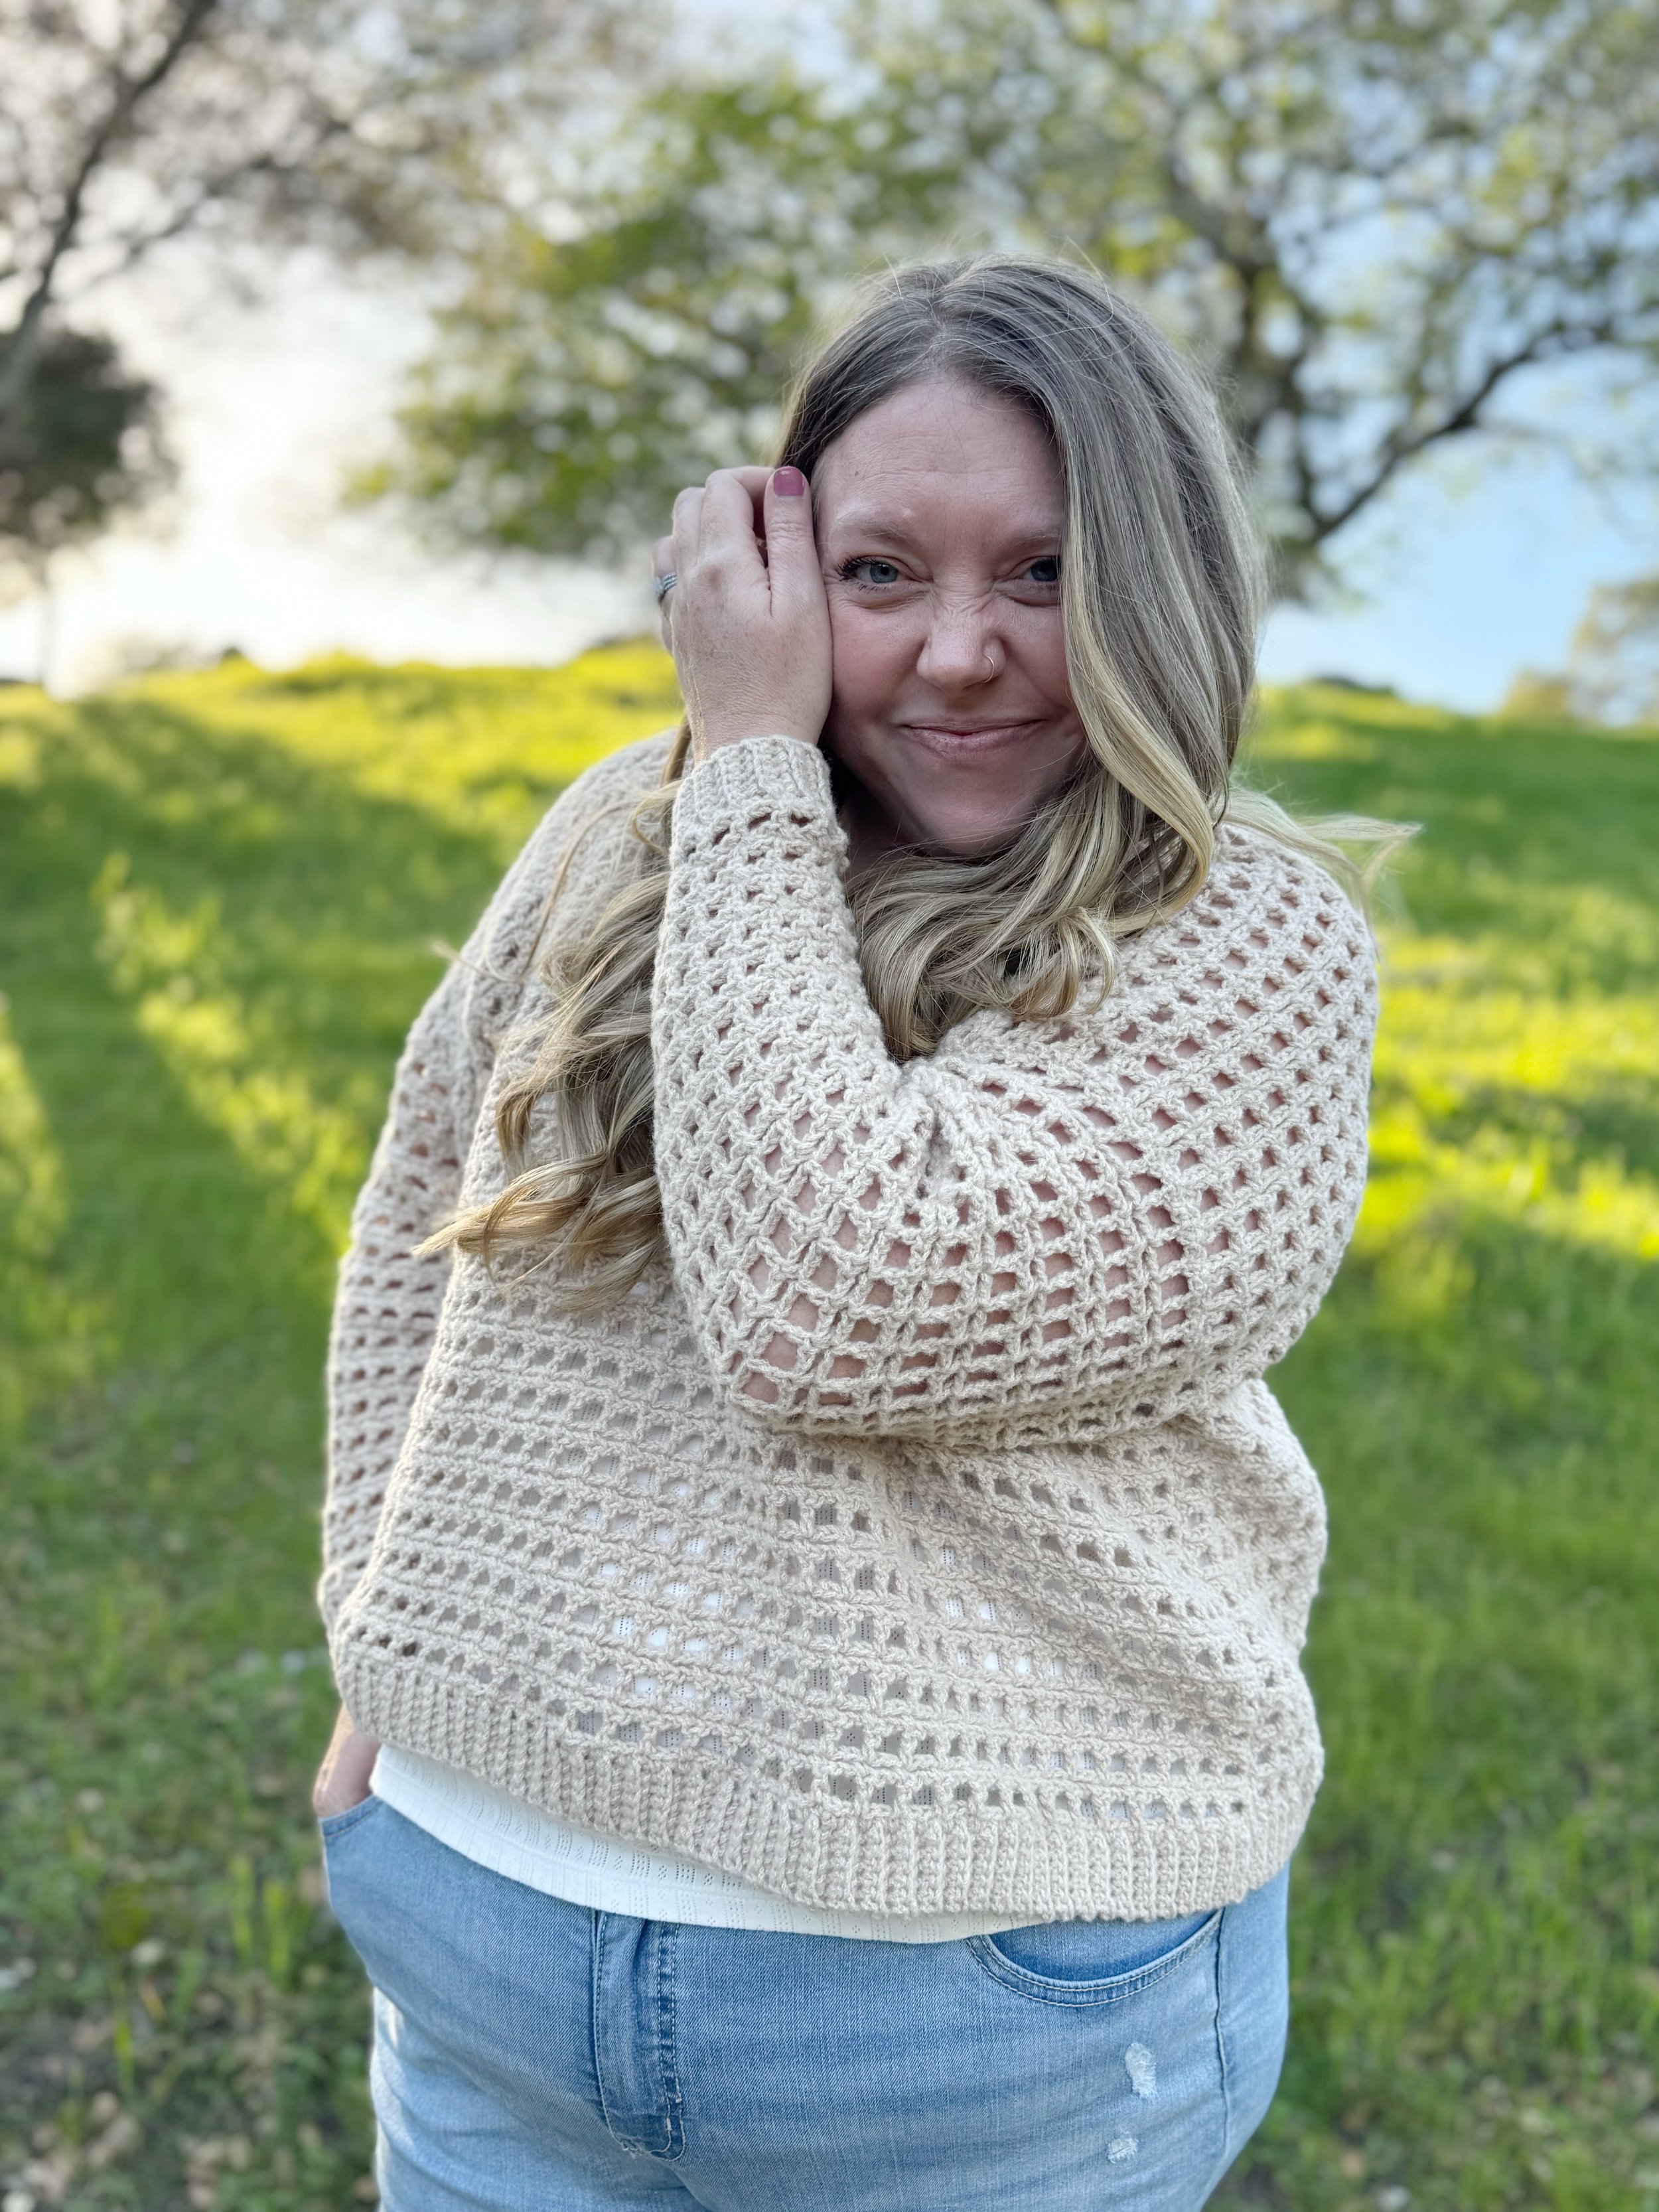
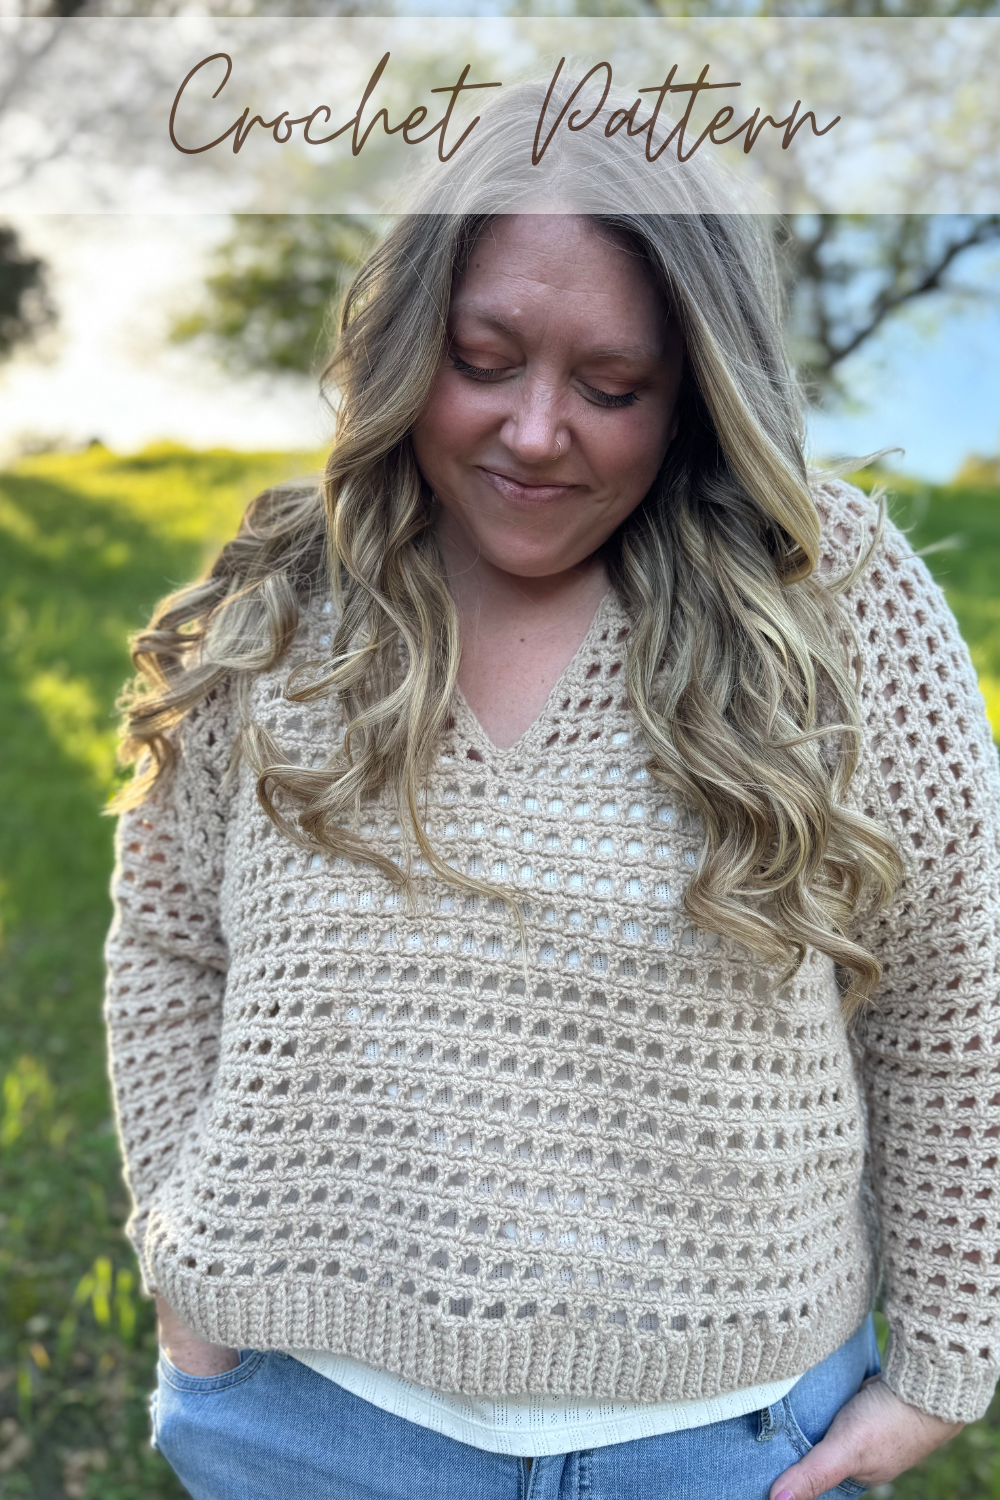
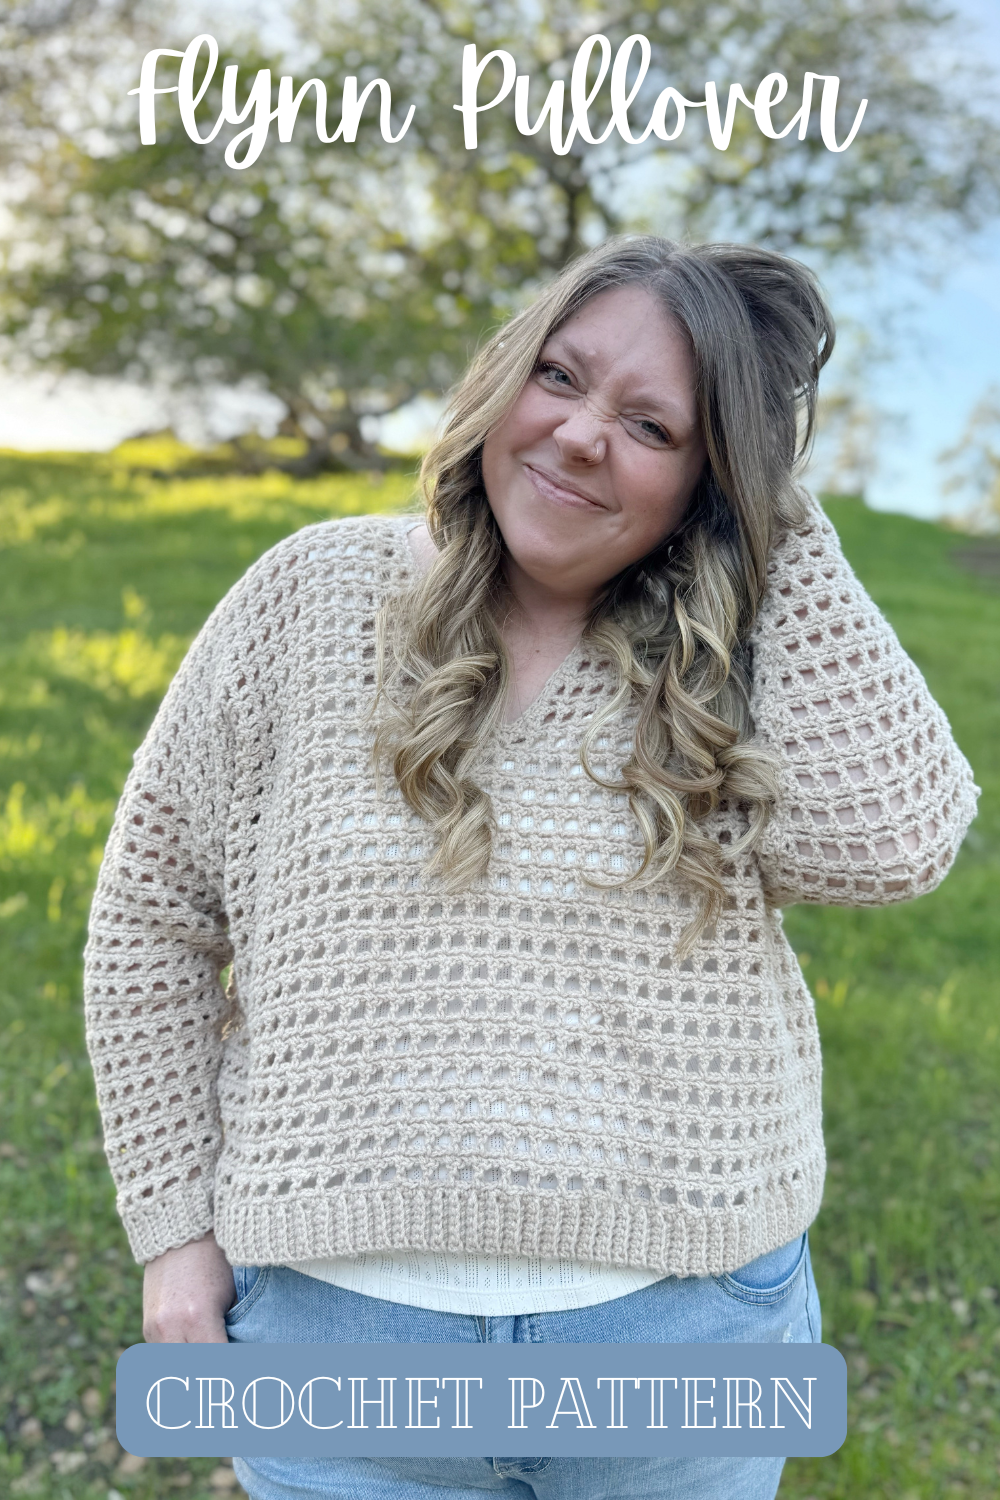
The Flynn Pullover is a classic, easy-to-wear sweater that takes everything you love about the Flynn Cardigan and turns it into a timeless pullover silhouette. Made with Lion Brand Re-Make, this version has beautiful drape, a soft feel, and cozy vibes. It’s a versatile wardrobe staple that’s just as fun to make as it is to wear. Keep scrolling for the free version, get a digital PDF version in my shop or treat yourself to the complete kit from Lion Brand Yarn.
Can you believe it’s already been two years since I first released the Flynn Cardigan? Time is such a funny thing because it really doesn’t feel like it was that long ago I was swatching and figuring out the decreases for the front panel shaping. I knew as soon as I finished, I wanted to revisit it in the future as a pullover sweater. Luckily I found the time this year to make that a reality.
If you loved the original Flynn Cardigan, I’m so excited to introduce you to its cozier, slightly simpler sister: the Flynn Pullover. I wanted a sweater version that felt just as classic and wearable, but even more streamlined to make. The result is a timeless crochet pullover that’s approachable, size-inclusive, and designed to live in your everyday wardrobe.
This version keeps everything you loved about the cardigan but skips the button band making it an even more beginner-friendly project.
About the Design
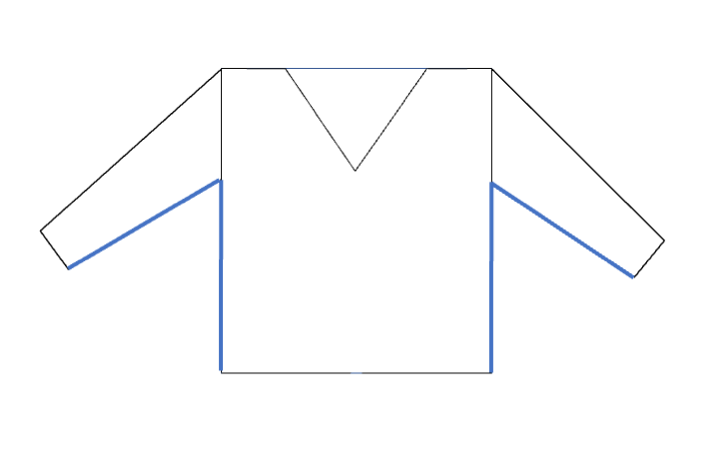
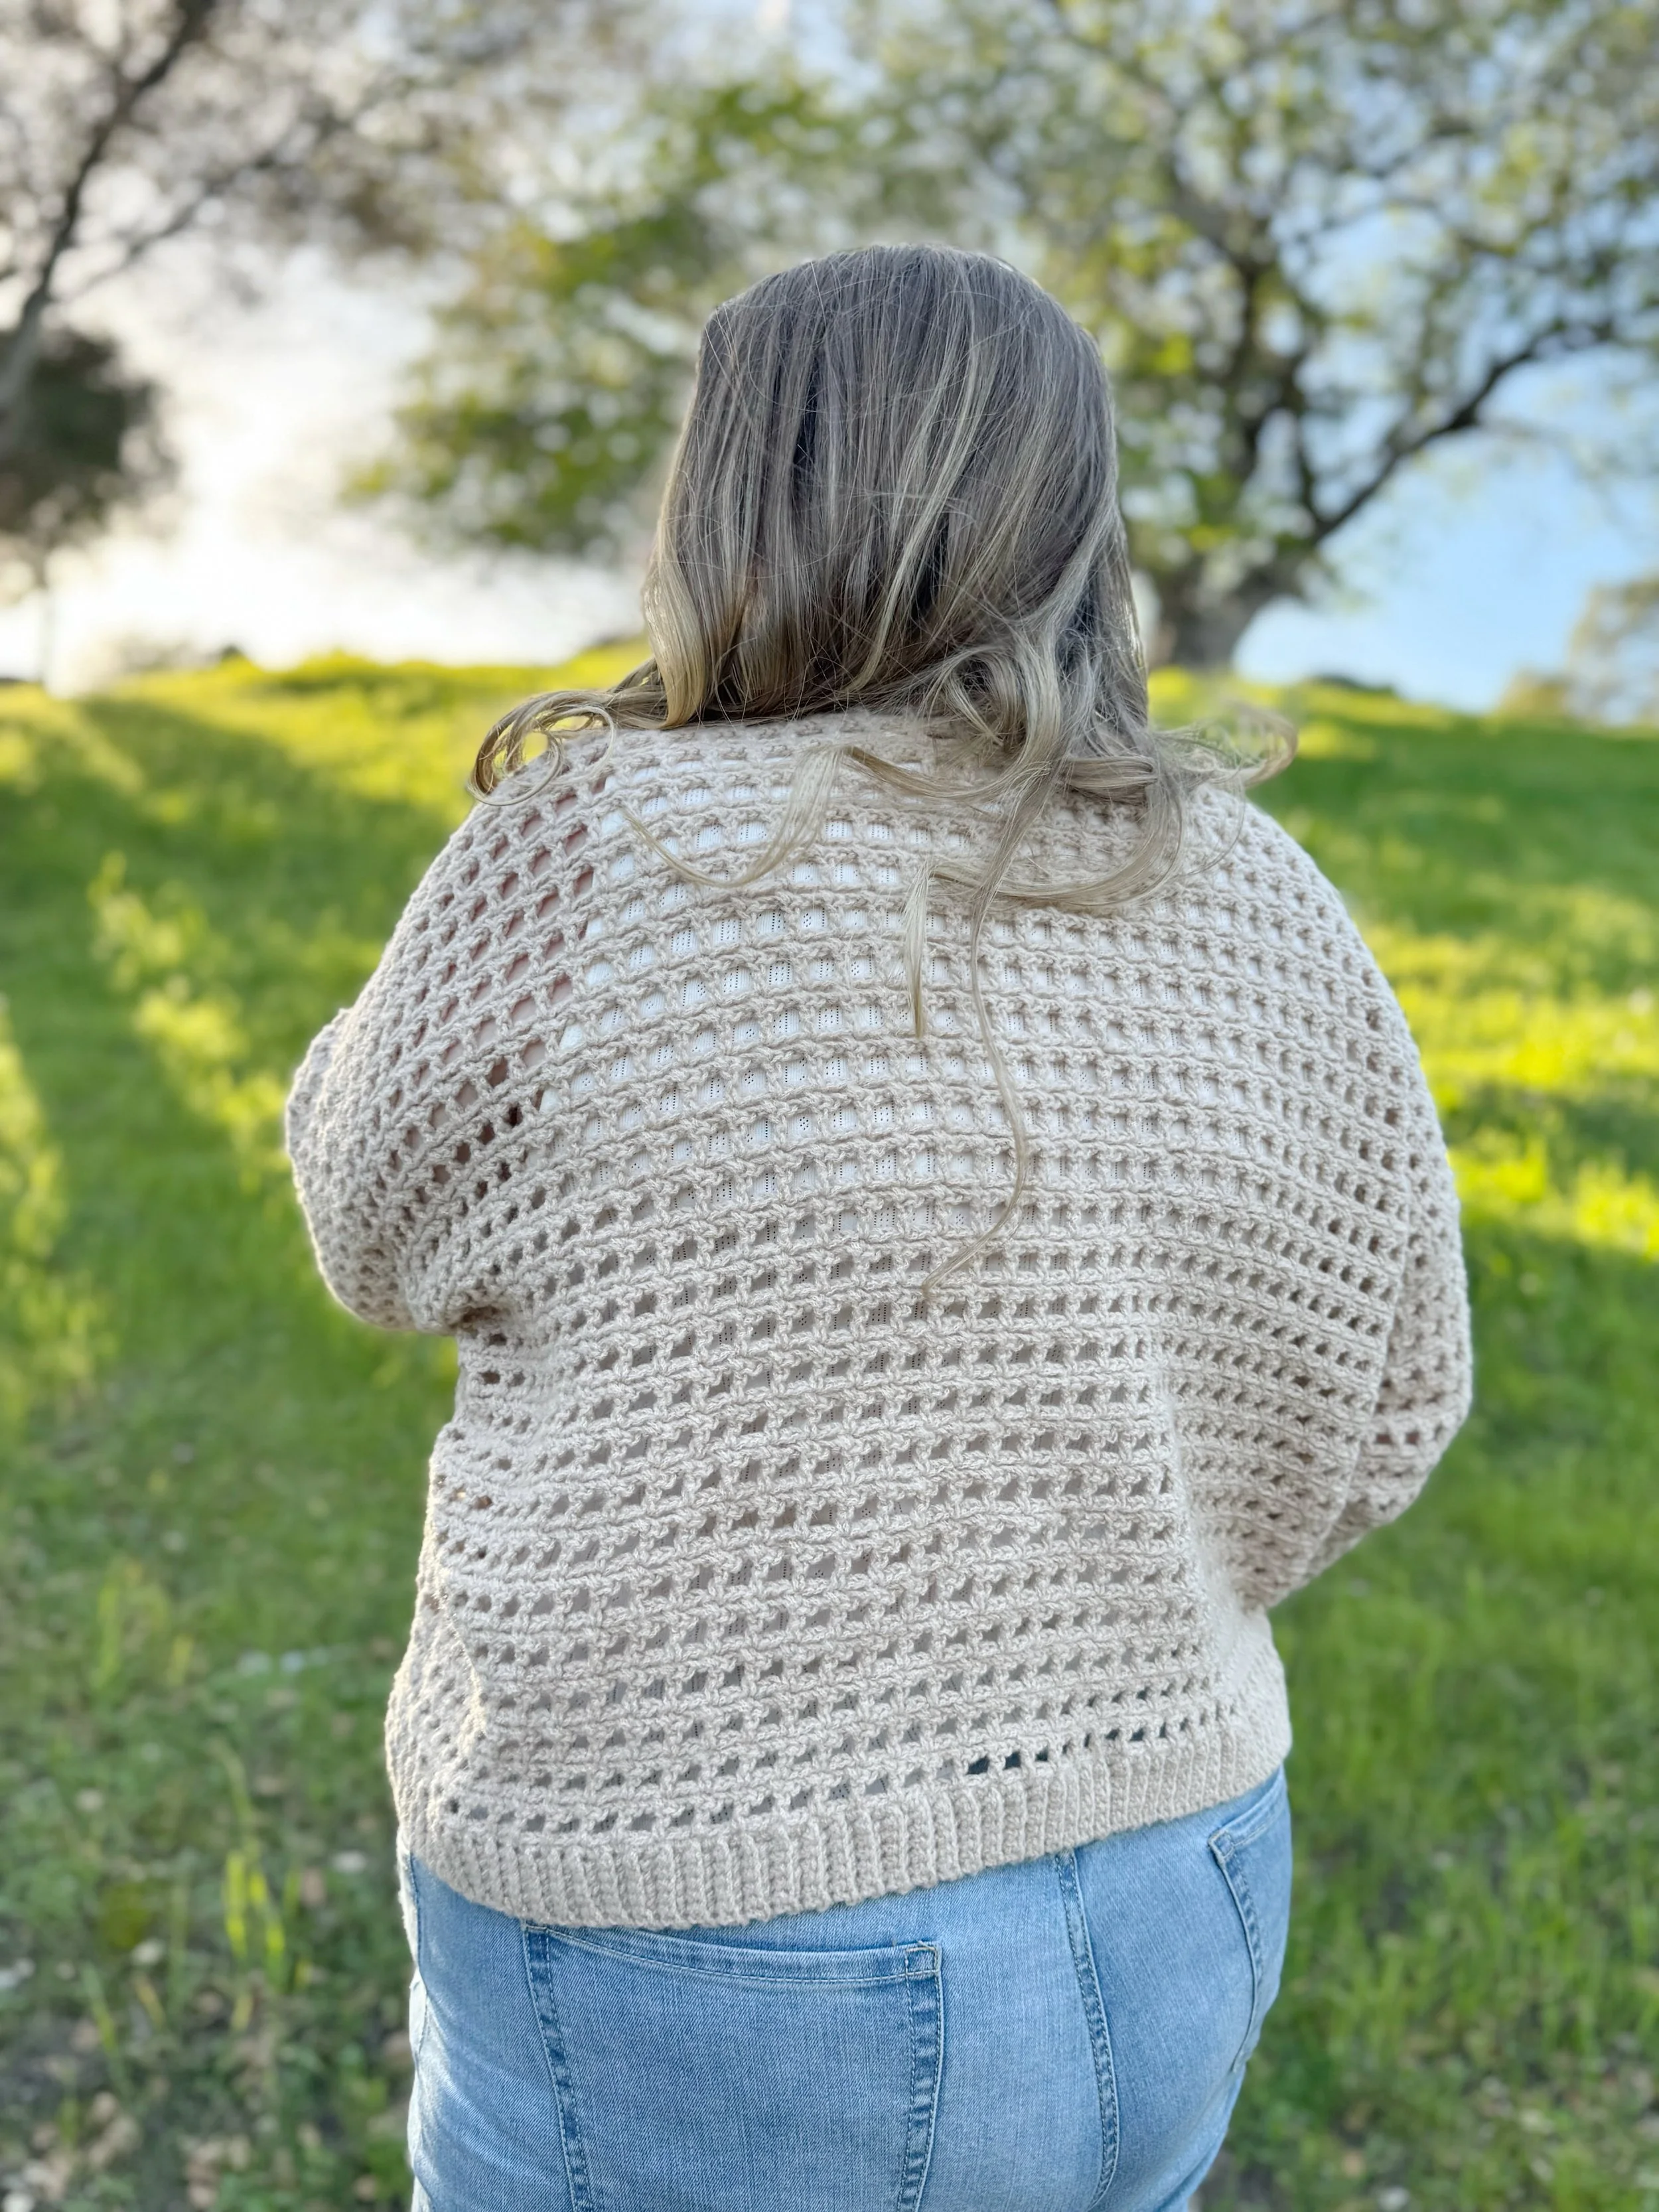
The Flynn Pullover is a bottom-up crochet sweater worked in four panels and seamed together for a structured, polished finish. The collar is added last, giving it a clean neckline that doesn’t take away from the beautiful stitches of the rest of the sweater.
Because it’s constructed in simple panels, this sweater is straightforward and repetitive in the best way. If you can crochet basic stitches, decrease and seam, you can make this sweater.
The fit is relaxed and comfortable and is easily adjustable to suit your body.
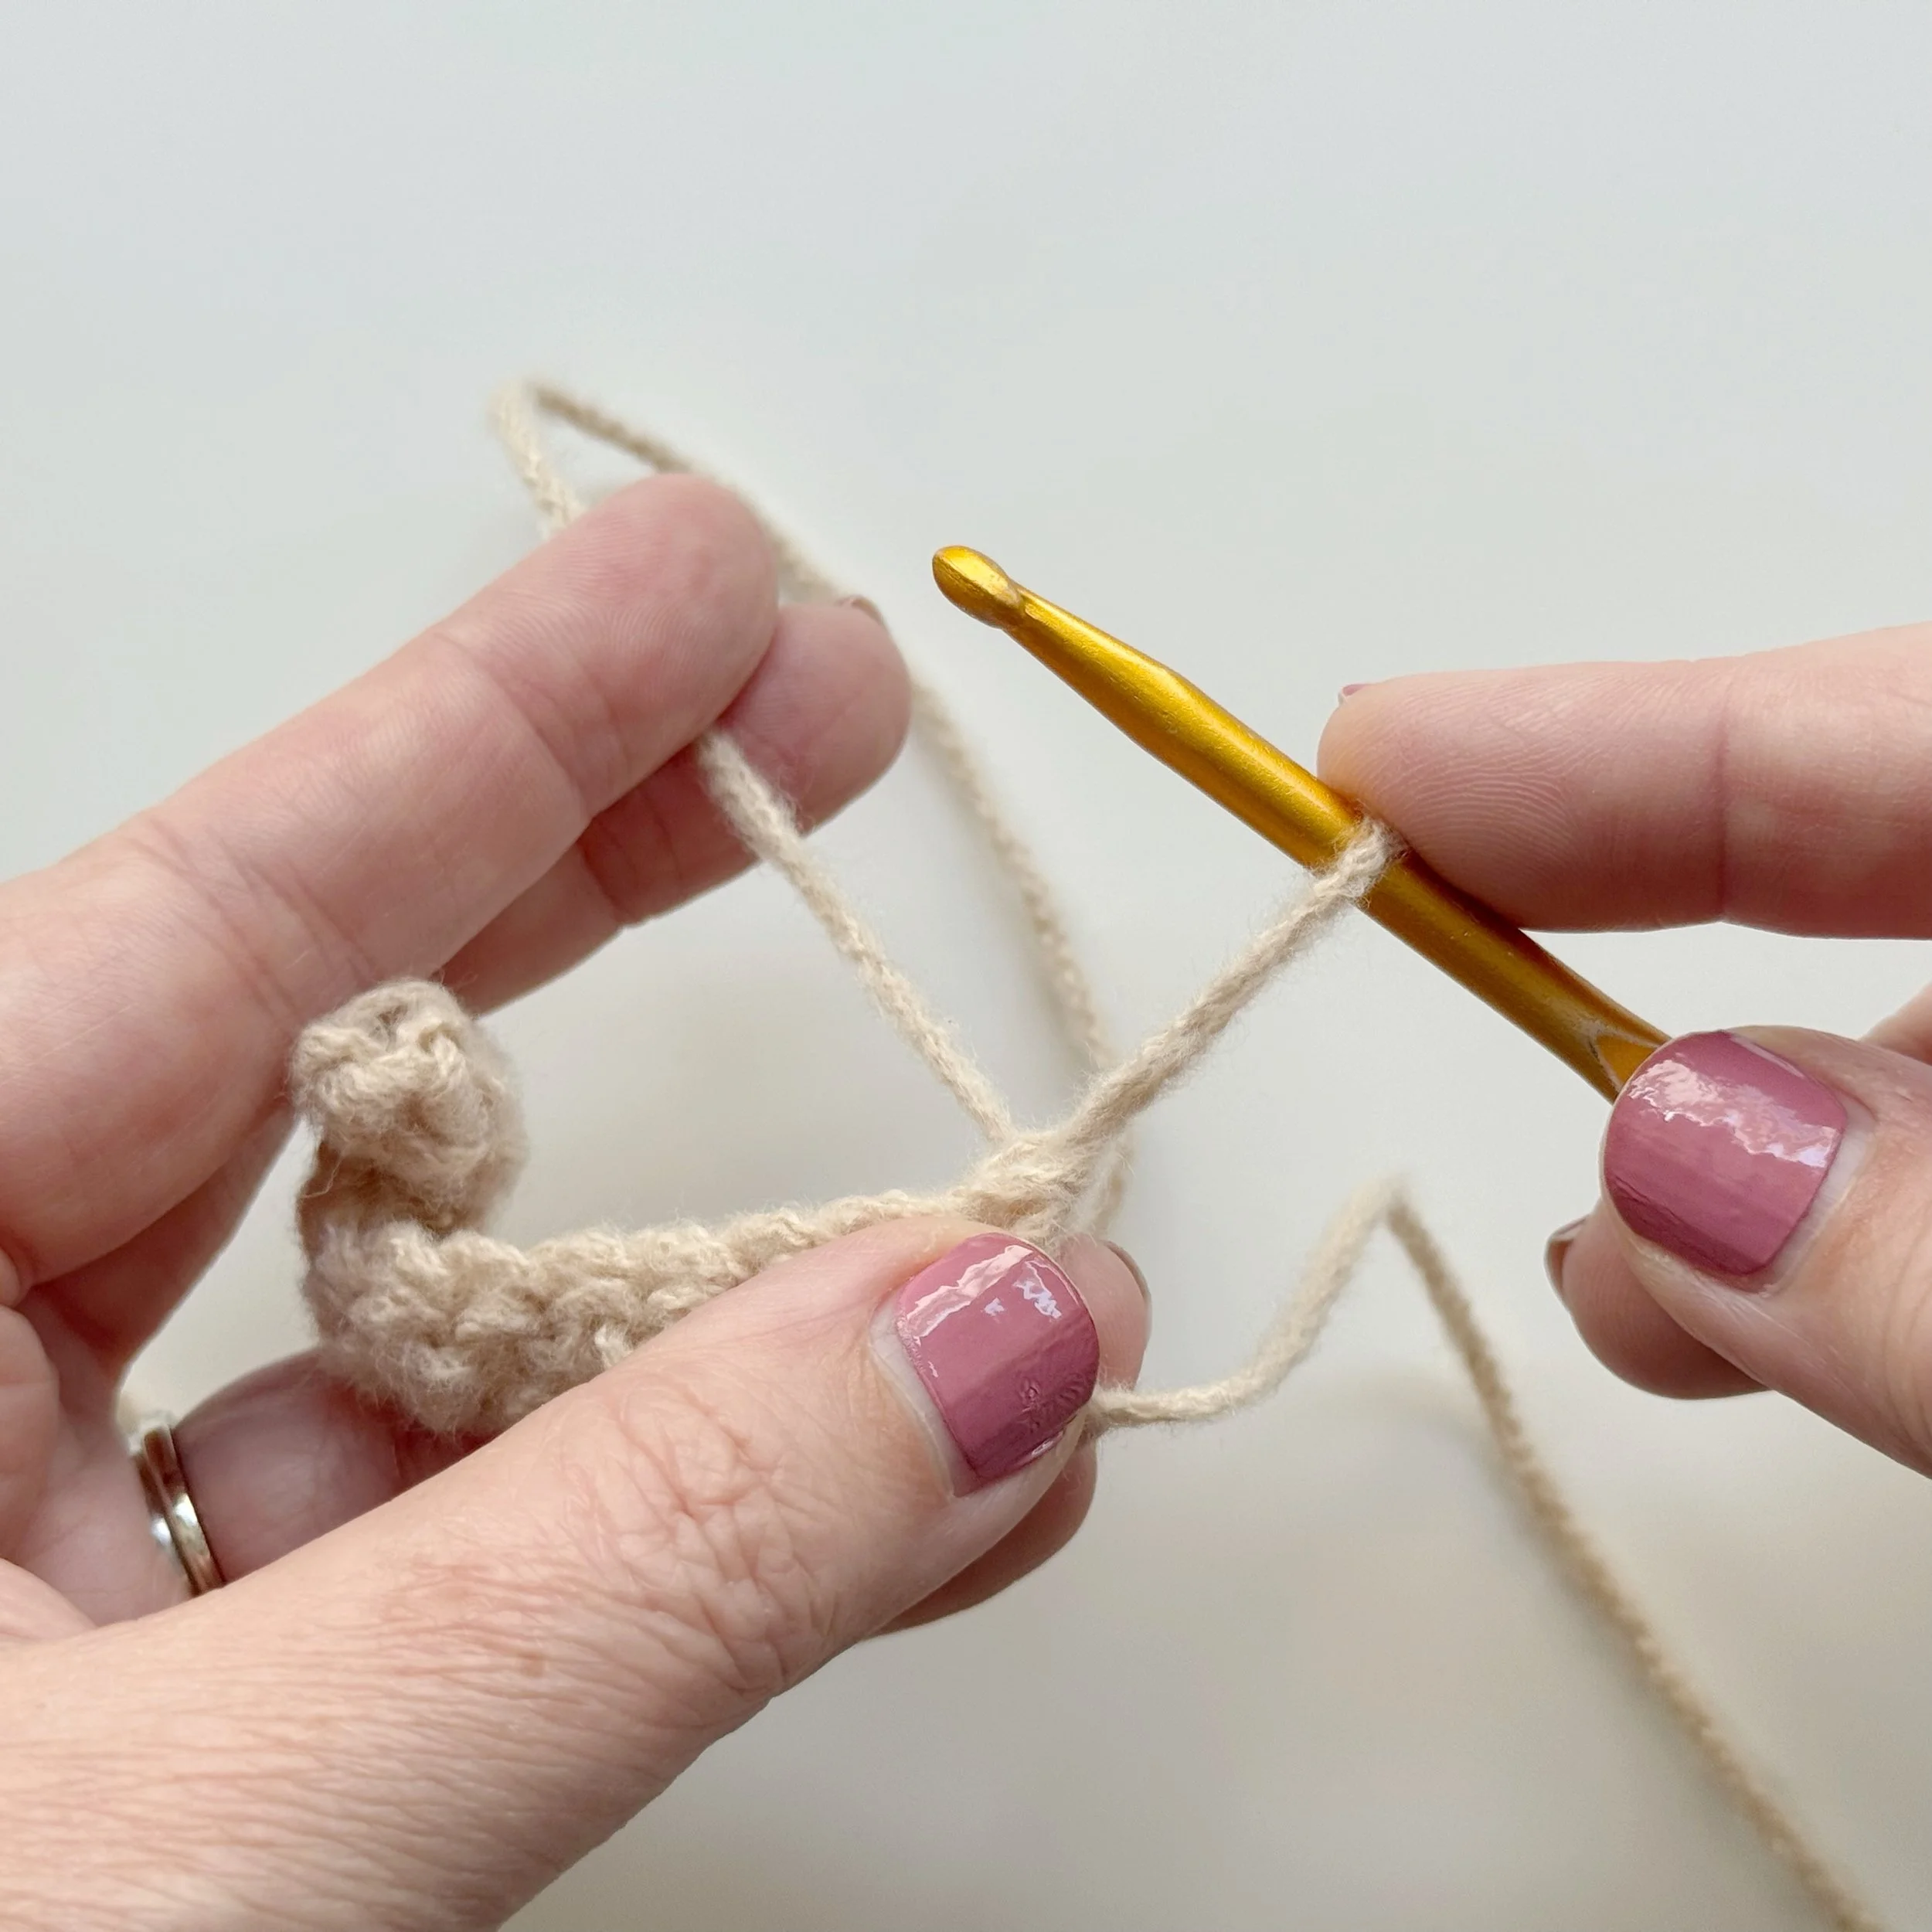
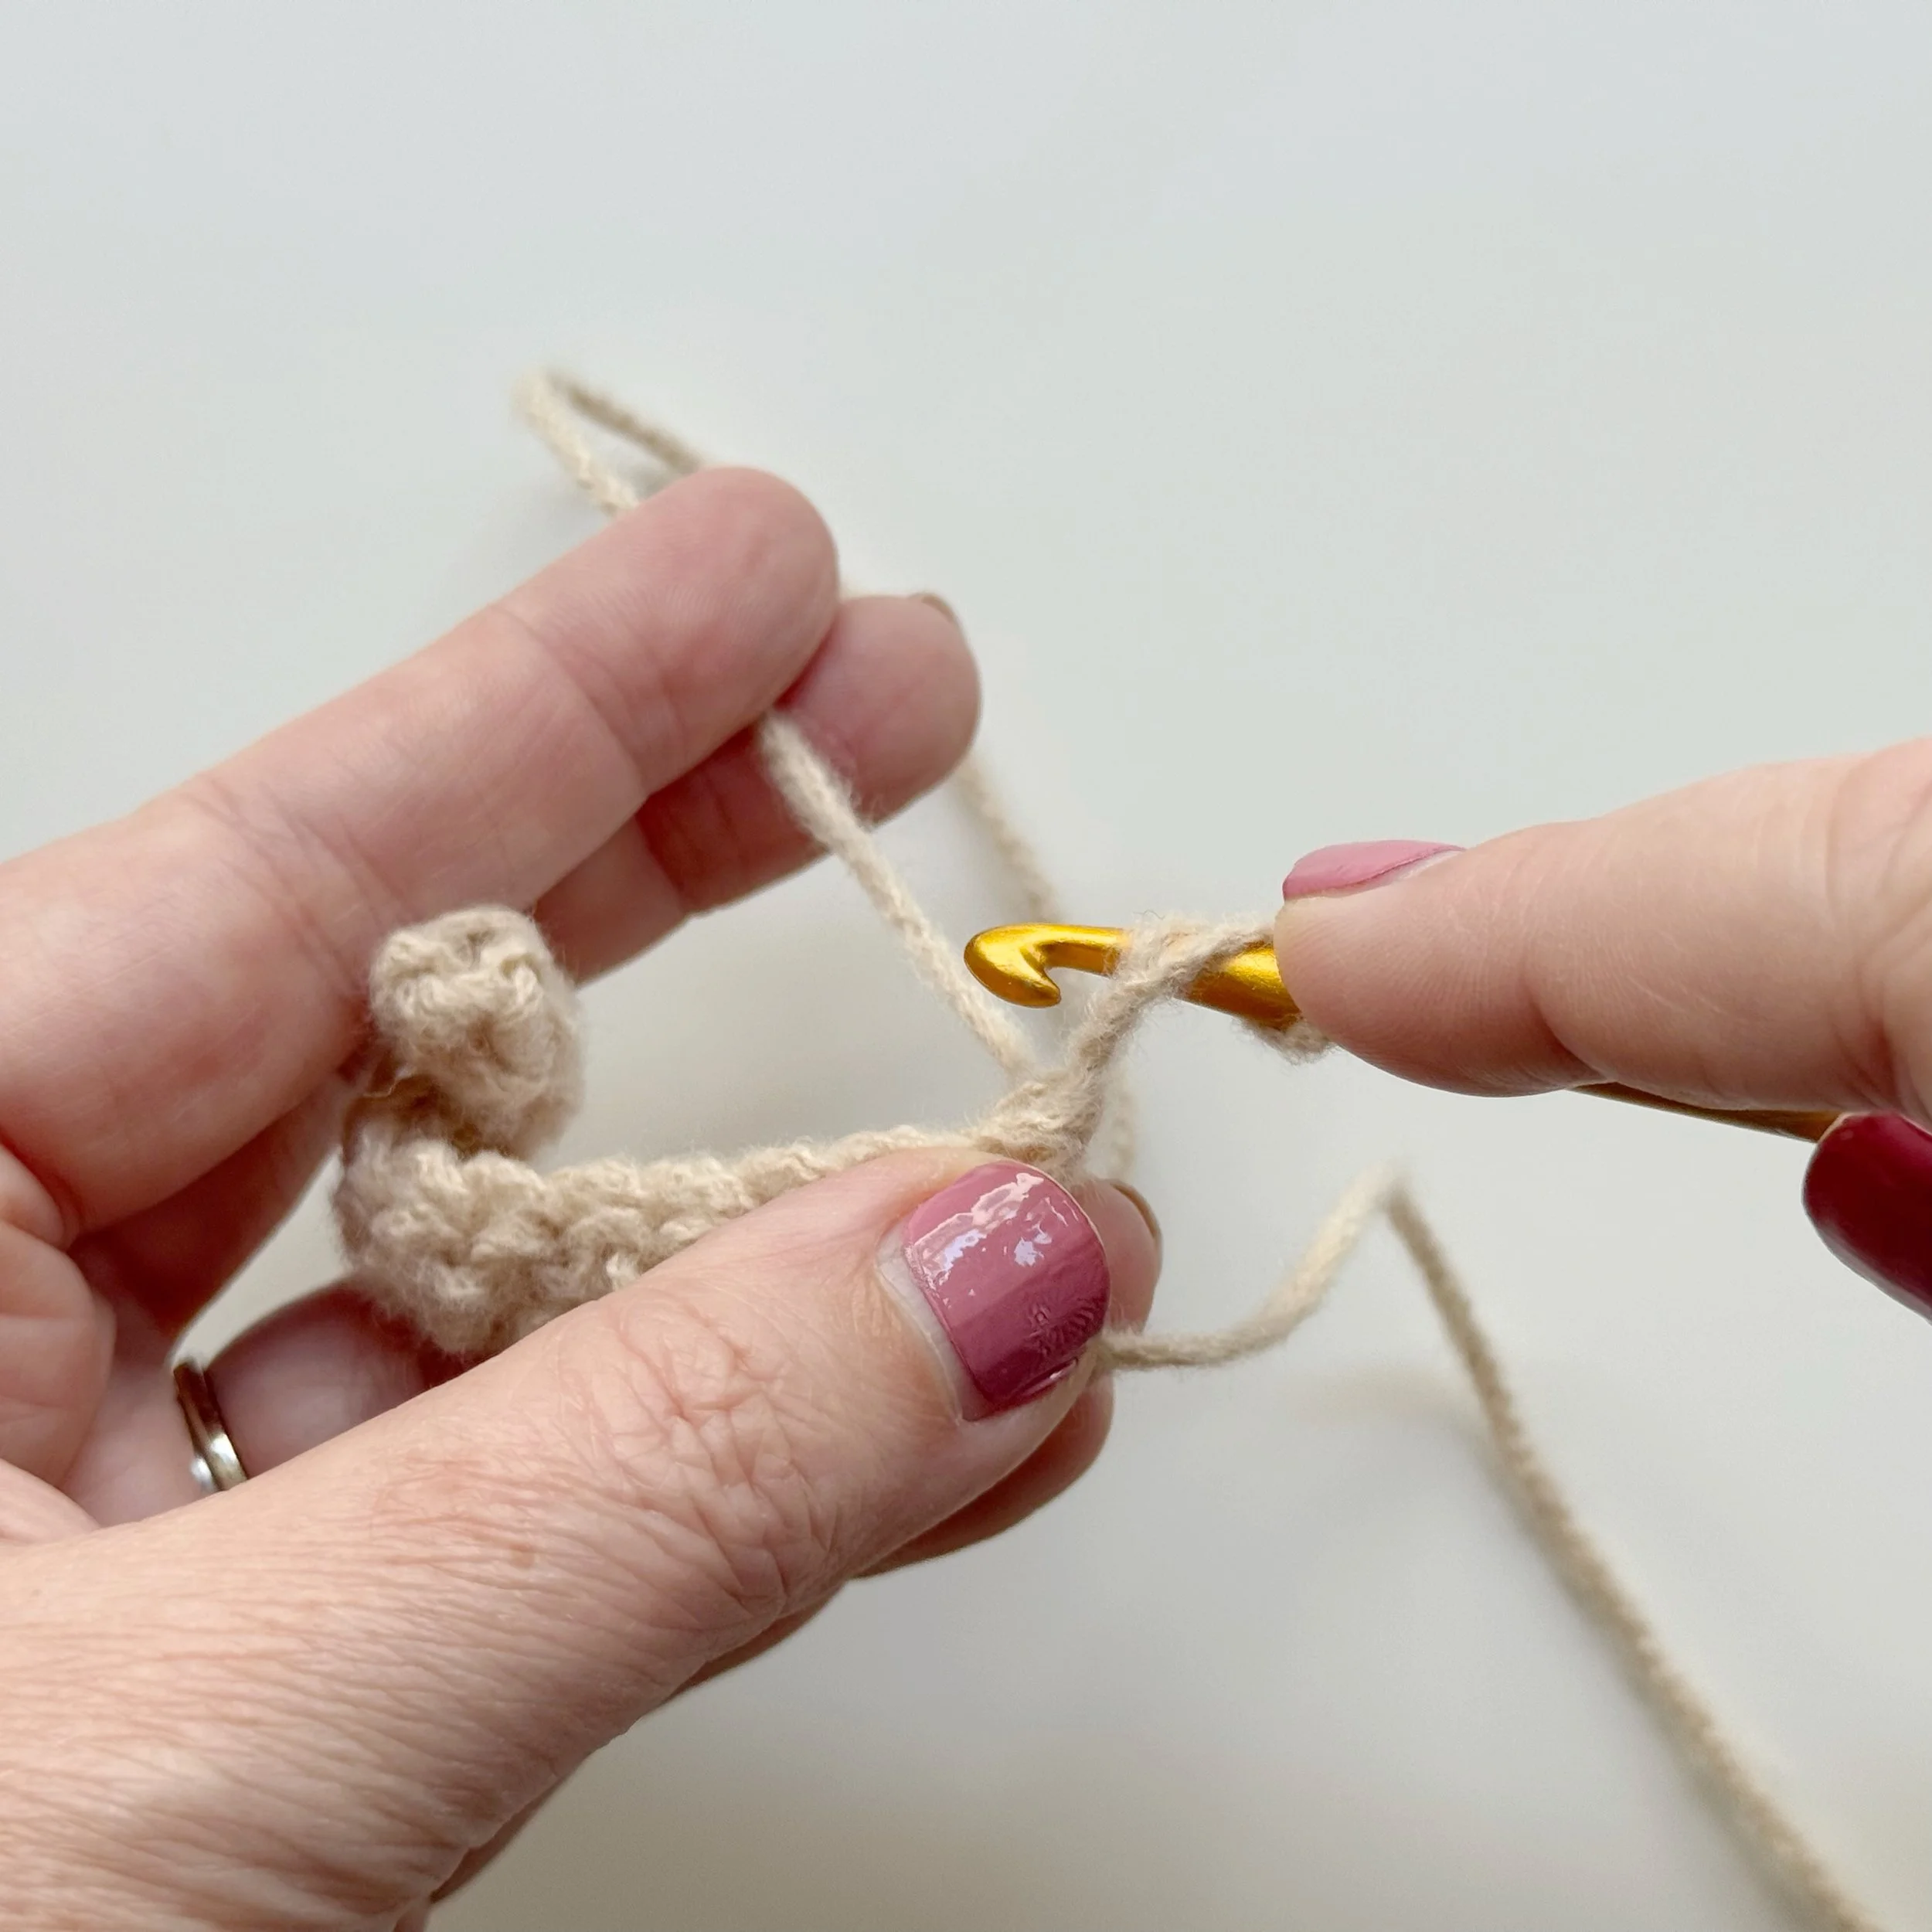
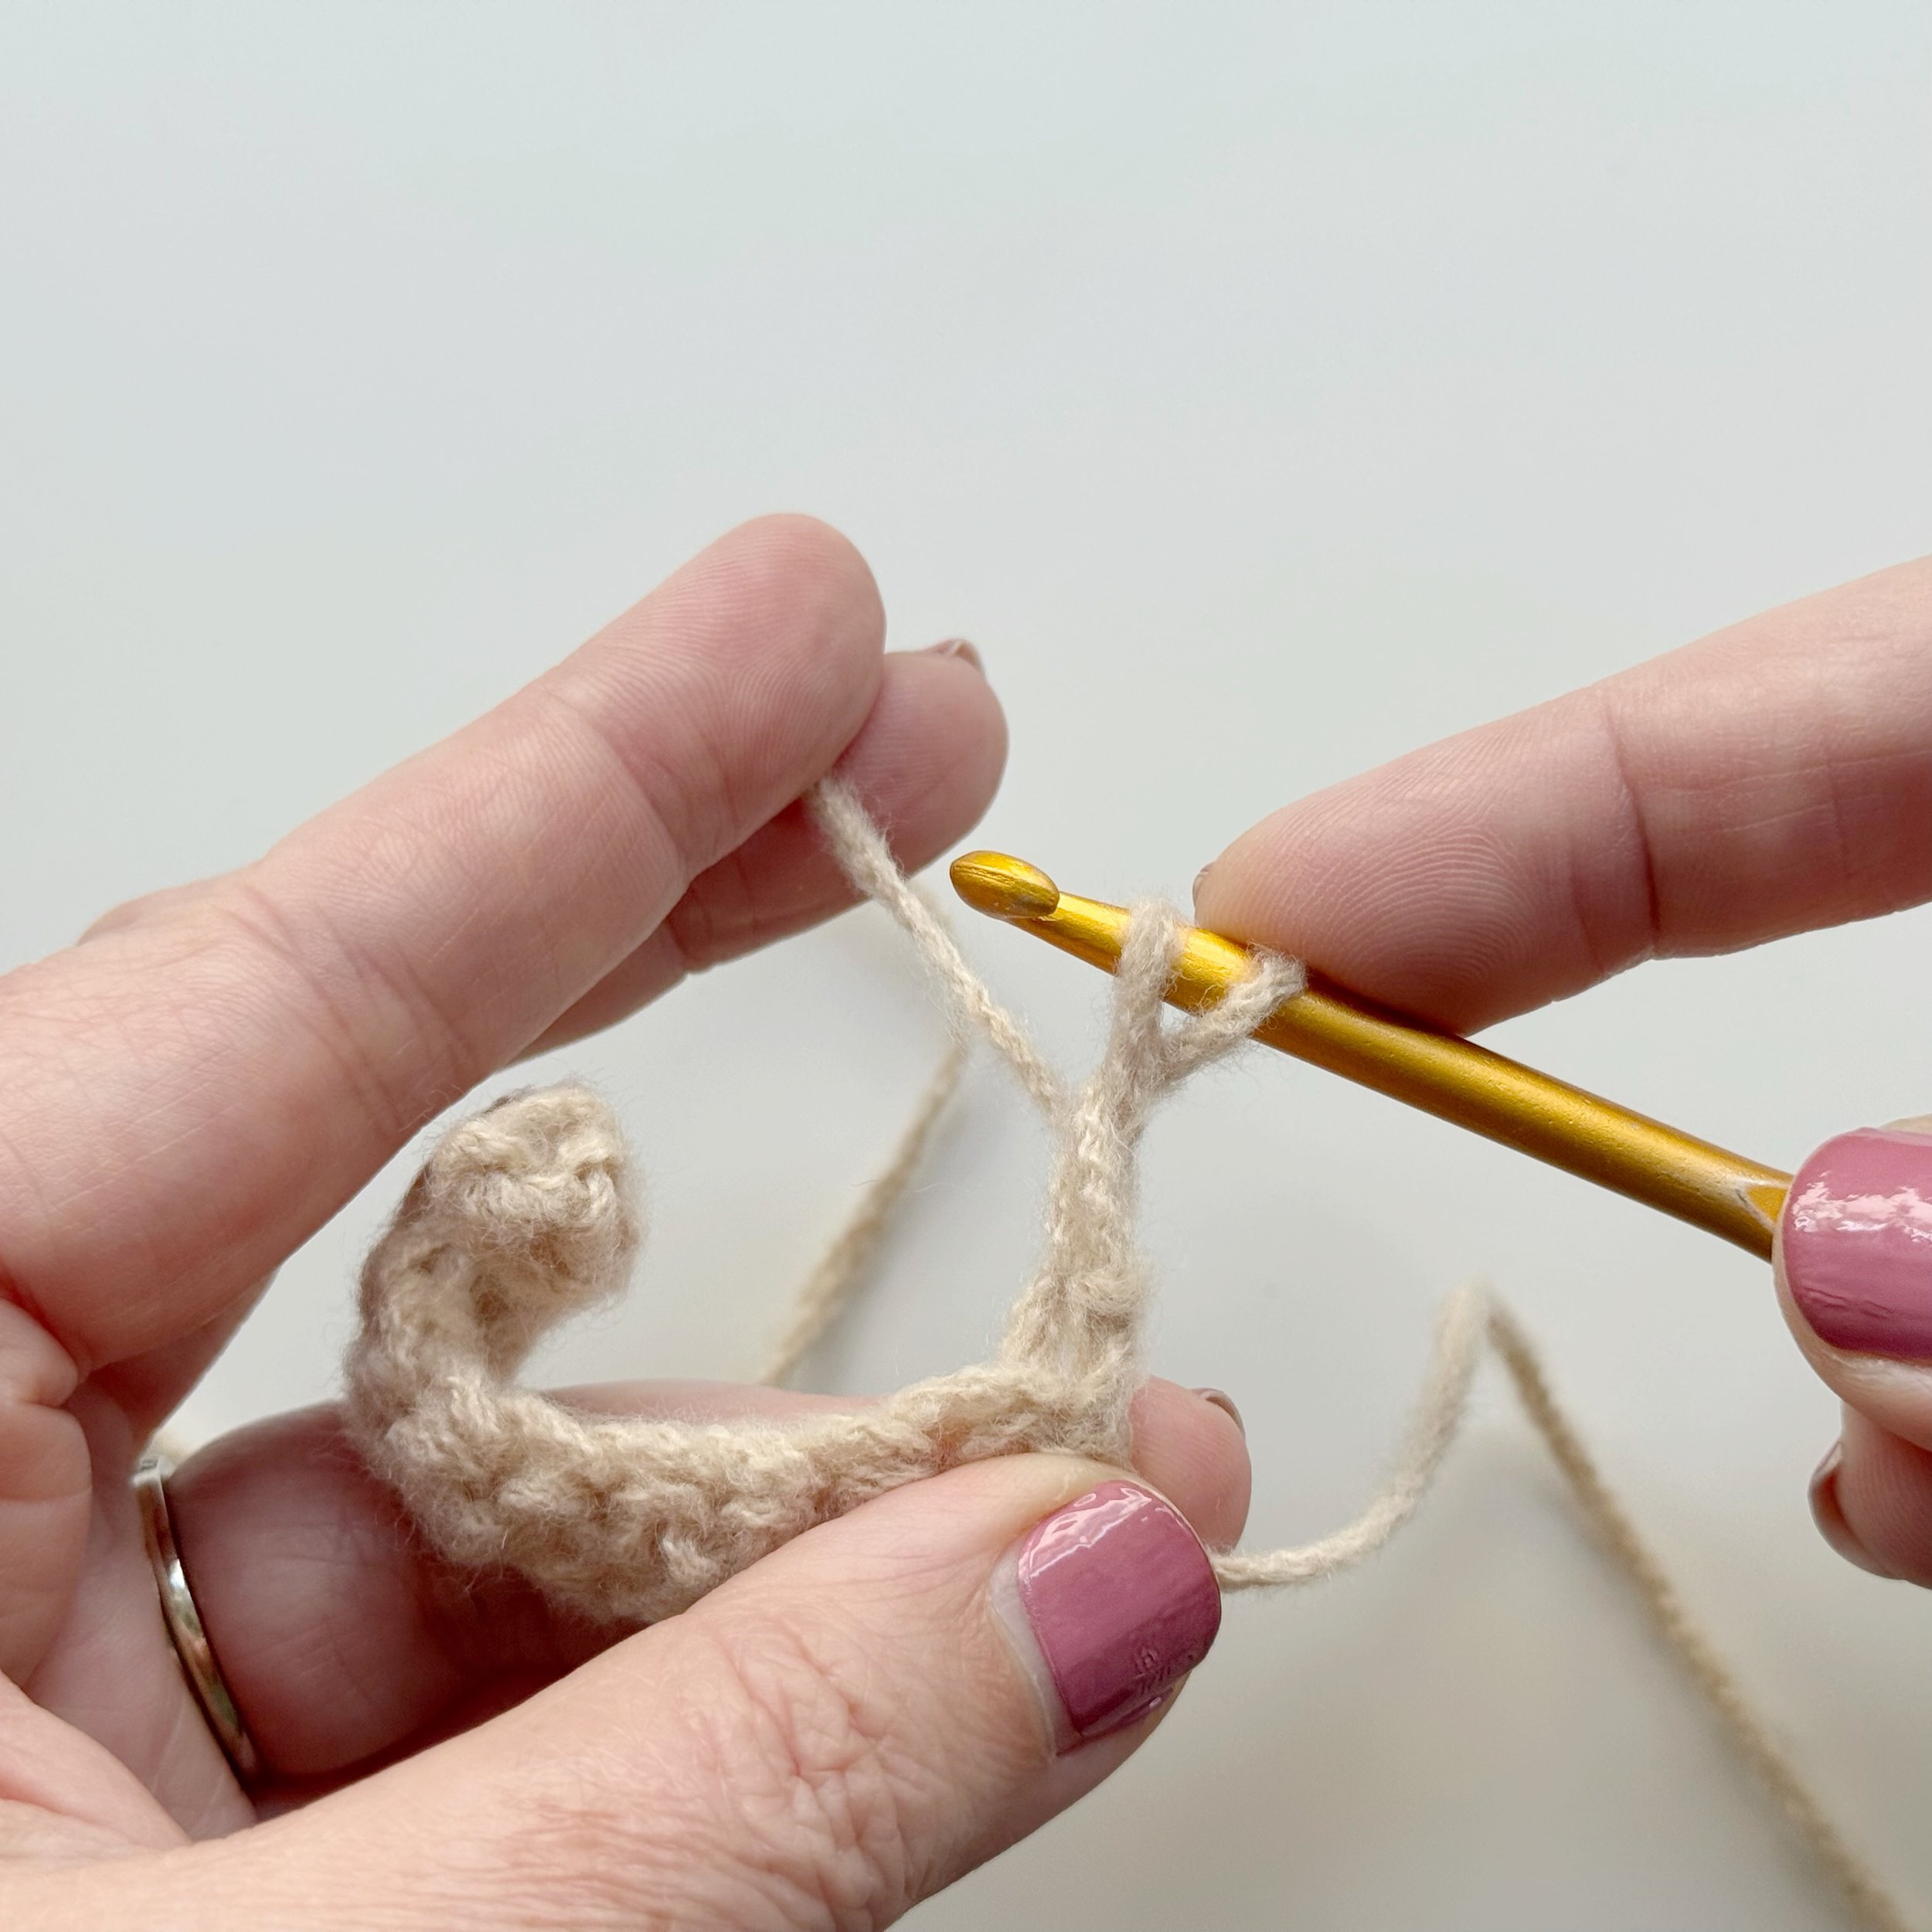
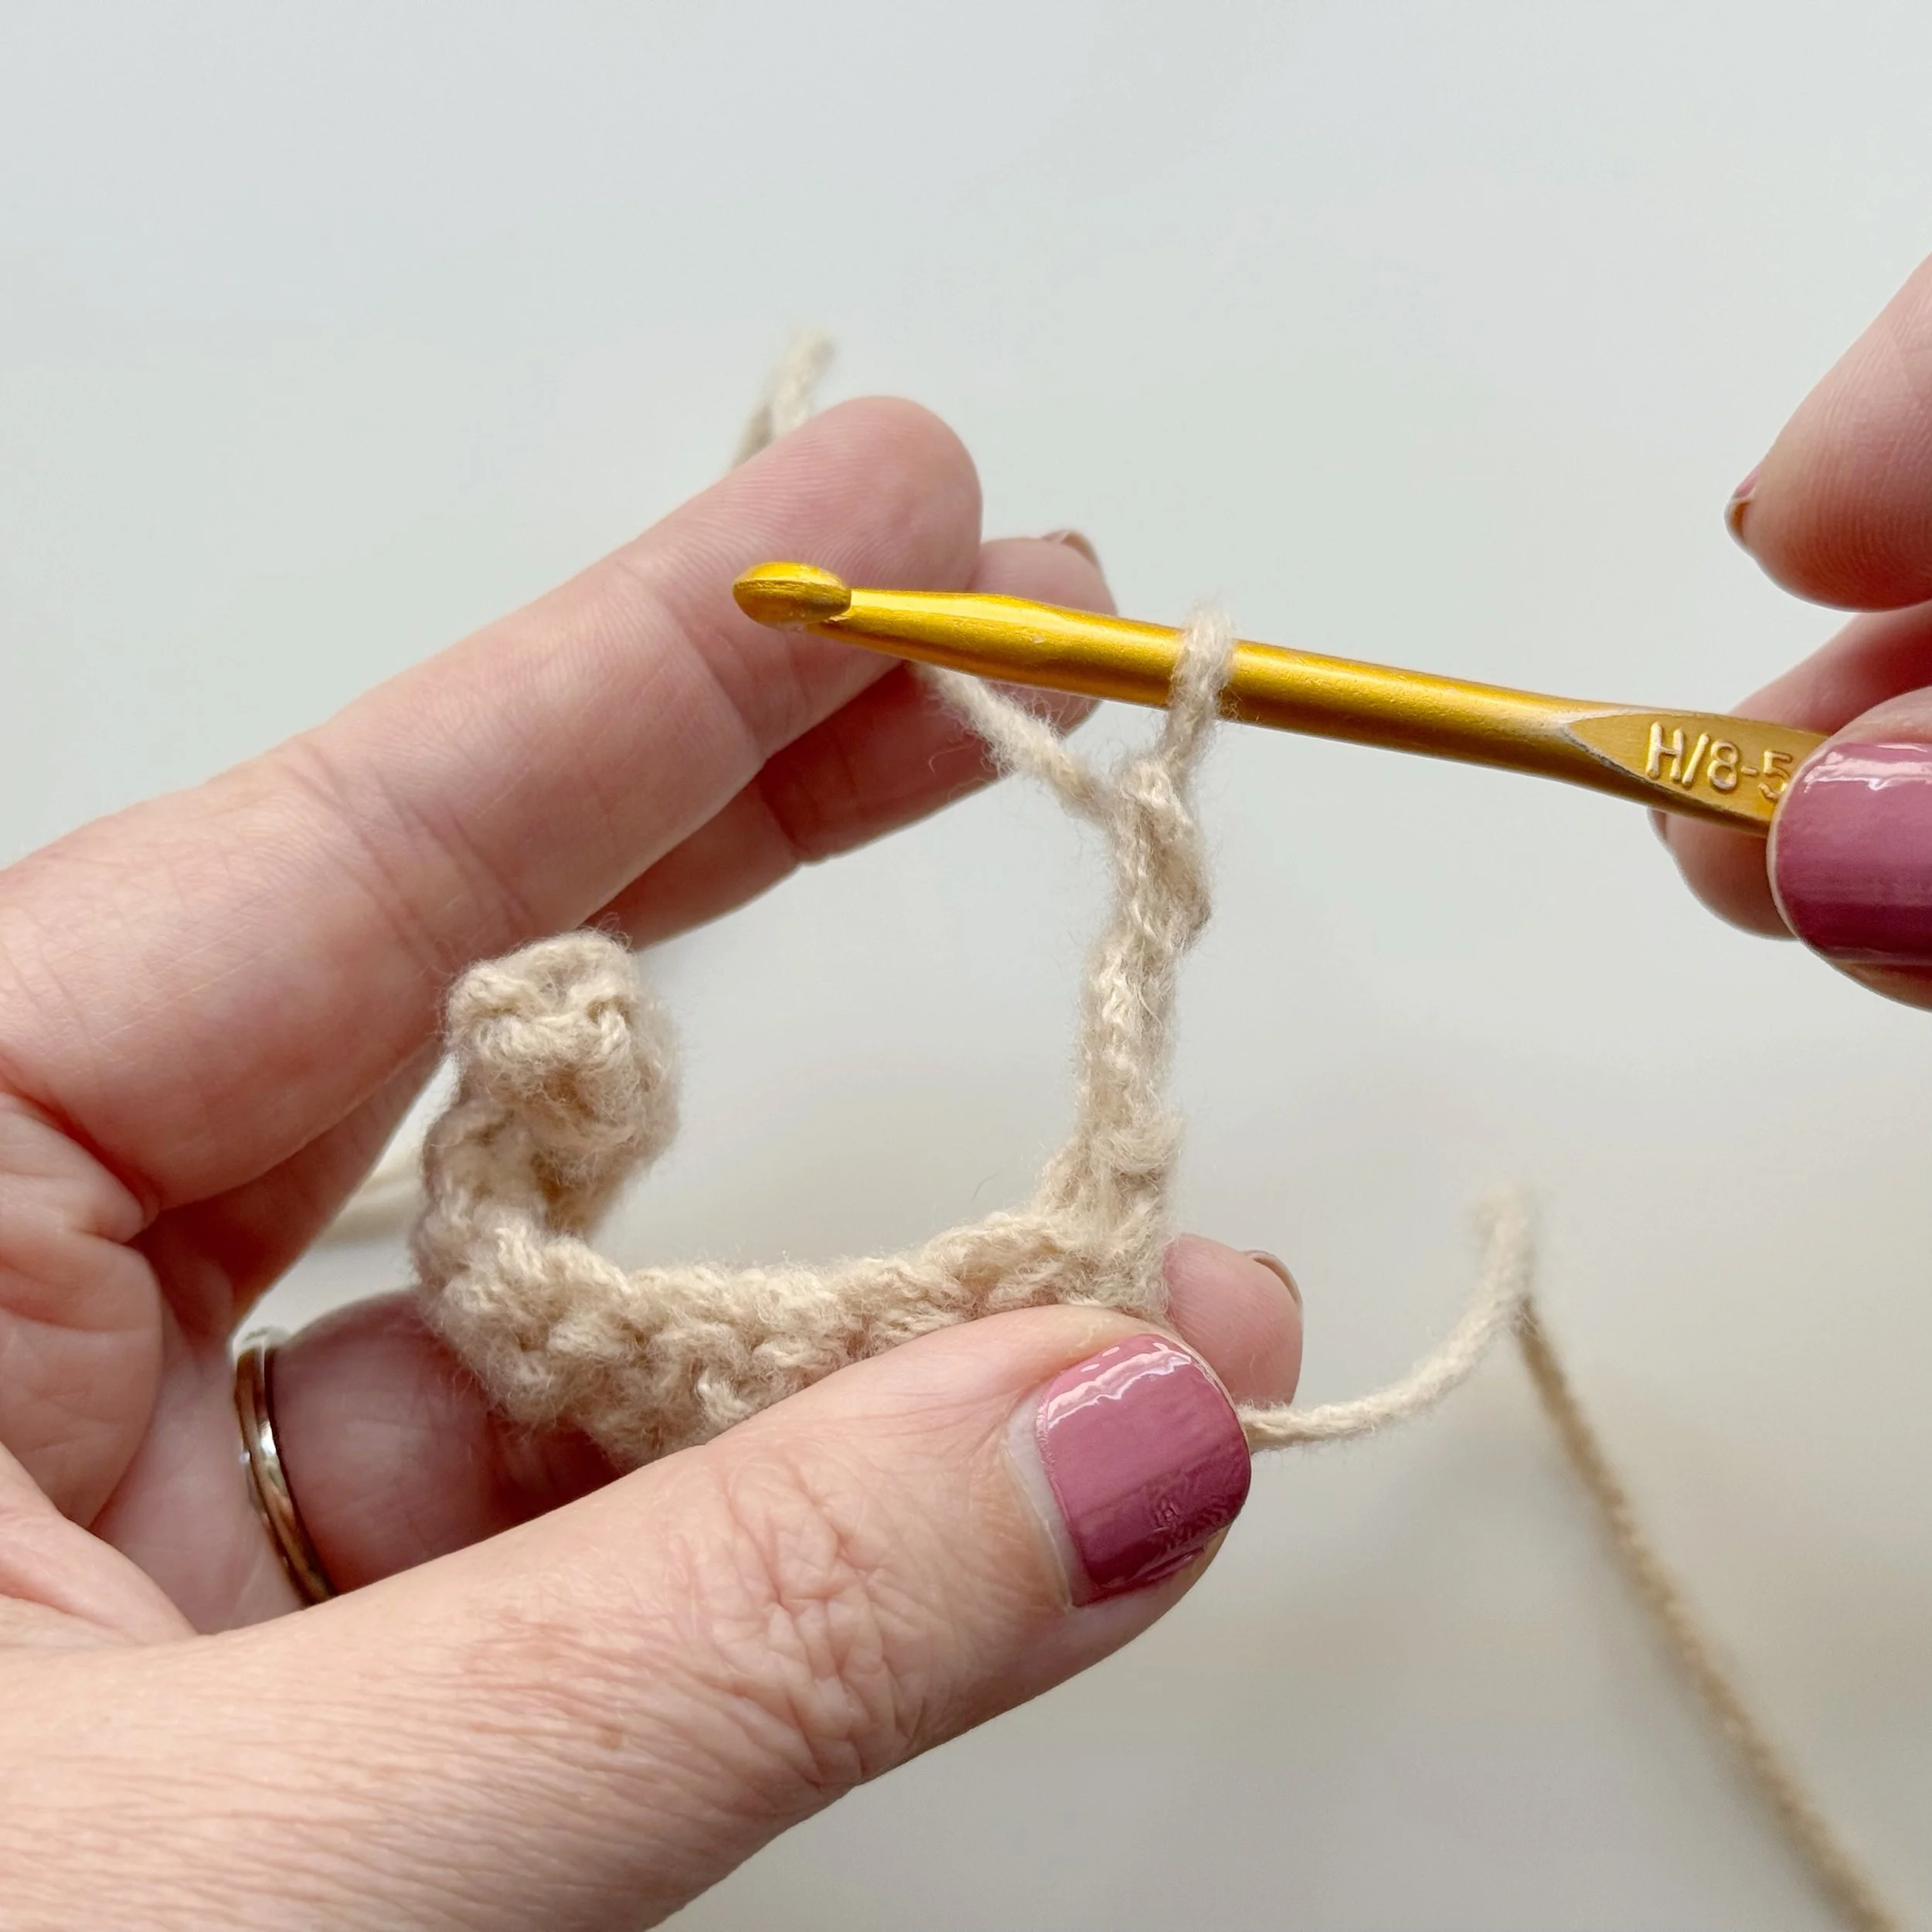
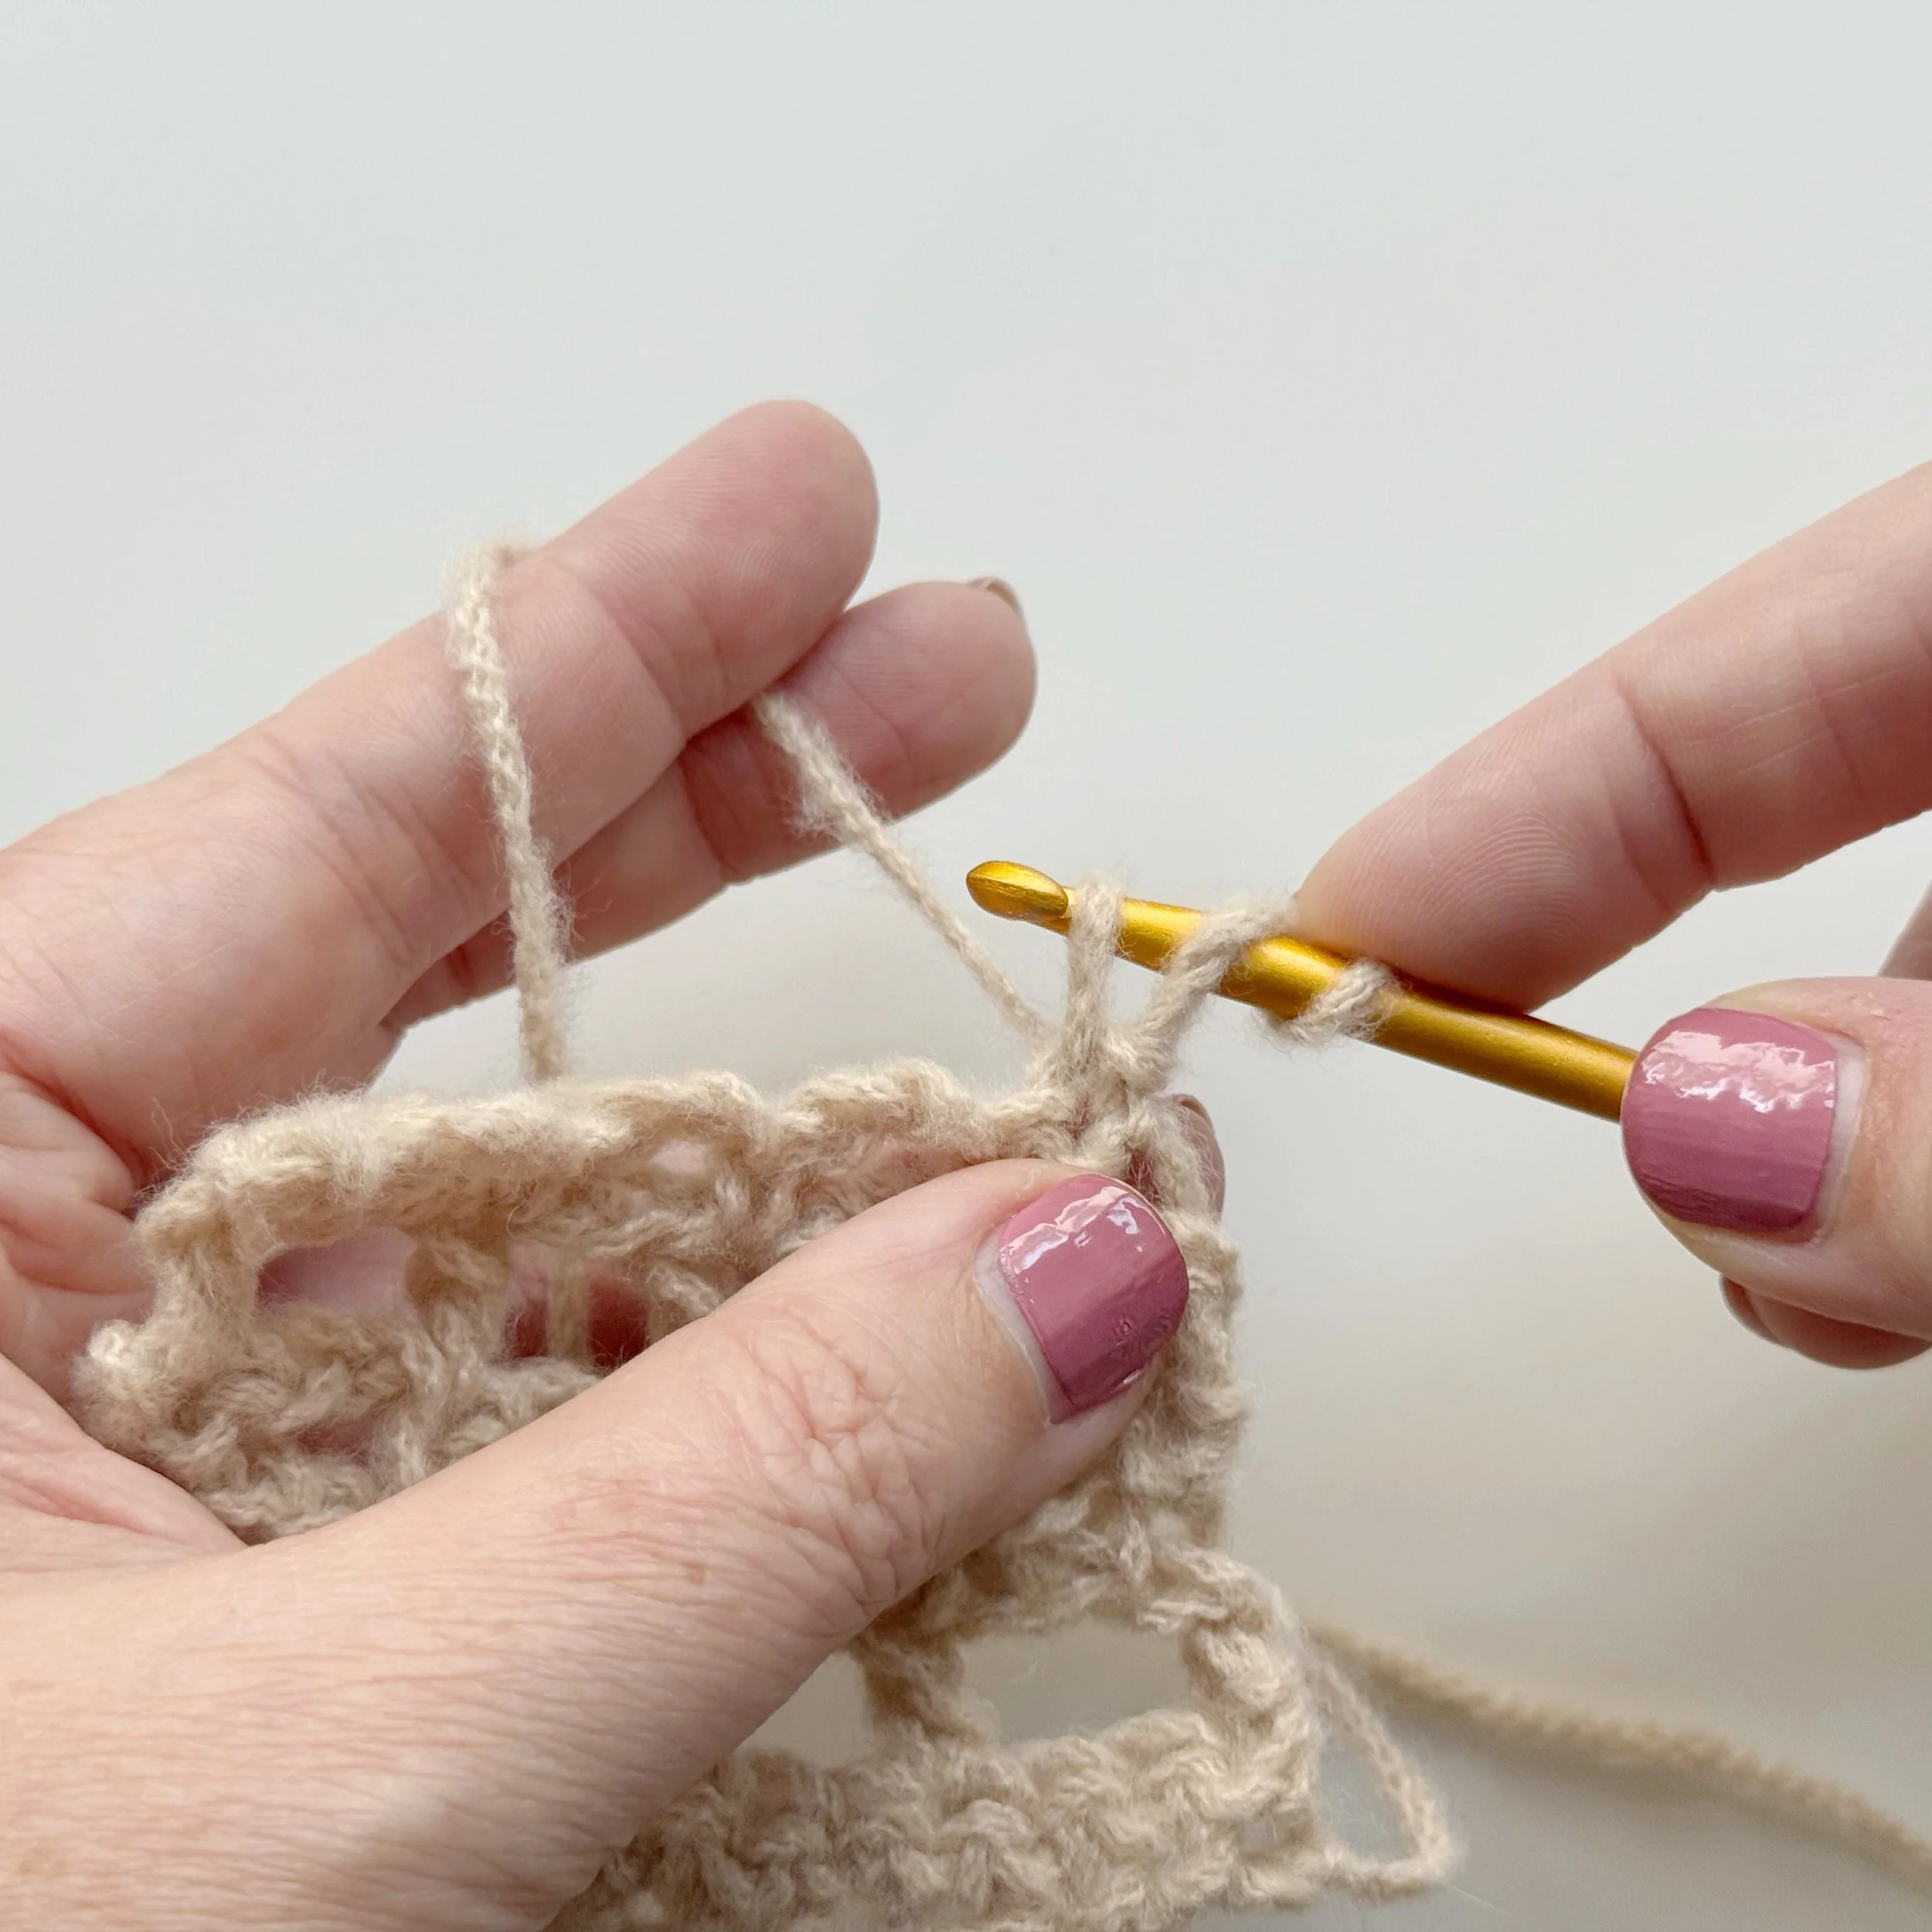
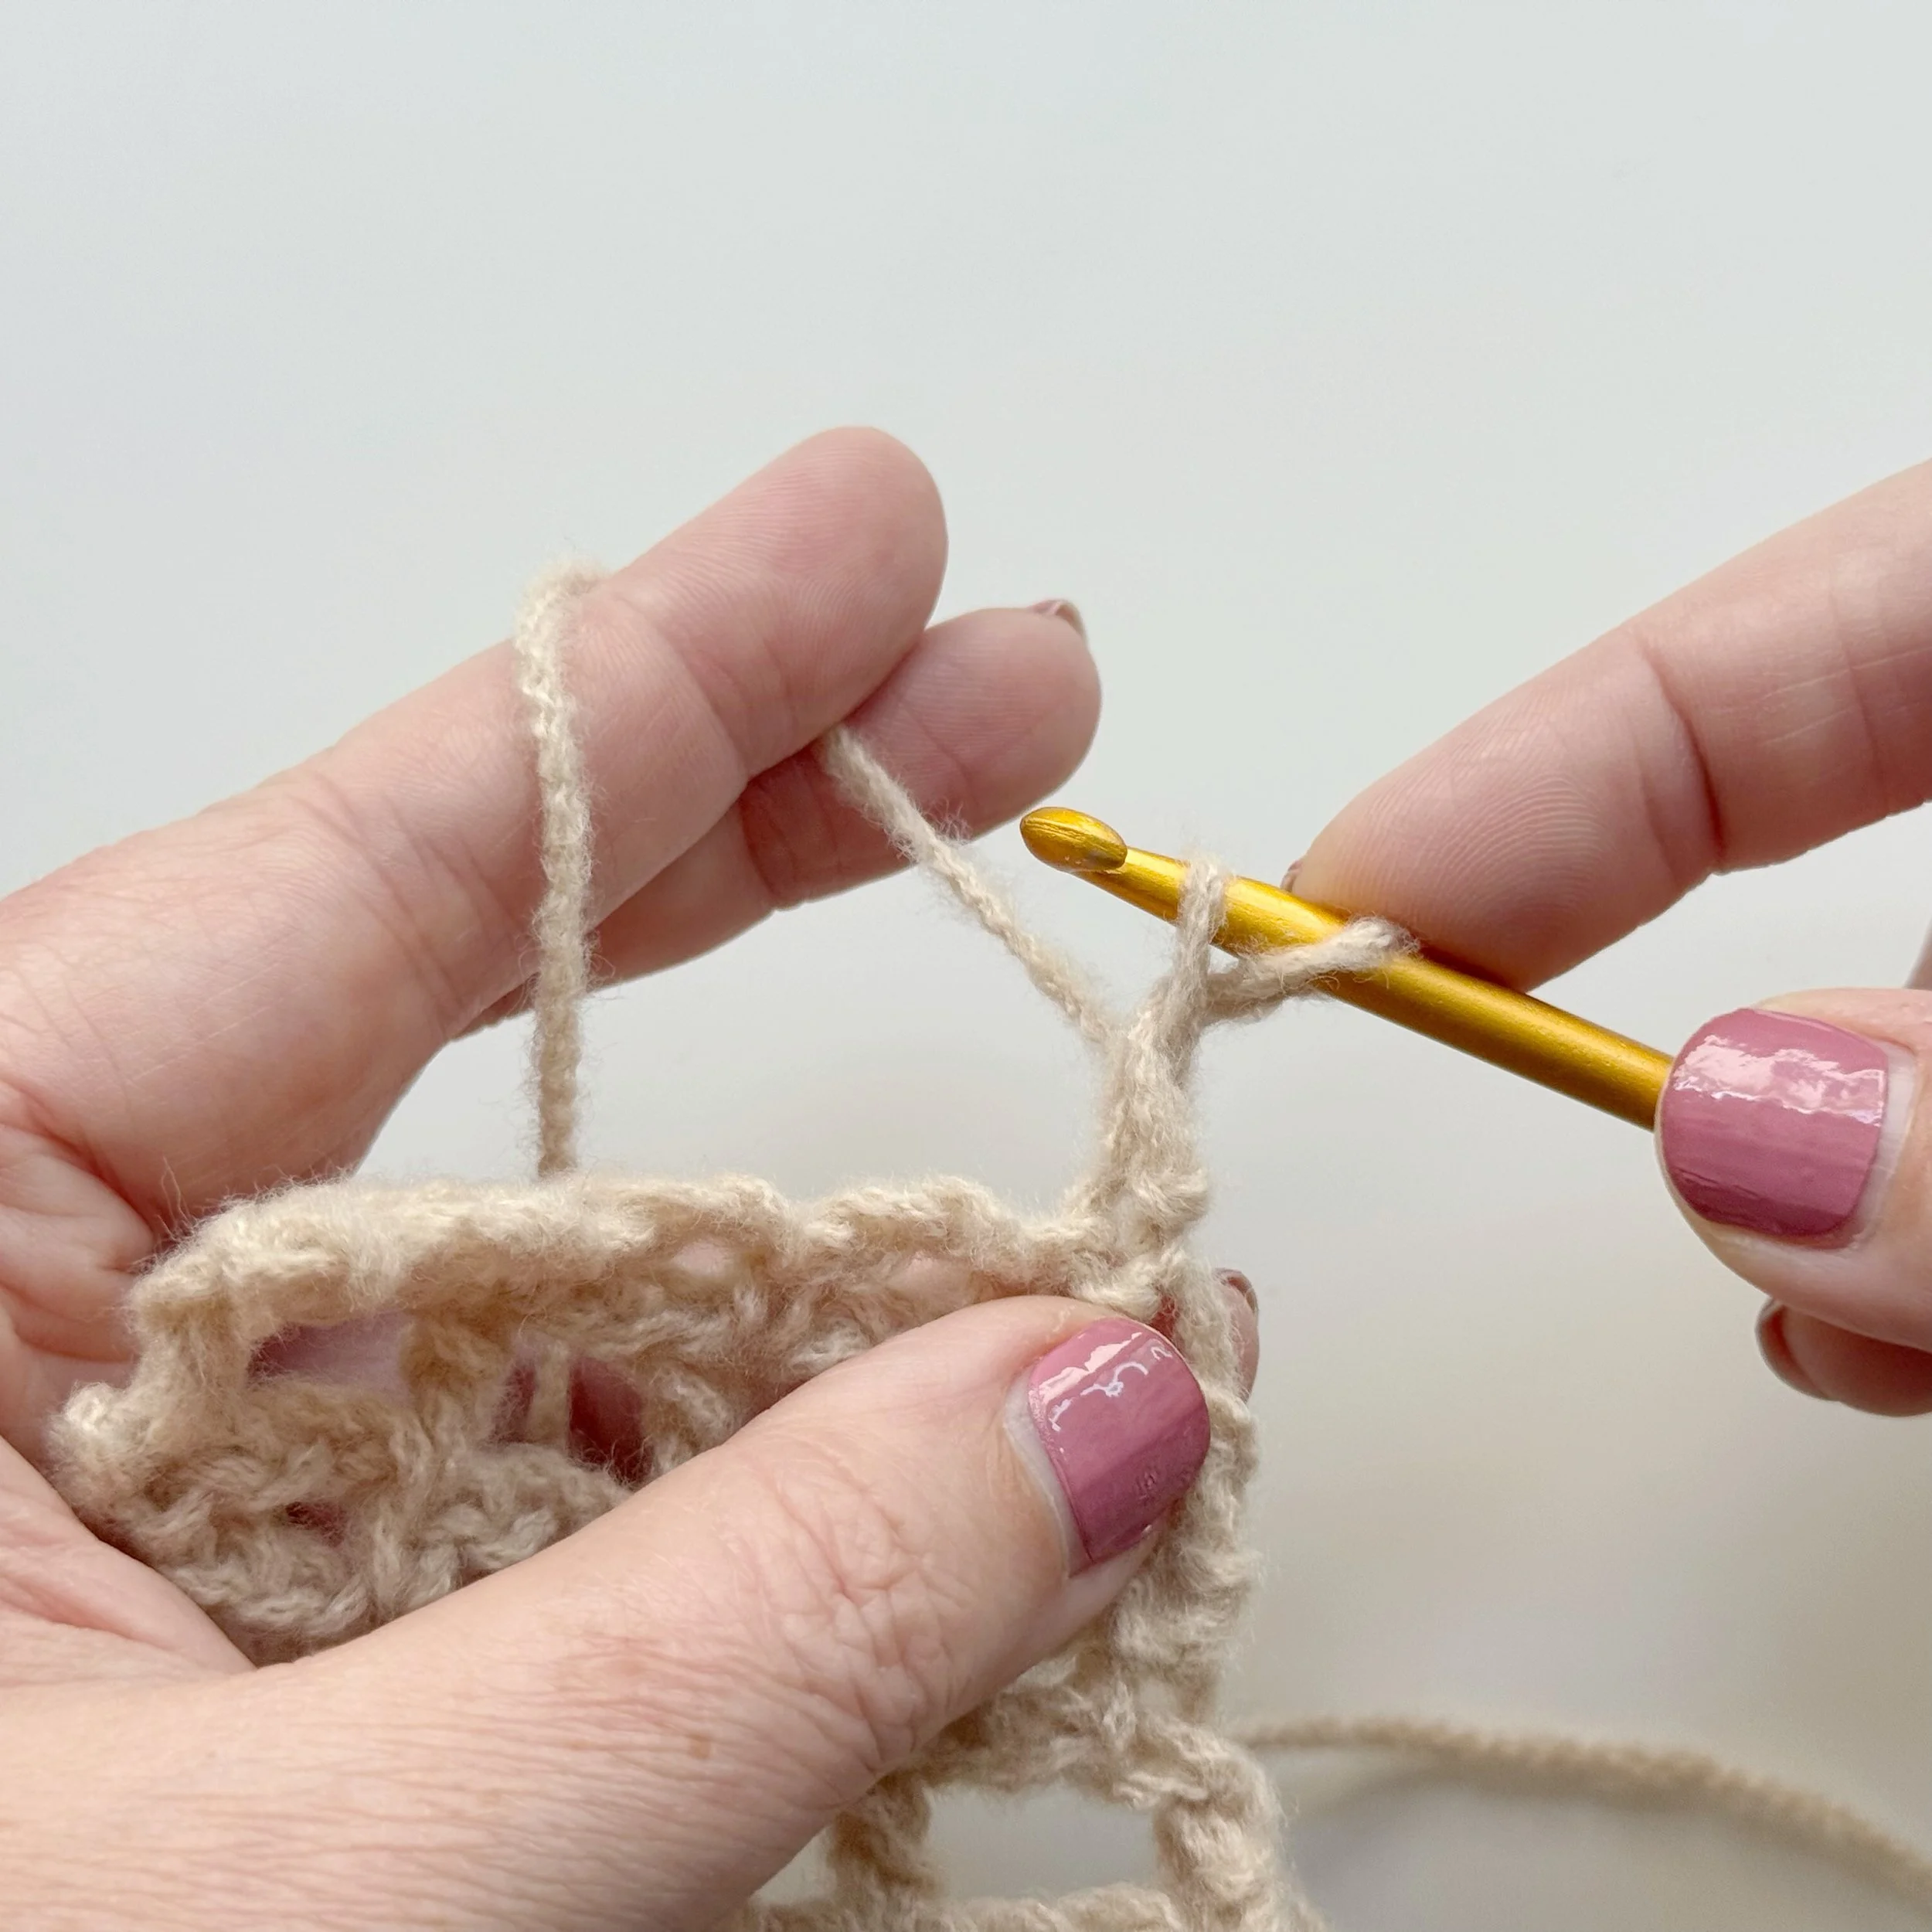
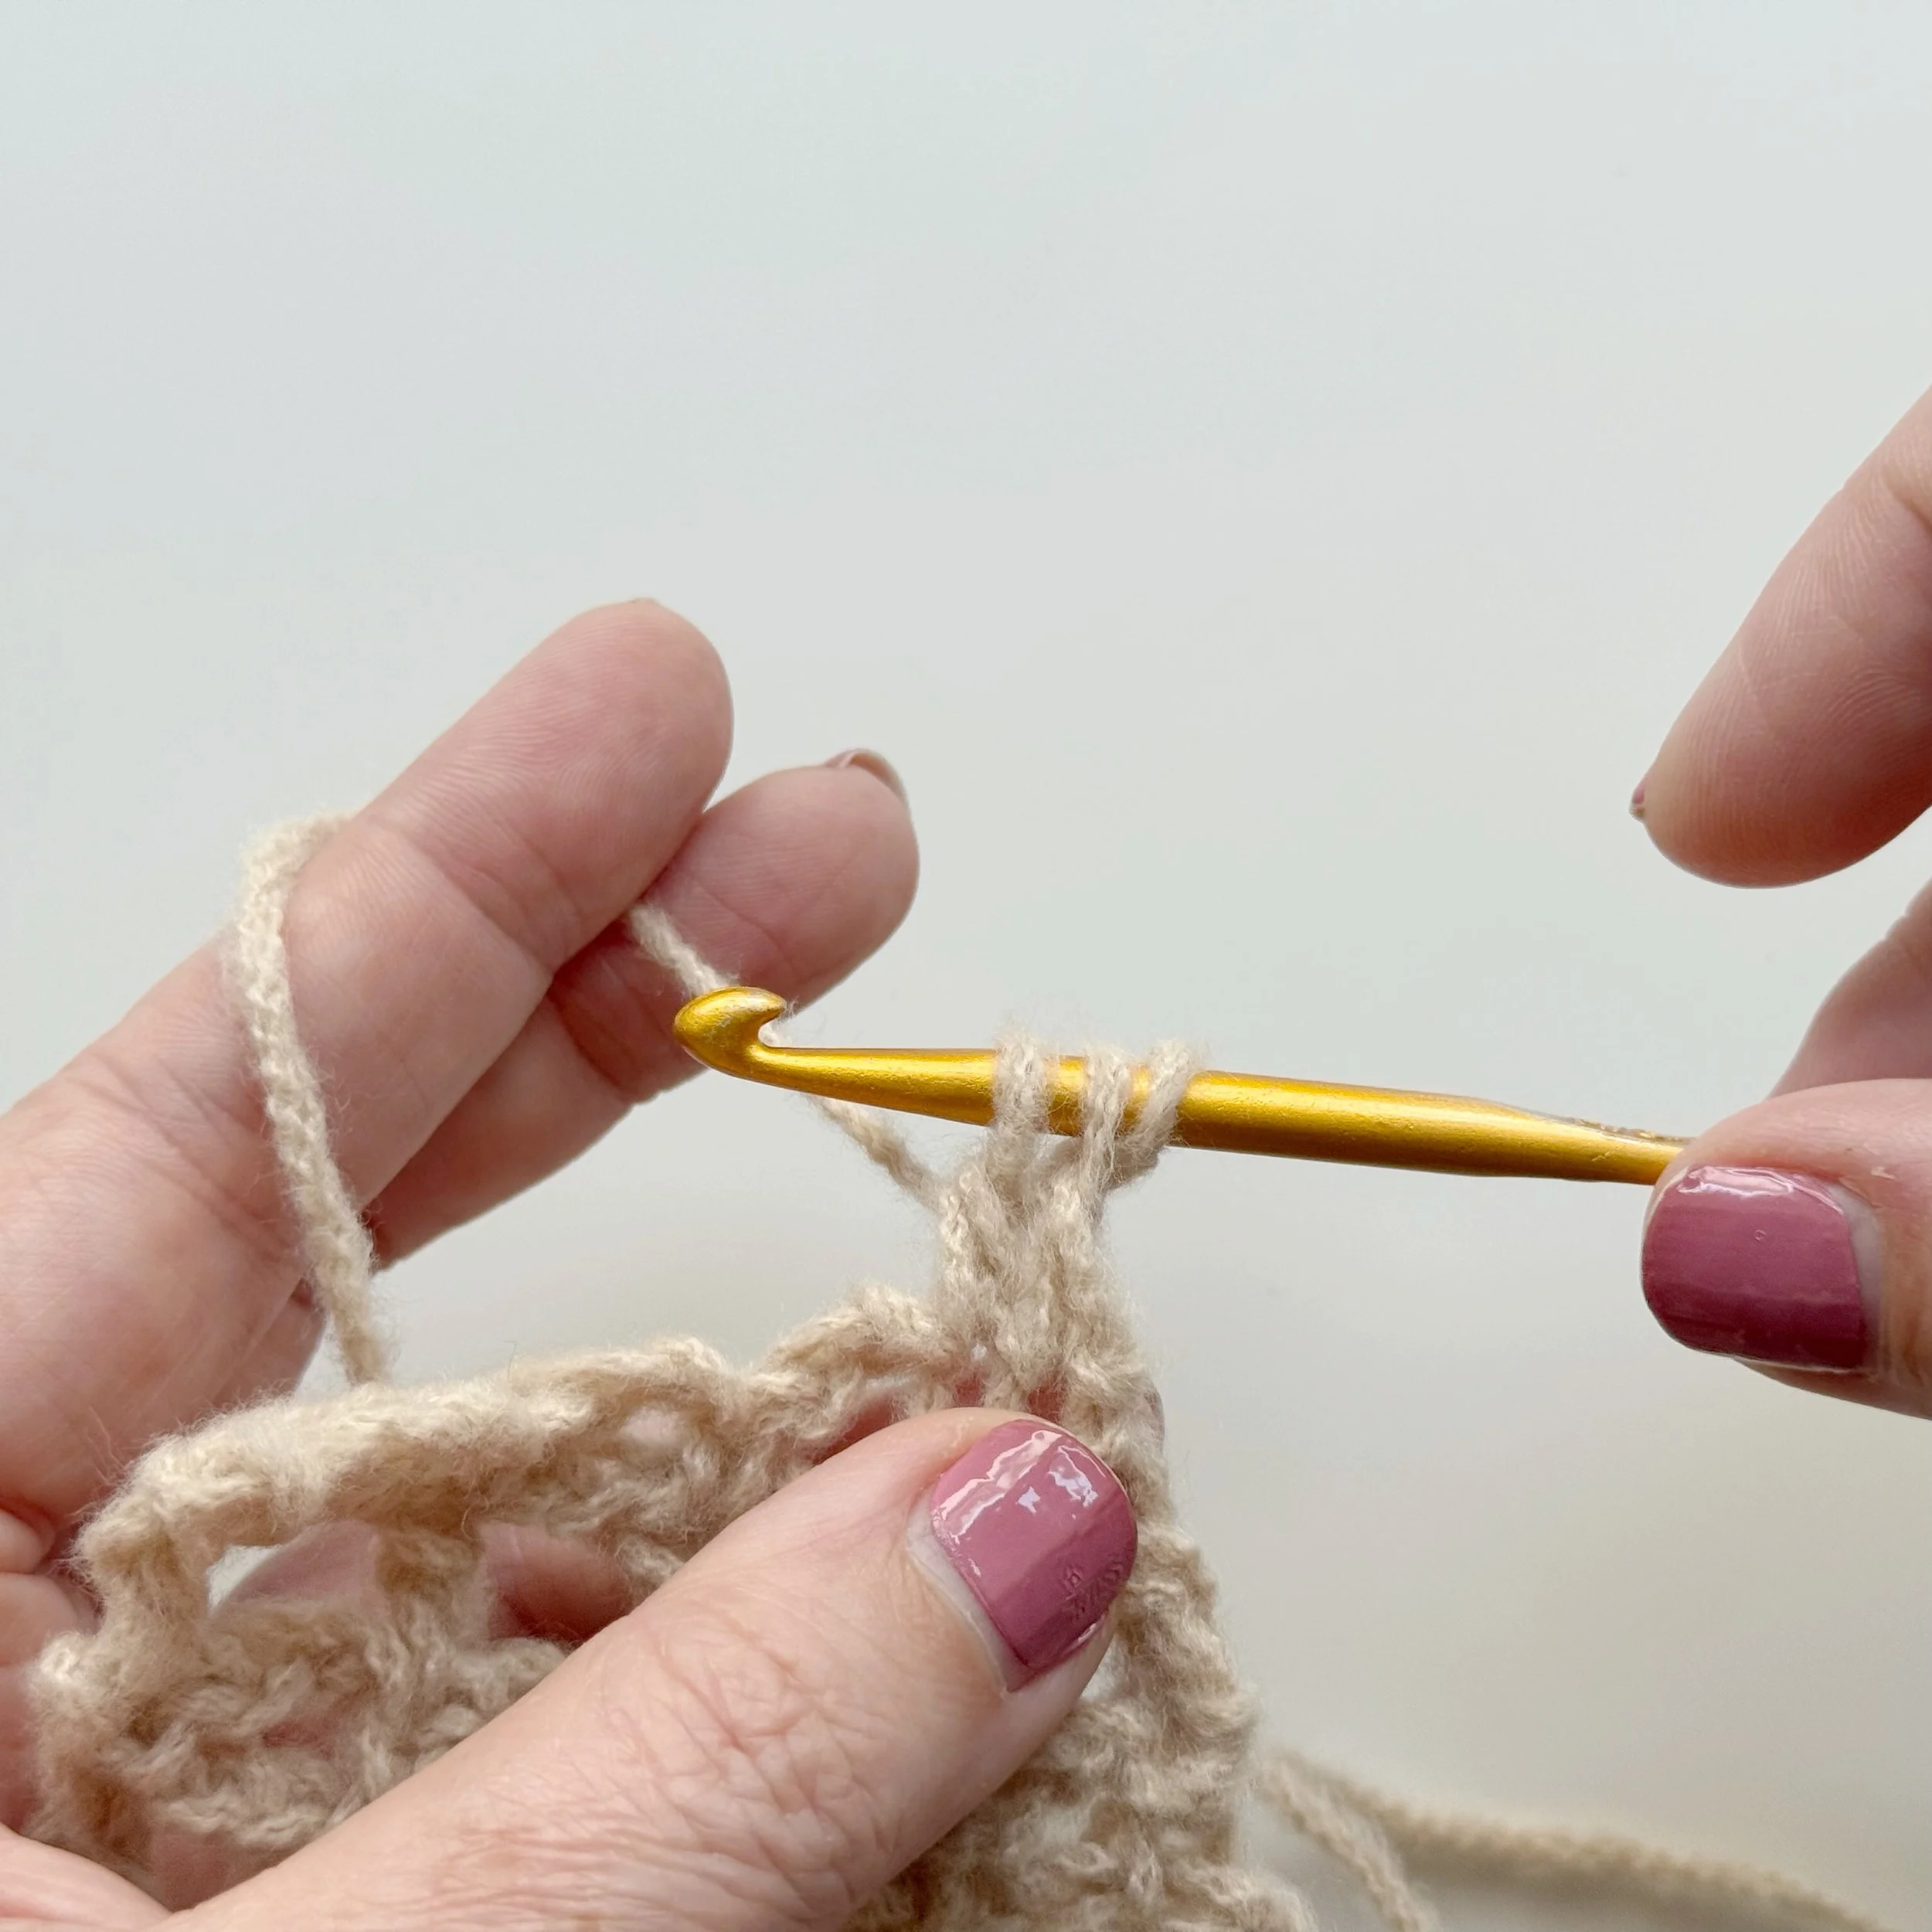
One part of the Flynn Pullover that I changed from the original Cardigan is the use of the chinless double crochet and chinless double crochet two together. I wanted the beginning of each row to be sturdier and look more cohesive so I opted for this stitch instead of the chains like in the cardigan. I’ve included a brief photo tutorial of the chinless stitches below.
Special Stitches
Chainless Double Crochet:
Draw up a tall loop about the size of a double crochet. Hold the loop tight against the hook with your pointer finger and wrap the hook around the loop. Insert hook into indicated stitch, yo and draw up a loop. Yo and draw through two loops, yo and draw through last two loops. One chainless dc made.

Chainless Double Crochet Two Together:
Start by working a chainless double crochet as instructed above until the last yo. Insert hook into next indicated stitch, yo and draw up a loop. Yo and draw through two loops, yo and draw through remaining loops on hook. One chainless dc2tog made.


Yarn Details
For the pullover version, I chose Lion Brand Re-Make, a category 4 (worsted weight) yarn that gives this sweater beautiful structure and drape. I wanted something a bit more cozy and warm as we transition from Winter to Spring.
Re-Make creates a fabric that feels substantial without being heavy, which makes it perfect for transitional weather and layering. It also gives the finished sweater a slightly elevated look while still being soft and wearable.
If you’d like to substitute, look for another weight 4 yarn that meets gauge and has similar fiber content for the best results.
Sizing & Fit
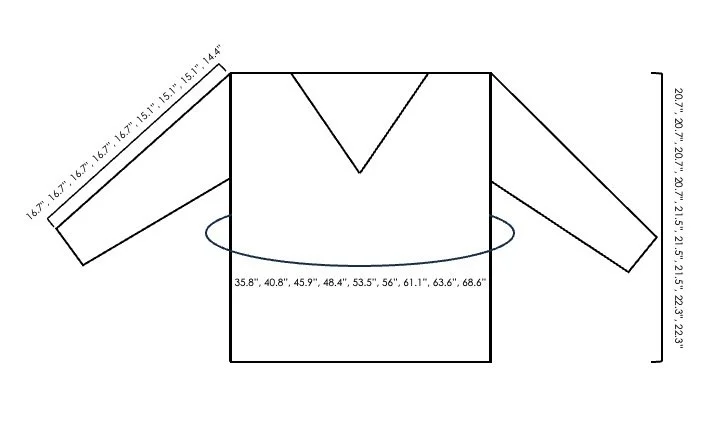
The Flynn Pullover is written for sizes XS–5X, with a size-inclusive fit and drop shoulders designed to work across a wide range of body types.
It has comfortable positive ease, meaning it’s meant to fit more relaxed rather than snug. I recommend choosing a size based on your largest measurement and then checking the finished measurements to determine how much ease you prefer.
I made a size 2X so that it wouldn’t be super snug on my belly. It gives it a bit more room at the top since I’m more pear shaped, but I love the way the fabric drapes. If I were to make it again, I might add an extra row or two to the length as this one is slightly cropped. I am 5’9” for reference.
How to Get the Pattern
The Flynn Pullover is available in three ways:
• Free on the blog (keep scrolling for the full written pattern)
• Ad-free, printable PDF in my shop
• A convenient yarn kit from Lion Brand Yarn
The PDF version includes a clean layout for printing and easy reading, while the kit makes it simple to grab exactly what you need to get started.
The Flynn Pullover Crochet Pattern
Materials:
717-1213 yards (4-6 skeins) of Lion Brand Re-Make (3.5oz/100g, 217yd/199m) 100% recycled polyester in the color Hazelnut or similar weight 4 yarn
Tapestry needle, scissors, tape measure, stitch markers
Abbreviations:
Ch(s)- chain(s)
St(s)- stitch(es)
sk- skip
sc- single crochet
dc- double crochet
dc2tog- double crochet two together
sl st- slip stitch
BLO- back loop only
RS/WS- right side/wrong side
sm- stitch marker
Notes:
1.Pullover is made in four pieces. Back panel, front panel and two sleeves. It is then seamed together and a collar is added directly to the neckline.
2.Ch 1 at beginning of rows does not count as a stitch. All double crochet rows start with a chainless double crochet (see special stitches).
3.The main pattern stitch is a multiple of 3+1.
4.Pattern is made with 6.5-8.5” of positive ease.
5. Model is wearing a size 2X and is 5’9”
Gauge:
19 sts X 10 rows = 4” X 4” in main pattern stitch.
For swatch use 5mm hook and ch 23,
Row 1: chainless dc in 2nd ch from hook, *ch 2, sk 2, dc, repeat from * across, turn.
Then use Rows 2-3 of main body back panel to finish swatch.
Size:
XS: fits bust 28-30” (approx. 717 yards/ 4 skeins)
S: fits bust 32-34” (approx. 792 yards/ 4 skeins)
M: fits bust 36-38” (approx. 860 yards/ 4 skeins)
L: fits bust 40-42” (approx. 907 yards/ 5 skeins)
XL: fits bust 44-46” (approx. 995 yards/ 5 skeins)
2X: fits bust 48-50” (approx. 1005 yards/ 5 skeins)
3X: fits bust 52-54” (approx. 1087 yards/ 6 skeins)
4X: fits bust 56-58” (approx. 1159 yards/ 6 skeins)
5X: fits bust 60-62” (approx. 1213 yards/ 6 skeins)
Video Tutorial
Pattern:
Back Panel: make one
Ribbing:
With 4.5mm hook, ch 7 (for all sizes)
Row 1: sc in 2nd ch from hook and in each ch across, ch 1, turn. (6)
Row 2: sc in BLO across, ch 1, turn. (6)
Repeat Row 2 for a total of 78(89, 100, 105, 116, 121, 132, 138, 149) rows.
Main Body:
Change to 5mm hook. Turn your ribbing 90 degrees.
We will now be working into the edges of the ribbing to start the main body of the back panel.
Row 1(RS): working into the row edges, sc in 1st edge and next 8 edges, *2sc in next row edge, sc 9, repeat from * across until 8(9, 10, 5, 6, 1, 2, 8, 9) edges remain, sc in all remaining edges. (85(97, 109, 115, 127, 133, 145, 151, 163)
Row 2(WS): chainless dc in 1st st, *ch 2, sk 2, dc, repeat from * across, turn. (85(97, 109, 115, 127, 133, 145, 151, 163)
Row 3(RS): ch 1, sc in 1st dc, *ch 2, sc in next dc, repeat from * across, turn. (85(97, 109, 115, 127, 133, 145, 151, 163)
Row 4: chainless dc in 1st st, *ch 2, dc in next sc, repeat from * across, turn. (85(97, 109, 115, 127, 133, 145, 151, 163)
Repeat Rows 3-4 for a total of 48(48, 48, 48, 50, 50, 50, 52, 52) rows.
*adjust rows here to change the length
Fasten off leaving a long tail for seaming.
Front Panel : make one
Ribbing:
With 4.5mm hook, ch 7 (for all sizes)
Row 1: sc in 2nd ch from hook and in each ch across, ch 1, turn. (6)
Row 2: sc in BLO across, ch 1, turn. (6)
Repeat Row 2 for a total of 78(89, 100, 105, 116, 121, 132, 138, 149) rows.
*adjust the total rows here to change the length
Main Body:
Change to 5mm hook. Turn your ribbing 90 degrees.
We will now be working into the edges of the ribbing to start the main body of the front panel.
Row 1(RS): working into the row edges, sc in 1st edge and next 8 edges, *2sc in next row edge, sc 9, repeat from * across until 8(9, 10, 5, 6, 1, 2, 8, 9) edges remain, sc in all remaining edges. (85(97, 109, 115, 127, 133, 145, 151, 163)
Row 2(WS): chainless dc in 1st st, *ch 2, sk 2, dc, repeat from * across, turn. (85(97, 109, 115, 127, 133, 145, 151, 163)
Row 3(RS): ch 1, sc in 1st dc, *ch 2, sc in next dc, repeat from * across, turn. (85(97, 109, 115, 127, 133, 145, 151, 163)
Row 4: chainless dc in 1st st, *ch 2, dc in next sc, repeat from * across, turn. (85(97, 109, 115, 127, 133, 145, 151, 163)
Repeat Rows 3-4 for a total of 27(27, 27, 27, 29, 29, 29, 31, 31) rows, ending on a Row 3 repeat.
V-Neck Shaping:
We will now be splitting off each side to create the neckline, starting with the front Right side.
Place a sm in the center sc of your panel. It will be in the 43rd(49th, 55th, 58th, 64th, 67th, 73rd, 76th, 82nd) stitch from either edge.
Right Side:
Row 1(WS): chainless dc in 1st st, *ch 2, dc in next sc, repeat from * across, until 2 sts before sm, ch 1, dc into same st as sm, turn. (42(48, 54, 57, 63, 66, 72, 75, 81)
Row 2(RS): ch 1, sc in 1st dc, sk ch 1, sc in next dc, *ch 2, sc in next dc, repeat from * across, turn. (41(47, 53, 56, 62, 65, 71, 74, 80)
Row 3: chainless dc in 1st st, *ch 2, dc in next sc, repeat from * across until 2 sts remain, dc2tog turn. (40(46, 52, 55, 61, 64, 70, 73, 79)
Row 4: ch 1, sc in 1st dc, place sm in that 1st st, *ch 2, sc in next dc, repeat from * across, turn. (40(46, 52, 55, 61, 64, 70, 73, 79)
Rows 5-20: Repeat Rows 1-4. (28(34, 40, 43, 49, 52, 58, 61, 67)
Row 21: chainless dc in 1st st, *ch 2, dc in next sc, repeat from * across, turn. (28(34, 40, 43, 49, 52, 58, 61, 67)
XS(S, M, L, XL, 2X, 3X)-ONLY
Fasten off leaving a long tail for seaming.
4X(5X)-ONLY
Row 22: ch 1, sc in 1st dc, *ch 2, sc in next dc, repeat from * across, turn. (61(67)
Row 23: chainless dc in 1st st, *ch 2, dc in next sc, repeat from * across, turn. (61(67)
Fasten off leaving a long tail for seaming.
Left Side:
With WS facing, attach yarn in center stitch of Row 27(27, 27, 27, 29, 29, 29, 31, 31) where sm was placed and ch 1.
Row 1(WS): chainless dc in same st as join, ch 1, dc in next sc *ch 2, dc in next sc, repeat from * across, turn. (42(48, 54, 57, 63, 66, 72, 75, 81)
Row 2(RS): ch 1, sc in 1st st *ch 2, sc in next dc, repeat from * across, until 2 sts remain, sk ch 1, sc in last st, turn. (41(47, 53, 56, 62, 65, 71, 74, 80)
Row 3: chainless dc2tog, *ch 2, dc in next sc, repeat from * across, turn. (40(46, 52, 55, 61, 64, 70, 73, 79)
Repeat Rows 1-4. (28(34, 40, 43, 49, 52, 58, 61, 67)
Row 21: chainless dc in 1st st, *ch 2, dc in next sc, repeat from * across, turn. (28(34, 40, 43, 49, 52, 58, 61, 67)
XS(S, M, L, XL, 2X, 3X)-ONLY
Fasten off leaving a long tail for seaming.
4X(5X)-ONLY
Row 22: ch 1, sc in 1st dc, *ch 2, sc in next dc, repeat from * across, turn. (61(67)
Row 23: chainless dc in 1st st, *ch 2, dc in next sc, repeat from * across, turn. (61(67)
Fasten off leaving a long tail for seaming.
Sleeves: (make two)
Ribbing:
With 4.5mm hook, ch 7 (for all sizes)
Row 1: sc in 2nd ch from hook and in each ch across, ch 1, turn. (6)
Row 2: sc in BLO across, ch 1, turn. (6)
Repeat Row 2 for a total of 26(26, 26, 28, 28, 28, 30, 30, 30) rows.
Sleeves Main Body:
Change to 5mm hook. Turn your ribbing 90 degrees.
We will now be working into the edges of the ribbing to start the main body of the sleeve.
XS(S, M) ONLY
Row 1(RS): sc in first 2 row edges, *2sc in next row edge, sc 2, repeat from * across, turn. (34(34, 34)
L(XL, 2X) ONLY
Row 1(RS): 2sc in 1st row edge, sc 2, *2sc into next row edge, sc 2, repeat from * across, until 1 st remains, sc in last row edge, turn. (37(37, 37)
3X(4X, 5X) ONLY
Row 1(RS): 2sc in 1st row edge, sc 2, *2sc into next row edge, sc 2, repeat from * across,, turn. (40(40, 40)
Row 2(WS): chainless dc, dc into same st, ch 2 *dc into next st, ch 2, repeat from * until 3 sts remain, 2dc into last st, turn. (36(36, 36, 39, 39, 39, 42, 42, 42)
Row 3(RS): ch 1, sc in 1st dc, ch 1, sc in next dc, *ch 2, sc in next dc, repeat from * across, ch 1, sc in last st, turn. (38(38, 38, 41, 41, 41, 44, 44, 44)
Row 4: chainless dc in 1st st, ch 2, *dc in next sc, ch 2, repeat from * across, dc in last sc, turn. (40(40, 40, 43, 43, 43, 46, 46, 46)
Row 5: ch 1, sc in 1st dc, *ch 2, sc in next dc, repeat from * across, turn. (40(40, 40, 43, 43, 43, 46, 46, 46)
XS-ONLY
Rows 6-25: Repeat Rows 2-5. (70)
Row 26: chainless dc in 1st st, *ch 2, dc in next sc, repeat from * across, turn. (70)
Row 27: ch 1, sc in 1st dc, *ch 2, sc in next dc, repeat from * across, turn. (70)
Rows 28-38: repeat Rows 26-27 ending on a Row 26 repeat. (70)
*adjust rows here to lengthen sleeve.
Fasten off leaving a long tail for seaming.
S(M,L)-ONLY
Rows 6-29: Repeat Rows 2-5. (76(76, 79)
Row 30: chainless dc in 1st st, *ch 2, dc in next sc, repeat from * across, turn. (76(76, 79)
Row 31: ch 1, sc in 1st dc, *ch 2, sc in next dc, repeat from * across, turn. (76(76, 79)
Rows 32-38: repeat Rows 30-31 ending on a Row 30 repeat. (76(76, 79)
*adjust rows here to lengthen sleeve.
Fasten off leaving a long tail for seaming.
XL-ONLY
Rows 6-33: Repeat Rows 2-5. (85)
Row 34: chainless dc in 1st st, *ch 2, dc in next sc, repeat from * across, turn. (85)
Row 35: ch 1, sc in 1st dc, *ch 2, sc in next dc, repeat from * across, turn. (85)
Row 36-38: repeat Rows 34-35 ending on a Row 34 repeat. (85)
*adjust rows here to lengthen sleeve.
Fasten off leaving a long tail for seaming.
2X(3X, 4X)-ONLY
Rows 6-33: Repeat Rows 2-5. (85(88, 88)
Row 34: chainless dc in 1st st, *ch 2, dc in next sc, repeat from * across, turn. (85(88, 88)
*adjust rows here to lengthen sleeve.
Fasten off leaving a long tail for seaming.
5X-ONLY
Rows 6-32: Repeat Rows 2-5. (88)
*adjust rows here to lengthen sleeve.
Fasten off leaving a long tail for seaming.
Seaming:
Lay Back Panel and Front Panel together at the shoulders with RS facing each other. Using your preferred seaming method attach front panel to back panel.
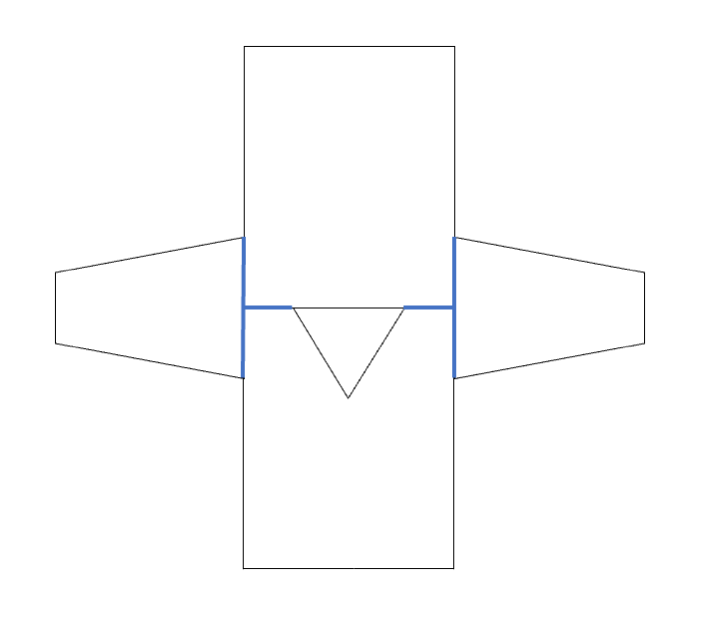
Attach the sleeves to the sides of the pullover, using your preferred seaming method, making sure to align the center of the sleeve with the shoulder seam. Make sure the sleeves are attached evenly from the center shoulder seam, down the sides. Using stitch markers to hold the sleeve in place is recommended.
Fold pullover so that the back and front panels are on top of each other. Then seam the sleeves from the underarm to the cuff. Seam the sides from the underarm down to the bottom. I made sure the panels were RS together and used a mattress stitch for an almost invisible seam.
Collar:
With 4.5mm hook, attach yarn to top left shoulder seam with RS facing out and ch 1.
Round 1: sc in same st as join and in each the edges of the rows along the neckline placing 2 sc in each dc row edge and 1 sc into each sc row, sc into each ch and dc across the back neckline, sl st to 1st st and place a sm into that st. (approx. 93(93, 93, 93, 93, 93, 93, 99, 99)
Round 2: sl st into each sc around until you’ve reached the sm.
Fasten off and weave in all ends.
Now you have a brand new cozy sweater to wear and enjoy! If you make a Flynn Pullover, I’d love to see it. Make sure to tag me @meghanmakesdo on socials and use #theflynnpullover so I can share.
As always you can find a printable PDF version of this pattern in my shop, Etsy and Ravelry or as a kit from Lion Brand Yarn.
Happy Crocheting,
Meghan